Get support for Dymo Rhino 5200 Industrial Label Printer

Dymo Rhino 5200 Industrial Label Printer Support Question

Dymo Rhino 5200 Industrial Label Printer Support Question

Find answers below for this question about Dymo Rhino 5200 Industrial Label Printer.
Need a Dymo Rhino 5200 Industrial Label Printer manual? We have 1 online manual for this item!
Question posted by eric960 on February 5th, 2014

What Causes A Label Stall Message To Appear?

The person who posted this question about this Dymo product did not include a detailed explanation. Please use the "Request More Information" button to the right if more details would help you to answer this question.

Requests for more information

Request from brice64798 on March 15th, 2021 1:14 PM
I just wanted to state that i had the same problem. Did some research and found this forum. @toterry help fix my problem, I too had a couple of small little yellow plastic pieces stuck in the gears. Followed his post and now works great thank you so much for your help!

Request from Saramendez94 on January 23rd, 2022 3:48 PM
it says stall on screen. And i dont know why. Please help

Request from Janet6552 on September 1st, 2022 6:37 AM
Can you help me on this?

Request from brendaleeadams on October 4th, 2022 11:19 AM
how to get rid of label stall detected

What do I need to do to fix thi

Request from R2d2f15 on January 16th, 2023 8:24 AM
more details?

Current Answers

Answer #1: Posted by DYMOhelpdesk on February 6th, 2014 1:12 AM
This answer was accepted by the poster of the original question.
DYMOhelpdesk

Member since:
January 10th, 2013

Points: 35,050
1,050
points
There are multiple reasons:

1) the blade is in the way;

2) there is tape on the rubber roll;

3) there is something in the cogs.

In cases 1 and 2 you can fix the printer yourself, in case 3 please ring us for a repair quote.

^CM

DYMO support

Answer #2: Posted by toterry on February 16th, 2016 3:57 PM
toterry

Member since:
February 16th, 2016

Points: 120
220
points
I fixed mine by removing a tiny piece of plastic jammed in the motor gears!

Screws are different sizes so lay them out exactly as they were and when reassembling unit, push any wires inside along the edges and away from the screw holes.

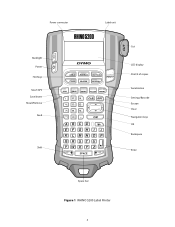
Rhino 5200, unscrew the 5 screws on back, pull front off, lay aside keypad. Remove 1 screw holding the circuit board on.

Unscrew the screws holding the tape compartment inside and carefully pull it up to expose the gears underneath. Look to see if there if there is anything between the gears. I had a tiny yellow piece of plastic between two gears. I carefully pushed the gears back and a little forward enough to push the plastic out. Put back together and you will have to hold the CUT knob down to get it together. Make sure the CUT knob moves freely. Works great now!

Answer #3: Posted by centrixindustrial on May 3rd, 2016 3:30 PM
centrixindustrial

Member since:
May 3rd, 2016

Points: 20
120
points
After about 3 dis assemble operations , and thrown back a few months, I decided to take it apart again.

After 20 minutes and a completely destroyed Rhino , I found a burnished ring around the magnet that senses motion . It is GLUED to the main motor shaft under the worm gear. SO I took apart the magnetic 3 leg sensor that was jammed against the magnet. The sensor had been rubbing HARD against the magnet and finally, probably due to heat from the spinning shaft came lose. THE MAGNET WAS GLUED TO THE SHAFT that the sensor reads.

So Bob's your Uncle. Tell him to throw this thing in the trash.

I got another 5200 and it has worked great for years. I have asked for support from the DYMO people... Lots of luck on that one... never heard a thing.

RIx


Answer #4: Posted by cbkoerner on September 13th, 2015 4:25 PM
cbkoerner

Member since:
September 13th, 2015

Points: 10
110
points
For DYMO Rhino 6000 Tape Stall:

in my case the this was caused by a disconnected gray wire on the tape capstan motor. remove the 7 screws on the back. face down, remove front from back. carefully remove the screw in the center of the pc board. lift a small amount on the side of the pc board to unscrew the black ground screw from the tape mechanism. carefully slide the brown retainer on the ribbon cable connector out (slide it ALONG the pc board, not away from the pc board), and remove the ribbon cable. you now have enough slack to fold the pc board away from the tape mechanism to re-solder any gray wires.

Related Dymo Rhino 5200 Industrial Label Printer Manual Pages

User Guide - Page 2

... the Text Style 9 Creating Multi-Line Labels 9 Using International Characters 10 Creating Industrial Labels 10 Creating Cable and Wire Labels 10 Creating Cable Labels 10 Creating Wire Labels 10 Creating Flag Labels 10 Creating Fixed Length Labels 10 Creating Panel Labels 11 Creating Patch Panel Labels 11 Creating Electrical Panel Labels 11 Using Breaker Multipliers 11 Printing Empty...
User Guide - Page 3

... Serialization 16 Using Advanced Serialization 16 Printing Options 16 Printing Multiple Copies 16 Collating Multiple Copies 17 Pausing Between Labels 17 Advancing the Label 17 Adjusting Print Contrast 17 Using Printer Memory 17 Saving a Label File 17 Recalling a Label File from Memory 17 Deleting a Label File from Memory 18 Cleaning Your Printer 18 Symbols 19 Troubleshooting 20 3
User Guide - Page 4

Power connector Backlight Power Hot Keys Size/CAPS Save/Insert Recall/Remove Feed Shift S HIF T Label exit BKSP S HIF T Cut LCD display Print/# of copies Serialization Settings/Barcode Escape Clear Navigation keys OK Backspace Enter Space bar Figure 1 RHINO 5200 Label Printer 4
User Guide - Page 5

...the battery pack into a power outlet. The printer uses RHINO Industrial label cartridges in this section to register your printer for a long period of the printer to the power adapter. Visit www.dymo.com ...information on obtaining an optional rechargeable battery pack. About Your New Printer With your new RHINO label printer, you purchased the hard case kit. Getting Started Follow the...
User Guide - Page 6

... not be used for information about purchasing additional label cartridges. Remove the batteries if the printer will take approximately two hours. Figure 5 4. To remove the label cartridge 1. However, to design labels depend on the back of the label currently inserted in Setting the Label Width. The Settings menu appears on the cartridge until the cartridge snaps into...
User Guide - Page 7

... settings are remembered; Press . 2. See Figure 6. To select a language 1. You can change the language selection at the top of the display shows the current label type and for the next time the printer is set to select a value between 0 (lighter) and 8 (darker). Press and then select Done (OK). Getting to Know Your...
User Guide - Page 8

... are described in detail later in memory. Working with Label Files The printer creates and stores labels as a label file in this feature off . See Formatting a Label on the display and all letters that you press SHIFT and then , an asterisk (*) appears in the display ; To add a label to select the function or symbol printed above a key...
User Guide - Page 9

... the text on all capital letters). To set for the height and width of labels to all the text on your label in the display. To print labels 1. The text style applies to enhance the appearance of text. Creating Multi-Line Labels You can choose from the display. Type the text for you are removed...
User Guide - Page 10

... portion and press . 3. Creating Industrial Labels You can create several types of labels that is applied to using RACE technology. The current label type is General with no special formatting, text centered, and the length automatically determined by the amount of the label, leaving a blank space in which the character variations appear depends on page 15...
User Guide - Page 11

... page 15. The result is separated by a solid black line on the display. 6. Creating Electrical Panel Labels An Electrical Panel label allows you to label a row of individual breakers within the fixed length appears shaded in the label. Using Breaker Multipliers Breaker multipliers allow you to adjust the size of breakers on page 15. Select...
User Guide - Page 12

... that breaker. 7. Select the block type and press . 4. Each block is 17.5 mm. Select the multiplier for each terminal. You can create two types of Labels on page 14. 12 Select On and press . 4. Press . 2. To create data for the blocks automatically, see Printing Separator Lines Between Cells on page 15...
User Guide - Page 13

...see Using Fuse Multipliers. All blank cells are not printed. Press the hot key for the label and press . The default fuse length is separated by a solid black line on page ...15. Enter the fuse multiplier for that are larger. To adjust the fuse multipliers after a label has been created, see Creating a Series of modules and press . 4. Select Fuse multipliers and press . ...
User Guide - Page 14

... the existing barcode is printed between each of multiple cell label you can add text before and after the barcode. A message appears asking if you can choose to print the human-readable ...(OK). To print separator lines between each cell. Using Barcodes The printer can edit the text for the particular label type are displayed in the display just like to print the humanreadable ...
User Guide - Page 15

... Some of the default symbols can be accessed from 1 to 9. Using the Text Library Your printer includes a text library, called My Library. You can be incremented from A to Z and a... more popular symbols can serialize any other character you enter. A confirmation message appears. 3. You can be found beginning on the label. For example, when the 2 is added to A10. Press and...
User Guide - Page 16

... can print up to increment this character position and press . 7. Press S HIFT + . 3. A box appears around the character where the cursor was positioned. 3. Repeat Steps 4 through 6 for each label and press . A new label is added in printing between labels, advance the label, and adjust the print contrast. The default is finished, the number of copies to...
User Guide - Page 17

...label. Select Print contrast and press . 3. Using Printer Memory The printer has a powerful memory feature that contains the label you can choose to 20 alphanumeric characters in length. To save a label file, all labels...Recalling a label replaces the current label. A message appears confirming that can turn this feature off to cut the label. Advancing the Label The default ...
User Guide - Page 18

... Figure 7 3. Gently wipe the padded side of the tool across the print head. Clean your printer from inside the label cartridge door. To clean the print head 1. Press . Deleting a Label File from Memory When you no longer need a stored label file, you long and trouble-free service, while requiring very little maintenance. To delete...
User Guide - Page 20

... while using your printer. Poor Print Quality • Clean the print head. Display text is cleared, press to label jam. • Open the label cartridge compartment and remove the cartridge. • Remove the label, clearing the jam. • Make sure the label passes smoothly through the label guides on backlight. Print error... RHINO labels have an easy-peel...
User Guide - Page 21

... the car where temperature may be over 60°C. èCaution • Do not charge in the battery pack. This may cause leakage, heat, smoke, an explosion, or fire. This could cause deterioration of a Lithium-ion rechargeable battery may also damage the protection device installed in a place that generates static electricity. •...
User Guide - Page 23

Send email messages to: [email protected] Please keep in the documentation. We welcome your suggestions about our user guides. Send us your comments or suggestions about additional ...

Similar Questions

Label Stall Detected
what does label stall detected on Rhino 5200 mean And how can I fix it?
(Posted by Merck008 2 years ago)
When I Press Print On My Rhino 5200 A Message Appears On The Screen Saying Tape
stale detected why does the tape not come out,what causes this to ha
(Posted by Philthompson66 6 years ago)
Label Stall Detected...
How do I fix it? There is not a way to connect to PC.
(Posted by arerrehc 6 years ago)
My Rhino 5200 Has An Error Message 'label Stall Detected', Is There Any Help?
Is there any help for the error message on my Rhino 5200 - "Label Stall Detected"?
(Posted by rcgrayjr 7 years ago)
Ask a New Question
Use the box below to post a new question about this Dymo product .
Points & Prizes
  • You can earn points for nearly everything you do on HelpOwl.com
  • You can trade in those points for gift cards at leading retailers such as Amazon.com and Walmart
  • It's that simple!
See How it Works
Create a Free Account

Dymo Manuals

Find free Dymo Rhino 5200 Industrial Label Printer manuals and user guides available at ManualOwl.com. Try out our unique manual viewer allowing you to interact with manuals from directly within your browser!

Dymo Reviews

View thousands of Dymo user reviews and customer ratings available at ReviewOwl.com.

Contact Information

Complete Dymo customer service contact information including steps to reach representatives, hours of operation, customer support links and more from ContactHelp.com.

Scoreboard Ratings

See detailed Dymo customer service rankings, employee comments and much more from our sister site.

Dymo Recalls

Find comprehensive Dymo recall information updated hourly on RecallOwl.com.