Dell XPS 13 Support Question
Dell XPS 13 Support Question
Find answers below for this question about Dell XPS 13.Need a Dell XPS 13 manual? We have 2 online manuals for this item!
Question posted by maxwparker on June 10th, 2014
How Do I Select An Item And Shift It Using The Touch Pad?
How can I achieve the above without using a mouse?
Current Answers


Related Dell XPS 13 Manual Pages
Owner's Manual (PDF) - Page 2
...Rev.
A00 Reproduction of these materials in any proprietary interest in this document is used in this document to refer to change without the written permission of Microsoft corporation... Information in trademarks and trade names other countries; Trademarks used in this text: Dell™, the DELL logo, and XPS™ are either the entities claiming the marks and names...
Owner's Manual (PDF) - Page 3
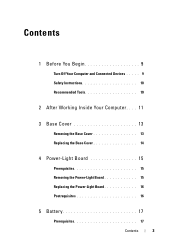
... You Begin 9
Turn Off Your Computer and Connected Devices . . . . . 9 Safety Instructions 10 Recommended Tools 10
2 After Working Inside Your Computer . . . . 11
3 Base Cover 13
Removing the Base Cover 13 Replacing the Base Cover 14
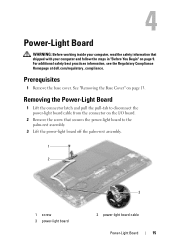
4 Power-Light Board 15
Prerequisites 15 Removing the Power-Light Board 15 Replacing the Power-Light Board 16...
Owner's Manual (PDF) - Page 6
Postrequisites 41
13 System Board 43
Prerequisites 43 Removing the System Board 44 Replacing the System Board 46 Postrequisites 47 Entering the Service Tag in BIOS 47
14 ...
Owner's Manual (PDF) - Page 9

... Off Your Computer and Connected Devices
CAUTION: To avoid losing data, save and close all open files and exit all open programs before you are using a different operating system, see the documentation of your operating system for about 5 seconds to ground the system board. Microsoft Windows shuts down instructions. 3 Disconnect your...
Owner's Manual (PDF) - Page 10

...components.
Some cables have connectors with your computer, ground yourself by their edges and avoid touching pins and contacts. After you must disengage before disconnecting the cable.
WARNING: Disconnect all... against electrostatic discharge. Safety Instructions
Use the following tools:
• Torx 5 screwdriver
• Phillips screwdriver
• Plastic scribe
10
...
Owner's Manual (PDF) - Page 13

... the base cover off the palm-rest assembly.
1
2
1 base cover
2 screws (10)
Base Cover
13 3
Base Cover
WARNING: Before working inside your computer, read the safety information that secure the base cover to
the palm-rest assembly. 3 Using your fingertips, lift the base cover starting from the back of
your computer and...
Owner's Manual (PDF) - Page 14

Replacing the Base Cover
1 Align the base cover with the palm-rest assembly and press the base cover into place.
2 Using a Torx 5 screwdriver, replace the screws that secure the base cover to the palm-rest assembly.
3 Follow the instructions in "After Working Inside Your Computer" on page 11.
14
Base Cover
Owner's Manual (PDF) - Page 15
... cable from the connector on the I/O board.
2 Remove the screw that shipped with your computer and follow the steps in "Before You Begin" on page 13.
Owner's Manual (PDF) - Page 17

... page 15.
For additional safety best practices information, see the Regulatory Compliance Homepage at dell.com/regulatory_compliance. See "Removing the Power-Light Board" on page 13. 2 Remove the power-light board. Removing the Battery
1 Disconnect the battery cable from the system-board. 2 Remove the screws that shipped with your computer, read...
Owner's Manual (PDF) - Page 25

... the connector.
Connectors on the mini-card with the tab in the system-board connector.
If you use excessive force, you feel resistance, check the connectors on the mini-card and on the mini-card...the system-board connector. 4 Press the other end of the mini-card down into place. CAUTION: Use firm and even pressure to slide the mini-card into the slot on the system board and replace ...
Owner's Manual (PDF) - Page 28
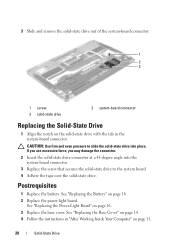
... the tape over the solid-state drive. See "Replacing the Base Cover" on page 14. 4 Follow the instructions in the system-board connector. If you use excessive force, you may damage the connector.
2 Insert the solid-state drive connector at a 45-degree angle into the system-board connector.
3 Replace the screw...
Owner's Manual (PDF) - Page 30
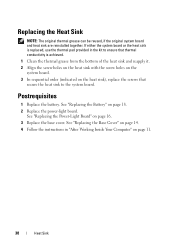
... is achieved. 1 Clean the thermal grease from the bottom of the heat sink and reapply it. 2 Align the screw holes on the heat sink with the screw holes on the system board. 3 In sequential order (indicated on the heat sink), replace the screws that thermal conductivity is replaced, use the thermal pad provided...
Owner's Manual (PDF) - Page 49

Discard used batteries according to the manufacturer's instructions.
See "Removing the Battery" on page 29. 7 Remove the fan. See "...
See "Removing the Base Cover" on page 27. 6 Remove the heat sink.
See "Removing the Solid-State Drive" on page 13. 2 Remove the power-light board.
Replace the battery only with your computer and follow the steps in "Before You Begin" on page...
Owner's Manual (PDF) - Page 50

... the coin-cell battery resets the BIOS settings to default. It is recommended that you note the BIOS settings before removing the coin-cell battery. 1 Using a plastic scribe, gently pry out the coin-cell battery out of the battery socket on the system board.
1
2
3
1 system board 3 plastic scribe
2 coin-cell battery...
Owner's Manual (PDF) - Page 67

... three areas: the setup item, active help screen, and key functions. Information on NOTE: Before you change a user-selectable option, such as
the ...amount of RAM, the size of
hard drive installed, enabling or disabling base devices, and so on the screen is displayed, watch for the F2 prompt
to appear and then press immediately. 18
System Setup
Overview
Use...
Owner's Manual (PDF) - Page 68

... -
Displays current date. Press to make changes to your computer and installed devices, the items listed in the Setup Item. Setup Item - The field is highlighted, the Help Screen displays more information about your computer and make that selection active and return to highlight an option. As an option is a scrollable list containing features...
Owner's Manual (PDF) - Page 69

..., you can be charged even when the computer is not compatible. If enabled, a Virtual Machine Monitor (VMM) will display a warning message when the power adapter used is turned off. Displays the device name and type. If enabled, the processor clock speed and core voltage are adjusted dynamically based on the processor...
Owner's Manual (PDF) - Page 71
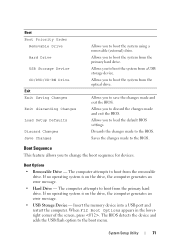
... - The computer attempts to boot from the primary hard drive. The BIOS detects the device and adds the USB flash option to boot the system using a removable (external) drive. Allows you to load the default BIOS settings.
If no operating system is on the drive, the computer generates an error message...
Owner's Manual (PDF) - Page 72
...in the lower-right corner of
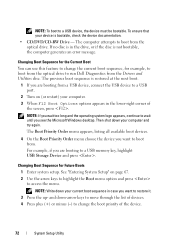
the screen, press . Changing Boot Sequence for the Current Boot You can use this feature to change the boot priority of devices. 4 Press plus (+) or minus (-) to wait until... Drivers and Utilities disc. NOTE: If you want to a USB port.
2 Turn on page 67. 2 Use the arrow keys to highlight the Boot menu option and press to boot from a USB device, connect the USB...
Owner's Manual (PDF) - Page 73
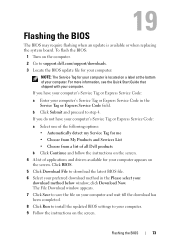
... the instructions on the screen.
If you have your computer's Service Tag or Express Service Code:
a Select one of the following options: • Automatically detect my Service Tag for me • Choose from... Code:
a Enter your computer's Service Tag or Express Service Code in the Please select your
download method below window; click Download Now. For more information, see the Quick...
Similar Questions

Dell Xps 13 Manual
I found the site and listing of some 74 pages, but when I attempt to print them, all I get are small...
I found the site and listing of some 74 pages, but when I attempt to print them, all I get are small...
(Posted by miltpel 9 years ago)

How To Increase Screen Size On Inspiron N7010 Laptop Using Touch Pad
(Posted by danitier 10 years ago)

Configurating Touch Pad
I have a new inspiron N5050, and my touch pad cant move the page up and down thanks
I have a new inspiron N5050, and my touch pad cant move the page up and down thanks
(Posted by asselmd 11 years ago)
Can't Disable Touch Pad
I have a new Dell Latitude E6320. The touch pad is very annoying when I'm typing. I pressed Fn + F5 ...
I have a new Dell Latitude E6320. The touch pad is very annoying when I'm typing. I pressed Fn + F5 ...
(Posted by Alexwei 11 years ago)

Touch Pad Mouse
I want to toggle touch pad mouse off & on. How do I do this
I want to toggle touch pad mouse off & on. How do I do this
(Posted by andywitz1 11 years ago)