Dell PowerEdge 4600 Support Question
Dell PowerEdge 4600 Support Question
Find answers below for this question about Dell PowerEdge 4600.Need a Dell PowerEdge 4600 manual? We have 11 online manuals for this item!
Question posted by bensabr on October 12th, 2013
Dell Poweredge 4600 Power Switch How To Replace
The person who posted this question about this Dell product did not include a detailed explanation. Please use the "Request More Information" button to the right if more details would help you to answer this question.
Current Answers
Related Dell PowerEdge 4600 Manual Pages
Microprocessor
Upgrade Installation Guide - Page 2
... hardware or loss of your computer. Other trademarks and trade names may be used in this document is strictly forbidden.
Dell Computer Corporation disclaims any manner whatsoever without notice. © 2002-2003 Dell Computer Corporation.
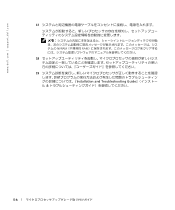
A05 Notes, Notices, and Cautions
NOTE: A NOTE indicates important information that helps you make better use of...
Microprocessor
Upgrade Installation Guide - Page 3

...
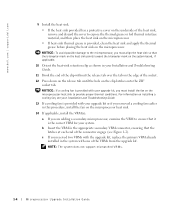
1 Turn off the system, including any peripherals, and disconnect the power cable from the electrical outlet.
2 Open the system doors, or ...dell.com, and upgrade the BIOS if necessary.
Each microprocessor and its associated cache memory are included in either the primary or secondary microprocessor sockets. To take advantage of future options in speed and functionality, you add or replace...
Microprocessor
Upgrade Installation Guide - Page 4
....
For information on removing a cooling fan, see your Installation and Troubleshooting Guide for information on the heat sink, you can become extremely hot. www.dell.com | support.dell.com
4 If you intend to remove the microprocessor. If any of the socket and leave the release lever in the open position (see "Getting...
Microprocessor
Upgrade Installation Guide - Page 5
....
Because the system uses a ZIF microprocessor socket, there is no need to bend the pins.
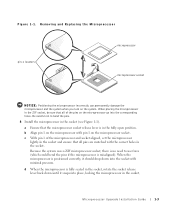
8 Install the microprocessor in the socket (see Figure 1-1).
Removing and Replacing the Microprocessor
pin-1 locators
microprocessor microprocessor socket
NOTICE: Positioning the microprocessor incorrectly can permanently damage the microprocessor and the system when you turn on the...
Microprocessor
Upgrade Installation Guide - Page 6
...or if you removed a cooling fan earlier in the system with the upgrade kit, replace the primary VRM already installed in this procedure, install the fan on the microprocessor heat ...
Microprocessor Upgrade Installation Guide For information on installing a cooling fan, see Figure 1-2).
www.dell.com | support.dell.com
9 Install the heat sink.
• If the heat sink provided has a ...
Microprocessor
Upgrade Installation Guide - Page 7
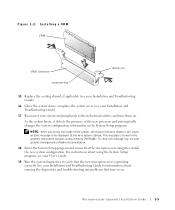
... microprocessor categories match the new system configuration. Installing a VRM VRM
VRM connector connector key
latches (2)
15 Replace the cooling shroud, if applicable (see your Installation and Troubleshooting Guide).
16 Close the system doors, or replace the system cover (see your system and peripherals to be displayed at the next system startup. This...
Microprocessor
Upgrade Installation Guide - Page 34
www.dell.com | support.dell.com
2 Installation and Troubleshooting Guide
3 Installation and Troubleshooting Guide
4
Installation and Troubleshooting Guide
a
b Installation and Troubleshooting Guide
5 5-1
6
5-2
Microprocessor
Upgrade Installation Guide - Page 36
www.dell.com | support.dell.com
c 1
ZIF
d
9
10 『Installation and Troubleshooting Guide
11
12 ZIF
Installation and Troubleshooting Guide
13
5-4
Microprocessor
Upgrade Installation Guide - Page 38
www.dell.com | support.dell.com
17
NVRAM RAM
18
19 Installation and Troubleshooting Guide
5-6
Information
Update — 1-GB 512-Mb Memory Modules - Page 1
... or death.
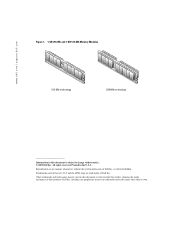
See Figure 1 to disable these technologies are not. If these features. The industry is completely populated with the same memory module technology. www.dell.com | support.dell.com
About Cautions
CAUTION: A CAUTION indicates a potential for complete information about safety precautions, working inside the computer, and protecting against electrostatic discharge.
Information...
Information
Update — 1-GB 512-Mb Memory Modules - Page 2
... in this document is strictly forbidden. disclaims any manner whatsoever without notice. © 2004 Dell Inc. www.dell.com | support.dell.com
Figure 1. 1-GB 256-Mb and 1-GB 512-Mb Memory Modules
512-Mb technology
256... entities claiming the marks and names or their products. Dell Inc. Printed in any proprietary interest in this document to refer to change without the written permission...
Rack-to-Tower
Conversion Guide - Page 5
... for joined multiple racks before extending a component from the bottom up, and load the heaviest item in a rack.
www.dell.com | support.dell.com
• System rack kits are secured to the rack, extend to the floor, and that the full weight of... the component rail release latches and sliding a component into the rack.
• Do not overload the power supply branch circuit that provides...
Rack-to-Tower
Conversion Guide - Page 7
www.dell.com | support.dell.com
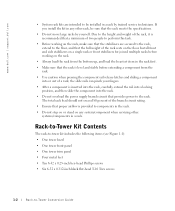
Recommended Tools
The following tools are required to perform the conversion: • #2 Phillips screwdriver ...• Installing the metal feet • Installing the tower front bezel • Removing the slide assemblies • Replacing the rack doors
Removing the Rack Doors
For instructions on removing the rack doors, refer to the procedures in the ...
Rack-to-Tower
Conversion Guide - Page 9
...5 Place the system on a smooth work surface.
1-6
Rack-to-Tower Conversion Guide www.dell.com | support.dell.com
4 Pull the cable-management arm away from the cable tray.
5 Remove the captive...may wish to make the system chassis lighter by labeling and removing the hard drives and power supplies (for instructions, see the Installation and Troubleshooting Guide).
1 Loosen the thumbscrews that ...
Rack-to-Tower
Conversion Guide - Page 15
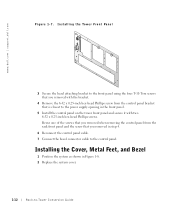
... and Bezel
1 Position the system as shown in Figure 1-8. 2 Replace the system cover.
1-12
Rack-to the control panel. Reuse one...removing the control panel from the rack front panel and the screw that is closest to the power supply opening in step 4.
6 Reconnect the control panel cable. 7 Connect the bezel connector ...inch hex-head Phillips screws.
www.dell.com | support.dell.com
Figure 1-7.
Rack-to-Tower
Conversion Guide - Page 19
www.dell.com | support.dell.com
3 Repeat step 2 at the back of the cabinet for this slide assembly. 4 If the slide assemblies are secured with screws, remove the ... rack cabinets.
1-16
Rack-to the procedures for the system you removed from the rack. Label the box as a rack installation kit for replacing the rack doors in a box. Replacing the Rack Doors
Refer to -Tower Conversion Guide
1 x 2
Backplane Installation Guide - Page 43
... • 1x2
(Inter-integrated circuit) • 1x2
SCSI
1 x 2 4 SCSI
:
I2C 68
:
Installation and Troubleshooting Guide First - For You and Your Computer
Safety
:
BIOS
ESM (Embedded Server Management)
Dell | Support Web 1
support.jp.dell.com
:
2 1x2 3
4
( Installation and Troubleshooting Guide )
( Installation and Troubleshooting Guide )
1 x 2
5-1
Removing the Back Fan Assembly - Page 1
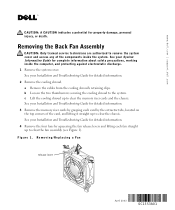
...of the components inside the computer, and protecting against electrostatic discharge. 1 Remove the system cover.
www.dell.com | support.dell.com
CAUTION: A CAUTION indicates a potential for detailed information. 3 Remove the memory riser cards by ...Troubleshooting Guide for property damage, personal injury, or death.
Removing/Replacing a Fan
release lever
April 2003
0C1553A01
Removing the Back Fan Assembly - Page 2
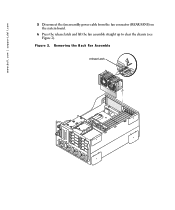
Removing the Back Fan Assembly
release latch Figure 2. www.dell.com | support.dell.com
5 Disconnect the fan assembly power cable from the fan connector (REAR FANS) on the system board.
6 Press the release latch and lift the fan assembly straight up to clear the chassis (see Figure 2).
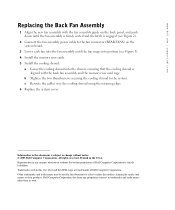
Removing the Back Fan Assembly - Page 3
...dell.com | support.dell.com
Replacing the Back Fan Assembly
1 Align the new fan assembly with the back fan assembly and the memory riser card cage.
Information in this document to refer to change without the written permission of Dell... the cables over the cooling shroud using the retaining clips. 6 Replace the system cover.
Printed in trademarks and trade names other than its...
Similar Questions

Where I Can Get Power Consumption Details Of My Dell Power Edge R620 Server
Product detailsDell Power Edge R620 Server 4 Years oldHow much power my server consumption at high u...
Product detailsDell Power Edge R620 Server 4 Years oldHow much power my server consumption at high u...
(Posted by unnam 3 years ago)

How To Replace Power Switch On Dell Poweredge 4600 Server
(Posted by lweltable20 9 years ago)

Dell Poweredge 4600- How To Remove And Replace The Power Button
I would appreciate step by step instructions to remove and replace a defective (collapsed) power but...
I would appreciate step by step instructions to remove and replace a defective (collapsed) power but...
(Posted by jelkes 10 years ago)

Poweredge 4600 Is Frequently Rebooting Without Warning.
No warning. Orange light on server is blinking. Replace battery light on UPS is lit.
No warning. Orange light on server is blinking. Replace battery light on UPS is lit.
(Posted by Anonymous-30352 12 years ago)