Dell PowerEdge 4600 Support Question
Dell PowerEdge 4600 Support Question
Find answers below for this question about Dell PowerEdge 4600.Need a Dell PowerEdge 4600 manual? We have 11 online manuals for this item!
Question posted by jelkes on September 16th, 2013
Dell Poweredge 4600- How To Remove And Replace The Power Button
I would appreciate step by step instructions to remove and replace a defective (collapsed) power button in one of our Dell Poweredge 4600 Servers. Thank you in advance for helping me.
Current Answers
Answer #1: Posted by TechSupport101 on September 16th, 2013 8:45 AM
TechSupport101

Member since:
May 24th, 2013 Points: 12,171,305

Member since:
May 24th, 2013 Points: 12,171,305
Hi, please wavici the video below for help.
Thank you!
http://m.youtube.com/watch?v=3mrN7ZmI3nA&desktop_uri=%2Fwatch%3Fv%3D3mrN7ZmI3nA
Thank you!
http://m.youtube.com/watch?v=3mrN7ZmI3nA&desktop_uri=%2Fwatch%3Fv%3D3mrN7ZmI3nA
Answer #2: Posted by prateekk007 on September 17th, 2013 5:43 AM
prateekk007

Member since:
December 5th, 2012 Points: 2,137,520
Member since:
December 5th, 2012 Points: 2,137,520
Hi jelkes,
Please check this service manual link below where you can find information on replacing various components for your system:
Pease reply if you have further queries.
To know more about Dell Product Support, Drivers & Downloads, Order & Dispatch status -> choose your region US Customers; India Customers. For Here for Dell support videos.Thanks & Regards
Prateek K
Related Dell PowerEdge 4600 Manual Pages
Microprocessor
Upgrade Installation Guide - Page 3

...a ZIF socket on the Dell Support website at support.dell.com, and upgrade the ...power cable from the electrical outlet.
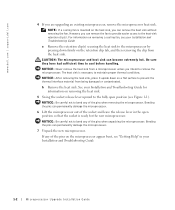
2 Open the system doors, or remove the system cover (see your Installation and Troubleshooting Guide).
To take advantage of future options in speed and functionality, you perform this procedure, read the safety instructions in your system. NOTICE: Before you add or replace...
Microprocessor
Upgrade Installation Guide - Page 4
... microprocessor. Bending the pins can become extremely hot. www.dell.com | support.dell.com
4 If you can remove the fan to provide easier access to the heat-sink retention clip(s).
b Remove the heat sink. Bending the pins can remove the heat sink without removing the fan. a Remove the retention clip(s) securing the heat sink to the microprocessor...
Microprocessor
Upgrade Installation Guide - Page 5
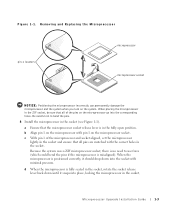
Removing and Replacing the Microprocessor
pin-1 locators
microprocessor microprocessor socket
NOTICE: Positioning the microprocessor incorrectly can permanently damage the microprocessor and the system when you turn on the ...
Microprocessor
Upgrade Installation Guide - Page 6
...of the connector engage (see Figure 1-2). c If you received two VRMs with the upgrade kit, replace the primary VRM already installed in your upgrade kit, you must align the heat sink so that... on the microprocessor. www.dell.com | support.dell.com
9 Install the heat sink.
• If the heat sink provided has a protective cover on the underside of the heat sink, remove and discard the cover to...
Rack
Installation Guide - Page 123
c
3
3
3
d
3
6-32 ×
e
12mm (0.5
)
f
6
a
(
and Troubleshooting Guide
)
b
supplies installed in the system ( Installation and Troubleshooting Guide
c
CTRL_PNL
d
LED
e
LED
f
10 Torx
g
h
i
6-32 × ¼
Installation (Remove all power )
4
T-
12 T-10 Torx
2
4-17
Rack-to-Tower
Conversion Guide - Page 3

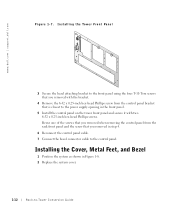
...1-10 Installing the Front Panel 1-11 Installing the Cover, Metal Feet, and Bezel 1-12 Removing the Slide Assemblies 1-14 Replacing the Rack Doors 1-16
Figures
Figure 1-1. Figure 1-2. Contents
Safety Instructions 1-1 Rack-to -Tower Kit Contents 1-3 Removing the Cable-Management Arm . . . . . 1-5 Removing the System From the Slide Assemblies 1-7 Removing the Front Bezel 1-8
Contents
3
Rack-to-Tower
Conversion Guide - Page 5
...sliding a component into the rack.
• Do not overload the power supply branch circuit that provides power to -Tower Conversion Guide The total rack load should not exceed ...0.312-inch black flat-head T-10 Torx screws
1-2
Rack-to the rack. www.dell.com | support.dell.com
• System rack kits are secured to the rack, extend to the floor,...; Do not step on or stand on the floor.
Rack-to-Tower
Conversion Guide - Page 7
... panel • Installing the tower front panel • Installing the metal feet • Installing the tower front bezel • Removing the slide assemblies • Replacing the rack doors
Removing the Rack Doors
For instructions on removing the rack doors, refer to the procedures in the documentation provided with the rack cabinet.
1-4
Rack-to-Tower Conversion...
Rack-to-Tower
Conversion Guide - Page 8
... off the system you are converting as well as all peripherals attached to this system.
2 At the back of the rack cabinet, disconnect and remove the AC power cable and all other cables connected to the back of the system and secured to the cablemanagement arm with Velcro straps.
3 Squeeze the release...
Rack-to-Tower
Conversion Guide - Page 9
...Guide You may wish to make the system chassis lighter by labeling and removing the hard drives and power supplies (for instructions, see the Installation and Troubleshooting Guide).
1 Loosen the thumbscrews that the..., grasp the system at a time. www.dell.com | support.dell.com
4 Pull the cable-management arm away from the cable tray.
5 Remove the captive thumbscrew and bracket that secure the ...
Rack-to-Tower
Conversion Guide - Page 11
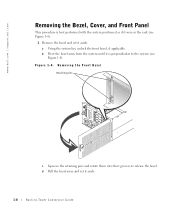
Figure 1-4. Removing the Front Bezel
retaining pins
c Squeeze the retaining pins and rotate them into their ... bezel away and set it aside.
1-8
Rack-to-Tower Conversion Guide www.dell.com | support.dell.com
Removing the Bezel, Cover, and Front Panel
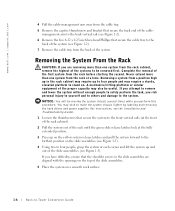
This procedure is perpendicular to the system (see Figure 1-4).
1 Remove the bezel and set it aside: a Using the system key, unlock the...
Rack-to-Tower
Conversion Guide - Page 12
... rack front panel to -Tower Conversion Guide
1-9 Rack-to the
chassis.
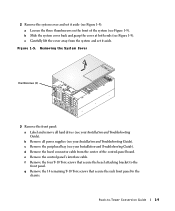
e Remove the control panel's interface cable. d Remove the bezel connector cable from the system and set it aside. Removing the System Cover
thumbscrews (3)
3 Remove the front panel:
a Label and remove all power supplies (see your Installation and Troubleshooting Guide).
Figure 1-5. c Carefully lift the...
Rack-to-Tower
Conversion Guide - Page 13
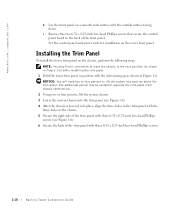
...Set the control panel and screws aside for installation on the chassis, perform the following steps. Installing the Trim Panel
To install the tower trim panel on the tower front panel...the three holes in Figure 1-6. i Remove the two 6-32 x 0.25-inch hex-head Phillips screws that secure the control panel board to -Tower Conversion Guide
www.dell.com | support.dell.com
h Lay the front panel on...
Rack-to-Tower
Conversion Guide - Page 15
... the control panel. www.dell.com | support.dell.com
Figure 1-7. Reuse one of the screws that you removed when removing the control panel from the rack front panel and the screw that you removed in step 4.
6 Reconnect the control panel cable. 7 Connect the bezel connector cable to the power supply opening in Figure 1-8. 2 Replace the system cover.
1-12...
Rack-to-Tower
Conversion Guide - Page 17
... NOTE: If screws are used to -Tower Conversion Guide Installing the Tower Front Bezel
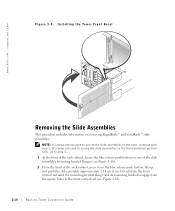
Removing the Slide Assemblies
This procedure includes information on the blue release push button, lift up, and push the slide assembly approximately 2.54 cm (1 inch) back from... 1-10).
1-14
Rack-to secure the slide assemblies in the rack, continue with step 1.
www.dell.com | support.dell.com
Figure 1-9.
Rack-to-Tower
Conversion Guide - Page 18
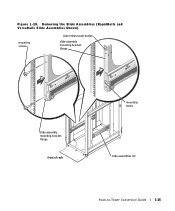
Removing the Slide Assemblies (RapidRails and VersaRails Slide Assemblies Shown)
mounting screws
blue release push button
slide-assembly mounting-bracket flange
slide-assembly mounting-bracket flange
front of rack
mounting hooks
slide assemblies (2)
Rack-to-Tower Conversion Guide
1-15 Figure 1-10.
Rack-to-Tower
Conversion Guide - Page 19
... system you removed from the rack. www.dell.com | support.dell.com
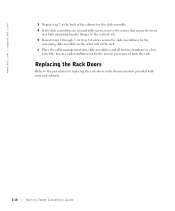
3 Repeat step 2 at the back of the rack. 6 Place the cable-management arm, slide assemblies, and all fastener hardware in the documentation provided with screws, remove the screws that secure the front
and back mounting-bracket flanges to -Tower Conversion Guide
Replacing the Rack...
Removing the Back Fan Assembly - Page 1
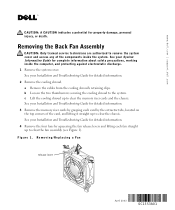
...the fan release levers and lifting each fan straight up to clear the chassis. Removing/Replacing a Fan
release lever
April 2003
0C1553A01 c Lift the cooling shroud up to clear.... a Remove the cables from the cooling shroud's retaining clips. b Loosen the two thumbscrews securing the cooling shroud to clear the memory riser cards and the chassis. www.dell.com | support.dell.com
CAUTION...
Removing the Back Fan Assembly - Page 2
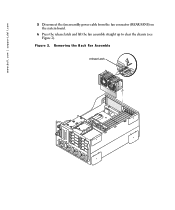
Removing the Back Fan Assembly
release latch Figure 2.
www.dell.com | support.dell.com
5 Disconnect the fan assembly power cable from the fan connector (REAR FANS) on the system board.
6 Press the release latch and lift the fan assembly straight up to clear the chassis (see Figure 2).
Removing the Back Fan Assembly - Page 3
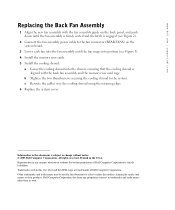
... fan snaps into position (see Figure 2).
2 Connect the fan assembly power cable to the system. Reproduction in any proprietary interest in trademarks and trade names other than its own. Printed in this document is strictly forbidden.
www.dell.com | support.dell.com
Replacing the Back Fan Assembly
1 Align the new fan assembly with the...
Similar Questions

How To Replace Power Switch On Dell Poweredge 4600 Server
(Posted by lweltable20 9 years ago)

What Is The Power And Heat Dissipation Data For The R310 Server? Thanks
(Posted by terrsquir 9 years ago)


How Update A Dell Poweredge 4600 Server Please?
Hi ! 'excuse-me for my english i speak frensh)I have reinstall my server and i would like to copie d...
Hi ! 'excuse-me for my english i speak frensh)I have reinstall my server and i would like to copie d...
(Posted by marietoumari 12 years ago)