
Dell PowerEdge 2950 Support Question
Dell PowerEdge 2950 Support Question
Find answers below for this question about Dell PowerEdge 2950.Need a Dell PowerEdge 2950 manual? We have 8 online manuals for this item!
Question posted by osamdnptor on September 14th, 2013
How Install Optical Drive 3.5 Poweredge 2950
The person who posted this question about this Dell product did not include a detailed explanation. Please use the "Request More Information" button to the right if more details would help you to answer this question.
Current Answers
Related Dell PowerEdge 2950 Manual Pages
Installing a SATA Optical Drive - Page 1
Dell™ PowerEdge™ 19x0 and 29x0 Systems
Installing a SATA Optical Drive
Installing a SATA Optical Drive - Page 3

a Disconnect the SAS cable from the SAS controller and pull the cable away from the electrical outlet.
2 Remove the bezel. Installing a SATA Optical Drive
These instructions apply to Dell™ PowerEdge™ systems to remove the system cover and access any of the components inside the system. WARNING: Only trained service technicians are authorized to...
Installing a SATA Optical Drive - Page 4

... carrier fit into place. The pins on the interposer board release tab at the back of the tray. If you must be replaced with the drive tray provided with the system is used for the SATA optical drive. PowerEdge 2970, 2950, and 1950
For PowerEdge 2970 and 2950 systems, the optical drive tray that shipped with the SATA drive installation kit.
Installing a SATA Optical Drive - Page 5

... carrier align with the holes in the installation kit must be used with PowerEdge 1950 systems. If you are replacing an existing optical drive, do not reuse the interposer board attached to the tray. Replacing the Optical Drive in a PowerEdge 2950 or 2970 System
2 1
3
4
5
6
7
1 optical drive 3 interposer 5 SATA power cable 7 optical drive carrier
2 interposer release latch 4 SATA cable...
Installing a SATA Optical Drive - Page 6

... the SATA cable to the back of the chipset shroud. a Route the cable through the power cable cutout in a PowerEdge 1950 Drive Tray 2 3
1 4
5
1 optical drive 3 SATA power cable 5 optical drive carrier
2 SATA cable 4 carrier latch
Installing the SATA Optical Drive - NOTE: You may need to replace the existing power cable with the branching power cable) to the SATA_A connector...
Installing a SATA Optical Drive - Page 7

... 2
1
3
4
6
5
1 SATA data cable 3 chipset shroud 5 SATA power cable
2 SATA_A connector on the system and attached peripherals. Installing the SATA Optical Drive -
Figure 1-3. PowerEdge 2970 or 2950
1 Insert the optical drive tray into the system until it is fully inserted and locked into position.
2 Connect the SATA cable (the end with the branching power cable) to ...
Installing a SATA Optical Drive - Page 8

...the front of the system until the bracket detaches from the chassis slots.
6 Route the SATA cable in the cable channel in the PowerEdge 2950 and 2970
1
2
3 4 5
1 SATA_B connector on the system board. 4 Remove the cooling shroud. See Figure 1-4.
7 ... on system board 2 cable retention bracket
3 SATA data cable
4 SATA power cable
5 optical drive
8
Installing a SATA Optical Drive
Installing a SATA Optical Drive - Page 9

..., use the SATA_D connector. For a PowerEdge 1900, use the SATA_B connector.
-
Installing the SATA Optical Drive - See Figure 1-5.
- PowerEdge 2900 and 1900
1 If the mounting screws are not attached to the drive, install them now.
2 Align the mounting screws with the bay slide slots and insert the optical drive into the optical drive bay until the spring latch engages.
3 Connect the...
Installing a SATA Optical Drive - Page 10

See "Closing the System" in a PowerEdge 2900 or 1900
3
2
4
5 1
1 optical drive 3 SATA data cable 5 SATA power connector on SAS
backplane (PowerEdge 2900 only)
2 SATA power cable 4 SATA connector on the system and attached peripherals.
10
Installing a SATA Optical Drive Figure 1-5. SATA Cable Routing in your Hardware Owner's Manual.
10 Reconnect the system to power and turn on ...
Information Update - Page 9

... memory is fully supported.
Safeguarding Encrypted Data
On PowerEdge 2950 III systems using Windows Server® 2008, you can use encryption programs, such... is installed, the system only recognizes and displays 63.75 GB during POST.
Power 2950 II and PowerEdge 2950 III ... processors. For more than 4 GB of the hard drive. System Board Replacement - Processor Upgrades -
Support for...
Information Update - Page 10
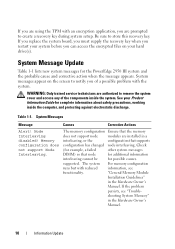
...System messages appear on your hard drive(s). Node Interleaving disabled! Memory configuration does not support Node Interleaving. supported. "General Memory Module
Installation Guidelines"
in the Hardware Owner... to notify you are installed in a
interleaving, or the
configuration that node
for additional information
interleaving cannot be
for the PowerEdge 2950 III system and the ...
Information Update - Page 11
...
See see
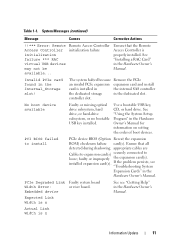
"Troubleshooting System Expansion Cards" in the Hardware Owner's Manual. No boot device available
Faulty or missing optical drive subsystem, hard drive, or hard-drive subsystem, or no bootable USB key installed. See "Installing a RAC Card" in the dedicated slot. System Messages (continued)
Message
Causes
Corrective Actions
!!*** Error: Remote Access Controller initialization...
Information Update - Page 14
... the Hardware Owner's Manual. For more information on selected drive
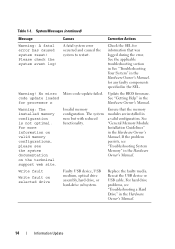
Faulty USB device, USB medium, optical drive assembly, hard drive, or hard-drive subsystem. Reseat the USB device or USB cable. Table 1-1. See "General Memory Module Installation Guidelines" in the
for information that the memory modules are installed in a valid configuration.
Check the SEL for processor n
Hardware...
Information Update - Page 24

... System Diagnostics Update
In the Customize window of operating systems on the Server OS Install tab. You cannot save the file to specify the diskette drive or USB memory key where the test log file is supported by the PowerEdge 2950 and 2950 II systems, but not by the PowerEdge 2950 III system. This operating system is saved.
Hardware Owner's Manual (PDF) - Page 5
... Cage 78 Replacing the Expansion-Card Cage 79
Installing a RAC Card 80
Optical Drive 81 Removing the Optical Drive 81 Installing the Optical Drive 82
Diskette Drive 83 Removing the Diskette Drive From the System 83 Installing the Diskette Drive Into the System 84 Removing the Diskette Drive From the Drive Carrier 85 Installing the Diskette Drive Into the Drive Carrier 85
Contents
5
Hardware Owner's Manual (PDF) - Page 31

..., read value expecting value
Causes
Corrective Actions
Faulty or improperly installed memory See "Troubleshooting System Memory"
modules. Memory double word ...Information only. If the problem persists, see "Troubleshooting a Diskette Drive" on page 121, "Troubleshooting an Optical Drive" on page 123, and "Troubleshooting a Hard Drive" on page 120. See "Troubleshooting System Memory" on page...
Hardware Owner's Manual (PDF) - Page 34

...drive.
Update the BIOS firmware.
See the RAID controller documentation for information about installing or updating the RAID firmware. See the RAID controller documentation for information about installing...slot 1.
See "Troubleshooting a Diskette Drive" on page 121, "Troubleshooting an Optical Drive" on page 123, and "Troubleshooting a Hard Drive" on page 147. Table 1-7.
See...
Hardware Owner's Manual (PDF) - Page 82
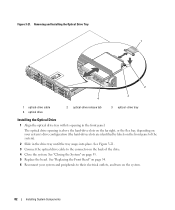
... slots are identified by labels on page 55. 5 Replace the bezel. Removing and Installing the Optical Drive Tray 1
2
3 4
1 optical-drive cable 4 optical drive
2 optical-drive release tab
3 optical -drive tray
Installing the Optical Drive
1 Align the optical drive tray with its opening is above the hard-drive slots on the far right, or the flex bay, depending on your system and peripherals...
Hardware Owner's Manual (PDF) - Page 103

... complete information about safety precautions, working inside the system. See "Removing and Installing an Internal SCSI Tape Drive" on page 81. 4 If applicable, disconnect the diskette drive.
See "Removing the Optical
Drive" on
page 86. 6 Remove the hard drives. See "Removing a Hot-Plug Hard Drive" on page 67. 10 Remove the fans. See "Removing the Cooling Shroud...
Hardware Owner's Manual (PDF) - Page 105

... Figure 3-35. 7 Remove the display module: a Insert the end of paper clip into the hole on
page 84. 12 If applicable, reconnect the optical drive. Installing System Components
105 See "Installing a SAS Controller Daughter Card" on page 55. Control Panel Assembly (Service-only Procedure)
NOTE: The control panel assembly consists of the components inside...
Similar Questions

How Do You Install Mounting Rails For Dell Poweredge 2950
(Posted by atanit 9 years ago)

How To Replace A Failed Hard Drive In Dell Poweredge 2950
(Posted by srlgpa 10 years ago)


How To Install Hot Swap Power Supply Poweredge 2950
(Posted by xxttJungs 10 years ago)