Dell PowerEdge 2400 Support Question
Dell PowerEdge 2400 Support Question
Find answers below for this question about Dell PowerEdge 2400.Need a Dell PowerEdge 2400 manual? We have 7 online manuals for this item!
Question posted by pldtnisc on September 6th, 2014
How To Upgrade The Firmware On A Dell Poweredge 2400 Server
The person who posted this question about this Dell product did not include a detailed explanation. Please use the "Request More Information" button to the right if more details would help you to answer this question.
Current Answers
Related Dell PowerEdge 2400 Manual Pages
Activating the Dell PERC2 - Page 3
... Installation and Troubleshooting Guide for more information. 3.
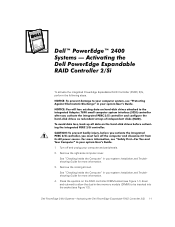
See "Checking Inside the Computer" in your computer and peripherals. 2. Dell PowerEdge 2400 Systems-Activating the Dell PowerEdge Expandable RAID Controller 2/Si 1-1 To activate the integrated PowerEdge Expandable RAID Controller (PERC) 2/Si, perform the following steps.
1. Remove the right-side computer cover. See "Checking...
Activating the Dell PERC2 - Page 4
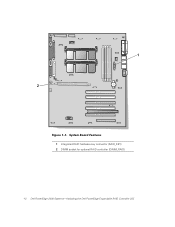
1 Integrated RAID hardware key connector (RAID_KEY) 2 DIMM socket for optional RAID controller (DIMM_RAID)
1-2 Dell PowerEdge 2400 Systems-Activating the Dell PowerEdge Expandable RAID Controller 2/Si
Activating the Dell PERC2 - Page 5

... for system memory.
Align the DIMM's edge connector with the slot in the center of the socket (see step A in the socket (see Figure 1-3). Dell PowerEdge 2400 Systems-Activating the Dell PowerEdge Expandable RAID Controller 2/Si 1-3 System memory is labeled "PC133."
6. NOTE: The RAID controller DIMM must be labeled "PE2400." The RAID hardware key should...
Activating the Dell PERC2 - Page 6
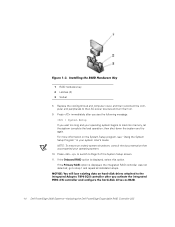
... displayed, the integrated RAID controller was not detected; 1 RAID hardware key 2 Latches (2) 3 Socket
8. Press to switch to step 1 and repeat all installation steps.
1-4 Dell PowerEdge 2400 Systems-Activating the Dell PowerEdge Expandable RAID Controller 2/Si NOTE: To ensure an orderly system shutdown, consult the documentation that accompanied your operating system begins to their AC...
Activating the Dell PERC2 - Page 7
... the integrated PERC 2/Si controller documentation. Configure the RAID subsystem and install the RAID driver and management
software. For more information, refer to RAID. Dell PowerEdge 2400 Systems-Activating the Dell PowerEdge Expandable RAID Controller 2/Si 1-5 Press to save the settings and reboot the system. 14. The default setting for Onboard RAID is SCSI.
13...
Activating the Dell PERC2 - Page 8

1-6 Dell PowerEdge 2400 Systems-Activating the Dell PowerEdge Expandable RAID Controller 2/Si
Installing an Air Baffle on Systems With a Single 866-MHz
Processor - Page 1
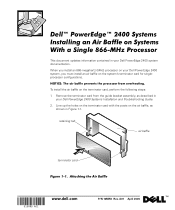
... the terminator card with the posts on the air baffle, as described in your Dell PowerEdge 2400 Systems Installation and Troubleshooting Guide.
2.
A01 April 2000
™ Remove the terminator card from the guide bracket assembly, as shown in your Dell PowerEdge 2400 system, you must install an air baffle on the terminator card, perform the following...
Installing Redundant Power Supplies - Page 3
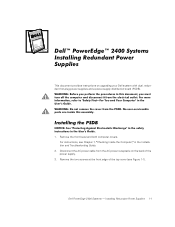
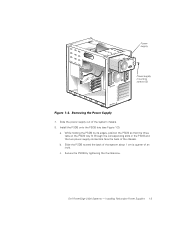
Dell PowerEdge 2400 Systems - Installing Redundant Power Supplies 1-1 Remove the two screws at the front edge of the power supply.
3. Remove the front bezel and both computer covers. Disconnect the AC power cable from the AC power receptacle on upgrading your Dell system with dual, redundant hot-plug power supplies and a power-supply distribution board (PSDB...
Installing Redundant Power Supplies - Page 4
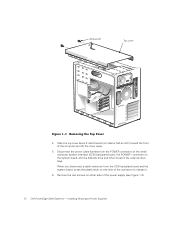
... in the external drive bays. Slide the top cover about 2 centimeters (cm) (about half an inch) toward the front of the power supply (see Figure 1-2).
1-2 Dell PowerEdge 2400 Systems - When you disconnect a cable connector from the POWER connector on the small computer system interface (SCSI) backplane board, the POWER1 connector on either side...
Installing Redundant Power Supplies - Page 5
b. Dell PowerEdge 2400 Systems - While holding the PSDB by tightening the thumbscrew.
Installing Redundant Power Supplies 1-3
Slide the PSDB toward the back of the system about 1 cm (a quarter ...
Installing Redundant Power Supplies - Page 6

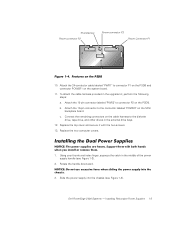
Attach the 12-conductor cable labeled "PWR3" to connector P3 on the PSDB (see Figure 1-4) and to connector POWER2 on power supply handle
9. Installing Redundant Power Supplies Power supplies (2) PSDB
Catch on the system board.
1-4 Dell PowerEdge 2400 Systems -
Installing Redundant Power Supplies - Page 7
.... 13. Using your thumb and index finger, squeeze the catch in the external drive bays.
12. Dell PowerEdge 2400 Systems - b. Attach the 18-pin connector labeled "PWR2" to connector P1 on the PSDB and connector... 1-3). To attach the cable harness provided in the upgrade kit, perform the following steps: a. Thumbscrew Power connector P2
Power connector P3 Power Connector P1
10.
Installing Redundant Power Supplies - Page 8
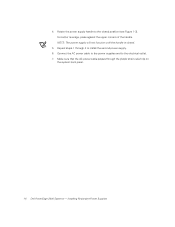
... passes through 4 to install the second power supply. 6. Installing Redundant Power Supplies Repeat steps 1 through the plastic strain-relief clip on
the system back panel.
1-6 Dell PowerEdge 2400 Systems - Rotate the power supply handle to the electrical outlet. 7. Connect the AC power cable to the power supplies and to the closed .
5. NOTE: The...
Rack Installation Guide - Page 13
... Systems Rack Installation Guide
This installation guide provides instructions for each PowerEdge system to be preinstalled in a Dell rack. support.dell.com
Dell PowerEdge 2400 Systems Rack Installation Guide 1-1 The rack kit includes the following items (see Figure 1-1):
• One pair of slide assemblies with mounting brackets* • One rack ...
Rack Installation Guide - Page 14
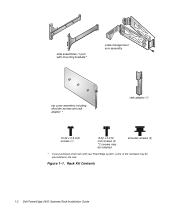
...Contents
1-2 Dell PowerEdge 2400 Systems Rack Installation Guide slide assemblies (1 pair) with mounting brackets*
cable-management arm assembly
top cover assembly including shoulder screws and rack adapter *
rack adapter (1)
10-32 x 0.5-inch screws (1)
8-32 x 0.313inch screws (4) *2 screws may be installed
shoulder screws (3)
* If you purchased a Dell rack with your PowerEdge system, some...
Rack Installation Guide - Page 15
... this guide.
To remove the doors, perform the following steps:
1.
For instructions on the front door. Open the latch on installing the PowerEdge system itself, see Figure 1-2). support.dell.com
Dell PowerEdge 2400 Systems Rack Installation Guide 1-3 To install the slide assemblies in the rack. The subsections that follow include instructions for performing these tasks...
Rack Installation Guide - Page 16
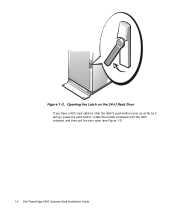
Opening the Latch on the 24-U Rack Door If you have a 42-U rack cabinet, slide the latch's push-button cover up as far as it will go, press the push button, rotate the handle clockwise until the latch releases, and then pull the door open (see Figure 1-3).
1-4 Dell PowerEdge 2400 Systems Rack Installation Guide Figure 1-2.
Rack Installation Guide - Page 27
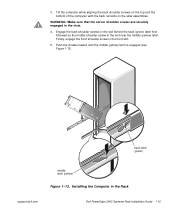
... back (green) latch first followed by the middle shoulder screw in the front slot.
5. Installing the Computer in the slots.
4. WARNING: Make sure that the server shoulder screws are securely engaged in the Rack
support.dell.com
Dell PowerEdge 2400 Systems Rack Installation Guide 1-15
Microprocessor
Upgrade Installation Guide - Page 3
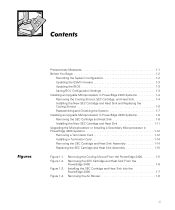
... PowerEdge 2400 1-5
Removing the SEC Cartridge and Heat Sink From the PowerEdge 2400 1-6
Installing the SEC Cartridge and Heat Sink Into the PowerEdge 2400 1-7
Removing the Air Blower 1-9
DELL ...Configuration 1-2 Updating the ESM Firmware 1-3 Updating the BIOS 1-3 Saving RCU Configuration Settings 1-3 Installing an Upgrade Microprocessor in PowerEdge 2400 Systems 1-4 Removing the Cooling ...
Microprocessor
Upgrade Installation Guide - Page 5
...\SlimFast\ts\ProcUpgrade\028WD\028wdeb0.fm
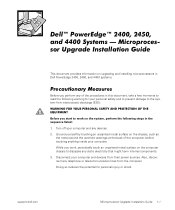
'HOOŒ 3RZHU(GJH DQG 6\VWHPV ³ 0LFURSURFHV VRU 8SJUDGH ,QVWDOODWLRQ *XLGH
This document provides information on upgrading and installing microprocessors in Dell PowerEdge 2400, 2450, and 4400 systems.
3UHFDXWLRQDU\ 0HDVXUHV
Before you perform any of the procedures in this document, take a few moments to read the following...
Similar Questions

Upgrading A Poweredge Sc1430 Server
My client presently has a PowerEdge SC1430 server at their office. It has a Xeon CPU 5110 @1.60 GHz....
My client presently has a PowerEdge SC1430 server at their office. It has a Xeon CPU 5110 @1.60 GHz....
(Posted by rlbconsulting21 6 years ago)

How To Upgrade Firmware On Dell Poweredge R810 Server Step By Step Tutorial
(Posted by jess2Destin 9 years ago)

Memory Error When Upgrading Dell Poweredge T310 Server
(Posted by zsgmpablit 10 years ago)


Hard Drive
I need to replace my Dell Hard Drives. I have (2) Dell 2400 Computers which I had for years. I have ...
I need to replace my Dell Hard Drives. I have (2) Dell 2400 Computers which I had for years. I have ...
(Posted by jstep45 12 years ago)