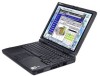
Dell Latitude CPX Support Question
Dell Latitude CPX Support Question
Find answers below for this question about Dell Latitude CPX - Notebook.Need a Dell Latitude CPX manual? We have 1 online manual for this item!
Question posted by Ariemaverick on August 8th, 2013
I Am Using An Old Lappy . It Just Shuts Off After 15-20 Min,
why is that ..any help
Current Answers
Answer #1: Posted by TommyKervz on August 8th, 2013 6:54 PM
TommyKervz

Member since:
January 10th, 2013 Points: 17,776,803

Member since:
January 10th, 2013 Points: 17,776,803
Greetings - Sounds like an overheating CPU issue (normally owing to a defect CPU fan, heatsink, dust and the like).
Related Dell Latitude CPX Manual Pages
Service Manual - Page 3

... this document to refer to change without the written permission of Dell Computer Corporation. Other trademarks and trade names may be used in this text: Dell, the DELL logo, and Latitude are trademarks of Dell Computer Corporation is subject to either the entities claiming the marks and names or their products. Dell...
Service Manual - Page 4
... Keyboard Assembly 14 Replacing the Keyboard Assembly 16 Microprocessor Module 18 Removing the Microprocessor Module 18 Replacing the Microprocessor Module 19 Display Assembly 20 Removing the Display Assembly 20 14.1-Inch Display Assembly Bezel and LCD Panel 21 Removing the 14.1-Inch Display Assembly Bezel 21 Removing the14.1-Inch LCD Panel 22...
Service Manual - Page 5
...Assembly Screws 14 Keyboard Assembly Removal 15 Keyboard and Track Stick Cables and Connectors 16 Microprocessor Module Removal 18 Display Assembly 20 14.1-Inch Display Assembly Bezel 21 ...10. Figure 6. Figure 9. Figure 17. Figure 8. Figure 14. Figure 18. Figure 11. Figure 15.
Figure 12. Figure 3. 12.1-Inch Display Assembly Bezel and LCD Panel 25 Removing the 12.1-Inch ...
Service Manual - Page 6
Figure 22. Palmrest Assembly Removal 31 Modem Assembly 33 System Board Assembly 35 Thermal Cooling Assembly Removal 36 Module Latch Assemblies Removal 37 Left Module Latch and Spring 38
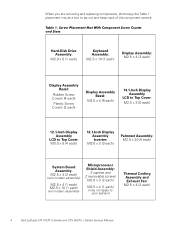
Table 1. Figure 23.
Figure 21. Figure 24. Table 2. Screw Placement Mat With Component Screw Counts and Sizes 4
Parts and Assemblies 6
vii Figure 25.
Figure 20.
Service Manual - Page 7
...prior training in PC troubleshooting techniques. A prerequisite for troubleshooting procedures and instructions on using this manual to test the computer system. Throughout this guide, blocks of your computer.
...are notes, notices, and cautions, and they are used as follows: NOTE: A NOTE indicates important information that helps you make better use of text may be accompanied by an icon and ...
Service Manual - Page 8
...instructions for removing and replacing field-replaceable components, assemblies, and subassemblies in this manual assumes that you use a book or something similar to exceed 180 degrees. It is recommended that a part can be allowed... angle of computer
support.dell.com
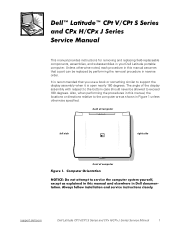
Dell Latitude CPt V/CPt S Series and CPx H/CPx J Series Service Manual
1 Also, when performing the procedures in your Dell...
Service Manual - Page 9
... Latitude CPt V/CPt S Series and CPx H/CPx J Series Service Manual
Disconnect all open application programs.
2. Remove any work in progress and close all other external cables from the PC Card slot.
7. Remove any attached peripherals. Save any installed PC Cards or plastic blanks from the computer.
6. If you cannot shut down the computer using the...
Service Manual - Page 11
...each)
12.1-Inch Display Assembly
LCD to Top Cover: M3.0 x 5 (4 each)
12.1-Inch Display Assembly Inverter:
M3.0 x 3 (3 each)
Palmrest Assembly: M2.5 x 20 (5 each)
System Board Assembly:
M2.5 x 4 (2 each) (w/o modem assembly)
M2.5 x 4 (1 each) M2.5 x 10 (1 each) (w/ modem assembly)
Microprocessor... Fan: M2.5 x 4 (2 each)
4
Dell Latitude CPt V/CPt S Series and CPx H/CPx J Series Service Manual
Service Manual - Page 12

... sure the ZIF connector is completely closed. Some of the connector.
2.
movable part of the connector.
1. support.dell.com
Dell Latitude CPt V/CPt S Series and CPx H/CPx J Series Service Manual
5 Grasp the interface cable and pull it releases the interface cable.
3. Use a small flat-blade screwdriver to disconnect the cable from them (see Figure 4).
Service Manual - Page 14
Hard-disk drive carrier
ASSY, CARR, HD
Palmrest assembly
ASSY, PLMRST, TPAD
20
Palmrest screws (5)
SCR, M2.5X20, PHH, LP, ZPS
19
Reserve battery
CUS, BTRY, RESERVE
Euro-language specific
KYBD, nn, iiii*, D-PTG, ..., FLX, TFT
12.1-inch flex cable
ASSY, CBL, FLX, W/EXTN,12.1
14 14 16 16
14 16, 17
support.dell.com
Dell Latitude CPt V/CPt S Series and CPx H/CPx J Series Service Manual
7
Service Manual - Page 20

... the socket. Lift the memory module out of the memory module socket just far enough for either the socket labeled DIMM A or the socket labeled...4. Memory modules are not interchangeable. Remove the memory module cover.
3. support.dell.com
Dell Latitude CPt V/CPt S Series and CPx H/CPx J Series Service Manual 13 they are keyed, or designed to disengage from its socket, carefully...
Service Manual - Page 22
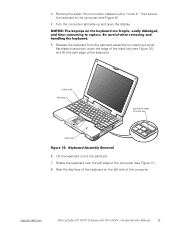
... on the left edge of the palmrest. 7. Turn the computer right-side up and open the display.
5. 3. support.dell.com
Dell Latitude CPt V/CPt S Series and CPx H/CPx J Series Service Manual 15 Release the keyboard from the palmrest assembly by inserting a small flat-blade screwdriver under the edge of the blank key (see Figure 9).
4.
Service Manual - Page 26

... 4-mm screw securing the shield brace (if present).
7.
support.dell.com
Dell Latitude CPt V/CPt S Series and CPx H/CPx J Series Service Manual 19 The tool fits on the left side of the board... pressure over the connector. NOTE: The microprocessor shield brace may not be present on your system uses a microprocessor shield with white marks on the front and back edge of the processor board (see...
Service Manual - Page 27
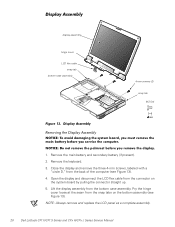
... display and disconnect the LCD flex cable from the bottom case assembly. NOTE: Always remove and replace the LCD panel as a complete assembly.
20 Dell Latitude CPt V/CPt S Series and CPx H/CPx J Series Service Manual Lift the display assembly from the connector on the bottom assembly (see Figure 13). 4. Remove the main battery and...
Service Manual - Page 28

... (6)
bezel latch
LCD flex cable
display-assembly top cover
3-mm screws (6)
M2.0x3 M2.5x4
1. Use a scribe to carefully pry the four rubber screw covers out of the four screw holes located at the... on the front of the display assembly (see Figure 14). support.dell.com
Dell Latitude CPt V/CPt S Series and CPx H/CPx J Series Service Manual 21 Remove the four 4-mm screws located at the top of...
Service Manual - Page 29

...bezel on a flat work surface. 3. Slide the cable through the opening .
22 Dell Latitude CPt V/CPt S Series and CPx H/CPx J Series Service Manual Lift and rotate the top of the LCD panel out of the top... hinge cover. 6. Pry the hinge-cover assembly apart slightly from the display assembly,
allowing just enough space for the flex cable to carefully pry the two plastic screw covers out of ...
Service Manual - Page 30

...cover assembly apart from the display assembly, allowing just enough space for the flex cable to the ...gently until it up with a small-blade screwdriver (see Figure 15).
If your replacement LCD panel is an IBM/Hitachi - ... pass through the opening .
5. support.dell.com
Dell Latitude CPt V/CPt S Series and CPx H/CPx J Series Service Manual 23 Find the manufacturer's name, either...
Service Manual - Page 31

... hand. 2. Do not force the LCD flex cable into the connector. Lay the LCD panel in the display. NOTE: Use a magnetic screwdriver to the top cover.
24 Dell Latitude CPt V/CPt S Series and CPx H/CPx J Series Service Manual Secure the right side first. 1. Place the bottom edge of the LCD panel in the bottom...
Service Manual - Page 33

... 3. Remove the three 3-mm screws securing the inverter to be
installed.
26 Dell Latitude CPt V/CPt S Series and CPx H/CPx J Series Service Manual Remove the inverter from the bottom of the hinge cover located ...the cable through the opening . 3. Remove the cable out from the display assembly, allowing just enough space for the flex cable to the left hinge of the LCD panel that secures ...
Service Manual - Page 34

... fold the cable at the crease so the word Torisan is facing up . If you are used .
The manufacturer is to be installed.
2. The words Torisan and Sharp are mounted reverse with ...Torisan LCD panel, fold the cable at the crease so the word Sharp is used . support.dell.com
Dell Latitude CPt V/CPt S Series and CPx H/CPx J Series Service Manual 27 Ensure that the name of the LCD panel that ...
Similar Questions

Dell Inspiron N5010 Wont Boot Start Up Just Shuts Down
(Posted by pacati 10 years ago)


My Dell Windows 7 Computer Just Shutts Off After 15- 20 Min Why
(Posted by Ariemaverick 10 years ago)
This Is A Windows 7 Dell Computer
I am using an old lappy . It just shuts off after 15-20 min
I am using an old lappy . It just shuts off after 15-20 min
(Posted by Ariemaverick 10 years ago)

My Dell Desktop Computer Just Blinks Amber On The Power Button. Whats The Issue.
Its an old computer... i don tknow the model .. I am 60 years old .. Please help with some easy step...
Its an old computer... i don tknow the model .. I am 60 years old .. Please help with some easy step...
(Posted by pritishuk2132 11 years ago)