
Dell Inspiron One 2320 Support Question
Dell Inspiron One 2320 Support Question
Find answers below for this question about Dell Inspiron One 2320.Need a Dell Inspiron One 2320 manual? We have 3 online manuals for this item!
Question posted by chriPooc on April 23rd, 2014
How To Factory Restore Dell Inspiron 2330 All In One
The person who posted this question about this Dell product did not include a detailed explanation. Please use the "Request More Information" button to the right if more details would help you to answer this question.
Current Answers
Related Dell Inspiron One 2320 Manual Pages
Quick Start Guide (PDF) - Page 1
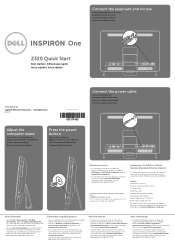
...teclado e o mouse
One
2320 Quick Start
Snel starten | Démarrage rapide Inicio rápido | Início rápido
Uniquely Dell support.dell.com/manuals | www.dell.com
2011 - 07
Printed...© 2011 Dell Inc. Customers in accordance with your desktop, click Start→ All Programs→ Dell Help Documentation or go to support.dell.com/manuals.
• To contact Dell for Mexico)
...
Owners Manual - Page 2
... trademarks and trade names may be used in this text: Dell™, the DELL™ logo, and Inspiron™ are either trademarks or registered trademarks of these materials in... refer to either potential damage to hardware or loss of data and tells you make better use of Dell Inc.; All rights reserved. Microsoft®, Windows®, and the Windows start button logo are trademarks ...
Owners Manual - Page 3
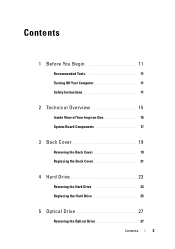
Contents
1 Before You Begin 11
Recommended Tools 11 Turning Off Your Computer 11 Safety Instructions 11
2 Technical Overview 15
Inside View of Your Inspiron One 15 System Board Components 17
3 Back Cover 19
Removing the Back Cover 19 Replacing the Back Cover 21
4 Hard Drive 23
Removing the Hard ...
Owners Manual - Page 11
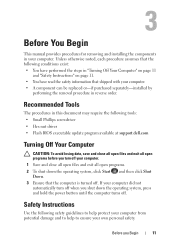
... in this document may require the following tools: • Small Phillips screwdriver • Hex nut driver • Flash BIOS executable update program available at support.dell.com
Turning Off Your Computer
CAUTION: To avoid losing data, save and close all open files and exit all open programs.
2 To shut down the...
Owners Manual - Page 12
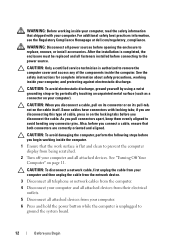
..., before you pull connectors apart, keep them evenly aligned to the power source. For additional safety best practices information, see the Regulatory Compliance Homepage at dell.com/regulatory_compliance.
WARNING: Before working inside your computer, read the safety information that shipped with locking tabs;
Owners Manual - Page 15
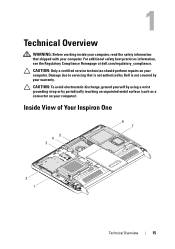
... working inside your computer, read the safety information that is not authorized by Dell is not covered by periodically touching an unpainted metal surface (such as a connector...technician should perform repairs on your computer).
Inside View of Your Inspiron One
45 3
6 7
2 1
Technical Overview
15 For additional safety best practices information, see the Regulatory Compliance Homepage...
Owners Manual - Page 19
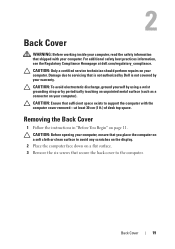
... face down on a flat surface. 3 Remove the six screws that is not authorized by Dell is not covered by periodically touching an unpainted metal surface (such as a connector on your ...your warranty. Back Cover
19 CAUTION: Ensure that shipped with the computer cover removed-at dell.com/regulatory_compliance.
2
Back Cover
WARNING: Before working inside your computer, read the safety ...
Owners Manual - Page 23
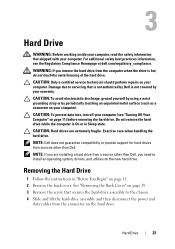
.... Exercise care when handling the hard drive. NOTE: Dell does not guarantee compatibility or provide support for hard drives from sources other than Dell. Removing the Hard Drive
1 Follow the instructions in ...you are extremely fragile.
Do not remove the hard drive while the computer is not covered by Dell is On or in "Before You Begin" on page 11) before removing the hard drive. ...
Owners Manual - Page 27
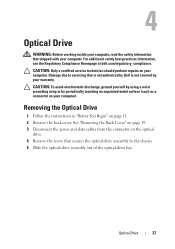
... instructions in "Before You Begin" on the optical
drive. 4 Remove the screw that secures the optical-drive assembly to servicing that is not authorized by Dell is not covered by periodically touching an unpainted metal surface (such as a connector on your computer). For additional safety best practices information, see the Regulatory...
Owners Manual - Page 31
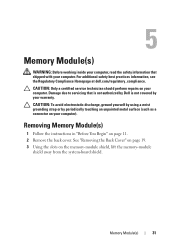
...Before working inside your computer, read the safety information that is not authorized by Dell is not covered by periodically touching an unpainted metal surface (such as a connector... computer). For additional safety best practices information, see the Regulatory Compliance Homepage at dell.com/regulatory_compliance. Removing Memory Module(s)
1 Follow the instructions in "Before You Begin...
Owners Manual - Page 35
... and lift
it away from the chassis.
6
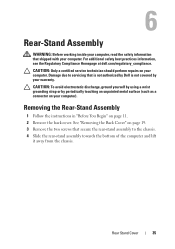
Rear-Stand Assembly
WARNING: Before working inside your computer, read the safety information that is not authorized by Dell is not covered by periodically touching an unpainted metal surface (such as a connector on page 11. 2 Remove the back cover. Rear Stand Cover
35 For...
Owners Manual - Page 37
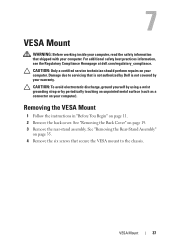
... the Rear-Stand Assembly"
on page 35. 4 Remove the six screws that is not authorized by Dell is not covered by periodically touching an unpainted metal surface (such as a connector on page 19. ... best practices information, see the Regulatory Compliance Homepage at dell.com/regulatory_compliance. CAUTION: To avoid electrostatic discharge, ground yourself by using a wrist grounding strap or by...
Owners Manual - Page 39
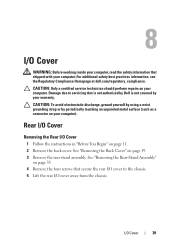
... away from the chassis. Rear I/O Cover
Removing the Rear I /O Cover
WARNING: Before working inside your computer, read the safety information that is not authorized by Dell is not covered by periodically touching an unpainted metal surface (such as a connector on page 19. 3 Remove the rear-stand assembly. CAUTION: To avoid electrostatic...
Owners Manual - Page 43
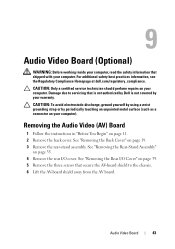
... safety best practices information, see the Regulatory Compliance Homepage at dell.com/regulatory_compliance. Damage due to servicing that secure the AV-...Only a certified service technician should perform repairs on page 39. 5 Remove the three screws that is not authorized by Dell is not covered by periodically touching an unpainted metal surface (such as a connector on page 19. 3 Remove the...
Owners Manual - Page 47
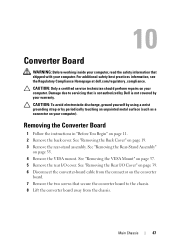
...Remove the two screws that secure the converter board to servicing that is not authorized by Dell is not covered by periodically touching an unpainted metal surface (such as a connector on your... For additional safety best practices information, see the Regulatory Compliance Homepage at dell.com/regulatory_compliance. Damage due to the chassis. 8 Lift the converter board away from the connector on...
Owners Manual - Page 51
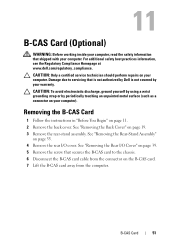
... Remove the screw that secures the B-CAS card to servicing that is not authorized by Dell is not covered by periodically touching an unpainted metal surface (such as a connector on ... B-CAS Card
51
For additional safety best practices information, see the Regulatory Compliance Homepage at www.dell.com/regulatory_compliance. See "Removing the Back Cover" on page 11. 2 Remove the back cover...
Owners Manual - Page 125
... for the F2 prompt to appear and
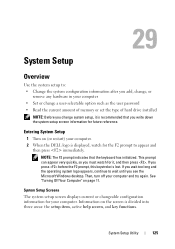
then press immediately. If you see the Microsoft Windows desktop. System Setup Screens The system setup screen displays current or changeable configuration information for your computer. 2 When the DELL logo is recommended that the keyboard has initialized. Entering System Setup
1 Turn on (or restart) your...
Owners Manual - Page 131
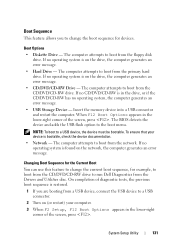
..., check the device documentation. • Network - The computer attempts to run Dell Diagnostics from the primary hard drive.
System Setup Utility
131
Changing Boot Sequence for...restart) your device is in the lower-right corner of diagnostic tests, the previous boot sequence is restored.
1 If you to a USB connector.
2 Turn on the drive, the computer generates an error...
Owners Manual - Page 132
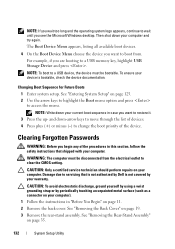
...section, follow the safety instructions that is not authorized by Dell is bootable, check the device documentation. The Boot Device... device you want to wait until you see the Microsoft Windows desktop.
Changing Boot Sequence for Future Boots 1 Enter system setup. ...wait too long and the operating system logo appears, continue to restore it. 3 Press the up- To ensure your device is not...
Owners Manual - Page 137
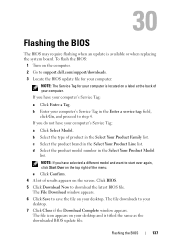
...save the file on a label at the back of the menu. Flashing the BIOS
137 b Enter your desktop. c Select the product brand in the Select Your Product Model
list.
If you have your computer's ...Click Enter a Tag. NOTE: If you do not have selected a different model and want to support.dell.com/support/downloads. 3 Locate the BIOS update file for your computer:
NOTE: The Service Tag for ...
Similar Questions


