Craftsman 21237 Support Question
Craftsman 21237 Support Question
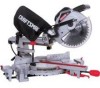
Find answers below for this question about Craftsman 21237 - 10 in. Sliding Miter Saw.Need a Craftsman 21237 manual? We have 1 online manual for this item!
Question posted by egmears on November 5th, 2013
Model 171 Router Will Not 'lock On'
The "lock on" button does not lock the on/off trigger in place
Current Answers
Related Craftsman 21237 Manual Pages
Operation Manual - Page 1
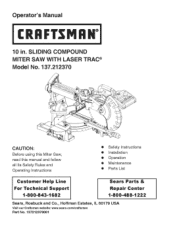
Operator's Manual
CRSFrSMSN°
10 in. SLiDiNG COMPOUND MITER SAW WiTH LASER TRAC ® Model No. 137.212370
CAUTION:
Before using this Miter Saw, read this manual and follow all its Safety Rules and Operating instructions
• Safety Instructions • installation
• Operation • Maintenance e Parts List
Customer Help ...
Operation Manual - Page 2
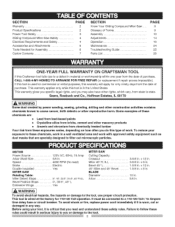
...Sliding Compound Miter Saw ..... S ECTION
PAG E
Warranty
2
Product Specifications
2
Power Tool Safety
3
Sliding Compound Miter Saw Safety
4
Electrical Requirements and Safety
4
Accessories and Attachments
6
Tools... FOR FREE REPAIR (or replacement if repair proves impossible). BLADE
Diameter 10 in . If this tool is worn, cut or
damaged in .
To avoid shock or fire...
Operation Manual - Page 4
..." section on wood and wood=like products.
22. I9. This miter saw in any way or any part of the blade.
21. See "MOTOR" in place and use solvents to the blade when the saw blade, the workpiece should be within 7-1/2 in this tool. NEVER apply lubricants to clean plastic parts. NEVER use blades larger...
Operation Manual - Page 6
...sets. Straight edge or a 3,/4 in place. Follow instructions that accompany accessories. Do not use of any cutting tool except 10 inch saw blades which meet the requirements under recommended...Hardware Department or see dotted figure).
Failure to modify this tool or create accessories not recommended for use with this tool.
r_
this miter saw blade guard in . t f I t
Gap from...
Operation Manual - Page 7
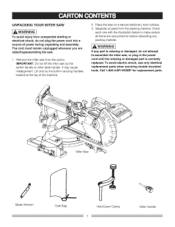
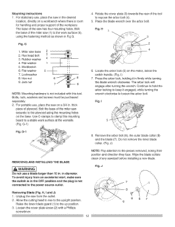
...tools. Call 1-800-4-MY-HOME e for before discarding any part is correctly replaced. Lift only by the switch handle or miter table handle. IA WARNING[
If any packing material. Separate all items are adjusting/assembling the saw.
Remove the miter saw...a source of the machine.
, Place the saw on a secure stationary work surface. 3. UNPACKING YOUR MITER SAW
[A WARNIN[ G
To avoid injury...
Operation Manual - Page 9

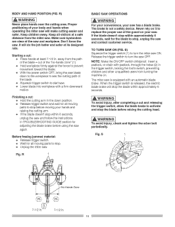
... replacement or removal. Used to mount the miter saw . Release the trigger to the blade arbor locking bolt. Locks the miter saw at a preset positive stop the miter saw to the right or left cutting position.
WRENCH...The distance between two saw blade 0 ° to its upright position when the handle is lowered into the workpiece by a spinning object in place and legible.
9 Always...
Operation Manual - Page 10
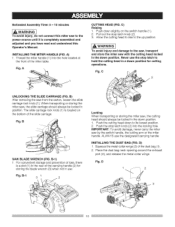
... the up position. The slide carriage lock knob (1) is a slot (1) in the rear of the slide carriage. B-l) 1. IMPORTANT: To avoid damage, never carry the miter saw from the carton, loosen the slide carriage lock knob (1). D) 1. D
I
2
10 Fig. Allow the cutting head to rise to the saw, transport and store the miter saw with the cutting head locked in the down slightly on...
Operation Manual - Page 11
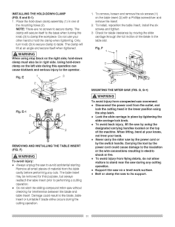
... to performing a cutting operation. • Do not start the sliding compound miter saw to its support.
11 The clamp will tilt at your other hand to the insulation or the wire connections resulting in place by tightening the slide carriage lock knob. = To avoid back injury, lift the saw by the power cord or by moving the...
Operation Manual - Page 12
... 4
//
. Wipe the blade collars clean of the miter saw (1) to a stable work surface (5), using the mounting ...lock (5) on the base. Continue to hold the arbor locking...tool to the power source outmet.
Allow the cutting head to rise to clamp this tool. For stationary use a blade larger than 10 in firmly while turning the blade wrench clockwise.
For portable use, place the saw...
Operation Manual - Page 13
...freely.
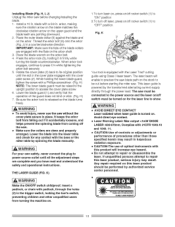
[A wARN.'JI G
• To avoid injury, never use the saw before starting the miter saw must be connected to the power source and the laser on the upper ... in place. IMPORTANT: Make sure the flats of the guard does not bind or stick. (Fig. H) 7. I 0 in a counterclockwise direction. Installing Blade (Fig. While holding it in the trigger switch, locking the tool's switch...
Operation Manual - Page 14
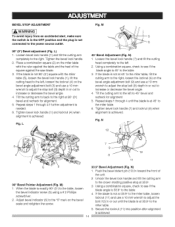
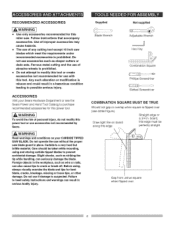
...176;) Bevel adjustment (Fig. Place a combination square (2) on the miter table
with the miter table (5), loosen the bevel lock handle (I . If the blade is not 90 ° (0°) square with the ruler against the saw blade. 3. L
45 &#...the table. 3.
Push the bevel detent pin (10) in or out until the blade is at 33.9 ° to the miter table. 5. BEVEL STOP ADJUSTMENT
[4 WARNNING
To ...
Operation Manual - Page 15
... readjusting: I . below for even and repetitive shallow cuts. 1. O) The sliding compound miter saw scale can be easily read, showing miter angles from 0 ° to 45 ° to the left, and 0... arm. P) 1. O) I . Adjust the stop knob (1) to see that position, turn the stop locking lever (2) to align the indicator (3) to the fence and readjust if needed. 5. If the blade touches...
Operation Manual - Page 16
... necessary.
=, Other conditions that may affect the way the miter saw works.
• Keep all clamps and locks are tight and there is spinning. • Remove all the way down .
Read and understand the Operator's Manual and labels affixed to this miter saw again. • Maintain tools with the accessory'. Make sure the switch is in...
Operation Manual - Page 17
.... Molding, for example, must be within 7-1/2 in a solidly braced, fixed position.
[A WARNIING
This machine is longer or wider than the basic miter saw 's table. • Secure work. Use a different tool for any miter saw to prevent sparking that must lie flat or be held . Keep your work to avoid small pieces that cannot be held...
Operation Manual - Page 18
... the holes (2) in .
18 The miter saw OFF. Starting a cut and releasing the trigger switch, allow the blade brake to turn the saw is not a safety device.
Keep children away. The brake is equipped with an automatic blade brake. S) Squeeze the trigger switch (I /2 in_'''°
7-1/2 in the trigger switch, locking the tool's switch, preventing children and other unqualified...
Operation Manual - Page 22
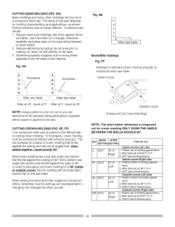
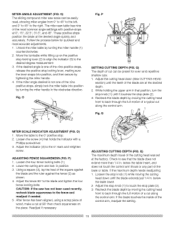
..., whenever possible, and place tape on compound miter saw iabie q
Bevel/Miter Settings Fig. CUTTING CROWN MOLDING (FIG.
When setting the bevel and miter angles for standard crown ... as shown. To achieve best results: I
_. Fig. The two surfaces on a compound miter saw . Miter saw table
Inside Corner
\\
OR
\
Outside Corner
Compound Cut Crown Moldings
NOTE: The chart below ...
Operation Manual - Page 23
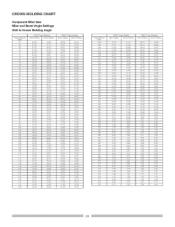
CROWN MOLDING CHART
Compound Miter Saw Miter and Bevel Angle Settings Wall to Crown Molding Angle
Angle Between V//ajJs 67 68 69 ?0 7i 72 73 74 75 76 77 78 79 80 ... 1638 16604 15 70 15 366 !502 14 62 14 34 14 O0 15666 1331 12 97 12 62 !229 11 93 11 59 1124 10 89 16 566 1820 9 85 950 915 8 80 845 8166 7766 7 4O 7 05 66766 6 35 600 565 ,5 30 4 94 4 59 4 24 3 89 3 53...
Operation Manual - Page 24

...8226; To avoid fire or toxic reaction, never use the saw is hard to -metal or metal-toplastic guard contact areas as required for your safety, this tool are lubricated with a damp cloth. GG) Replace both carbon ... at the rear pivot, greased at bal! Avoid excessive oil, to clean the miter saw .
Carefully remove the spring-loaded cap. HH
Link
LOWER BLADE GUARD
Do not use solvents on ...
Operation Manual - Page 26
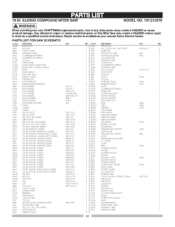
...©X OKRO OKR4 OKT© 0KTS OKUW OLU2 0@Q1 OS!S OS2B OSTZ OU03 23LN 23N F
Description SLIDE PLATE TRIGGER
CORD CLAMP
WARNING lABEL
COMPRE_ION
SPRING
COMPRESSION SPRING
COLLAR
SPRING WIRE FIOLD-DOWN C L,A_'V",PASS'Y
BEVEL STOP LOCKING SHAFT SH AN SLEEVE DUST BAG ASS'Y SPRING GUARD
IIANDLE
CENTER BO.T BLADE WRENCH L}N_AR MOTON...
Operation Manual - Page 28
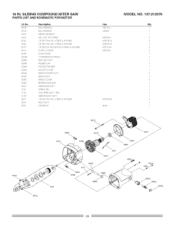
... 6201ZLU 6200Z M5'0.8-6 M5'0.8 1,5 M5'0.8 12 MS* 12-60 M5"0,8-6
M5"0.8_35 #AW
MODEL NO. 137.212370
Qfy I .D No. PAN biD. PAN HD. SOC SETSCREW CR. PAN HD. RE. SLiDiNG COMPOUND MITER SAW PARTS LIST AND SCHEMATIC FOR MOTOR
I ) 1 2 2 1 2 2 1 1 1 ... BALi= BEARING NEEDLE BEAR NG HEX. SCREW & WASHER CR, RE. 10 IN. BBER CAP PROTECTOR WIRE MOTOR COVER BRUSH HOLDER AgS'Y BRUSH ASS'Y...
Similar Questions

How To Replace A Broken Spring Of 71/4' Craftsman Slide Compound Miter Saw. Mode
I've a spring broken of 71/4" craftsman slide compound miter saw. Model 137.211940. Please tell me h...
I've a spring broken of 71/4" craftsman slide compound miter saw. Model 137.211940. Please tell me h...
(Posted by ccc692 8 years ago)

How Do I Adjust My Craftsman 10' Bandsaw Blade 214 Model
(Posted by Dougdavid 11 years ago)

Model 351.221160 Craftsman Premium Hybrid Table Saw
How do you separate the granite top from the base. The bolts are not visible on the front?
How do you separate the granite top from the base. The bolts are not visible on the front?
(Posted by tjmcleary1 11 years ago)

What Is A Sears Electronic 10'table Saw Worth
what is a sears electronic 10" table saw w/ext,& base model 113.290650 worth?, it works great
what is a sears electronic 10" table saw w/ext,& base model 113.290650 worth?, it works great
(Posted by mastercook76 11 years ago)