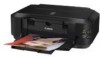
Canon iP4700 Support Question
Canon iP4700 Support Question
Find answers below for this question about Canon iP4700 - PIXMA Color Inkjet Printer.Need a Canon iP4700 manual? We have 1 online manual for this item!
Question posted by belmarbeachbums on September 14th, 2014
Cannot Remove Jam And No Jam Present.
I turn the machine on, jam light appears. Turn machine off immediately and then back on and jam light clears. Try to make a copy and machine runs for 5 seconds, jam light appears again and machine stops. Opened all access doors, removed cartridge, thoroughly examined interior, no debris found, but machine is not operable. Please help.
Current Answers
Answer #1: Posted by Odin on September 14th, 2014 7:27 AM
Odin

Member since:
April 10th, 2010 Points: 41,236,690

Member since:
April 10th, 2010 Points: 41,236,690
Although you feel there is "No Jam Present," there probably is a jam. See this Canon page for help in finding it.
Hope this is useful. Please don't forget to click the Accept This Answer button if you do accept it. My aim is to provide reliable helpful answers, not just a lot of them. See https://www.helpowl.com/profile/Odin.
Related Canon iP4700 Manual Pages
iP4700 series Getting Started - Page 1
Photo Printer
series
Getting Started
Read Me First
Make sure to read this manual before using the printer. Please keep it in hand for future reference.
iP4700 series Getting Started - Page 3
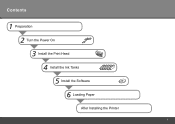
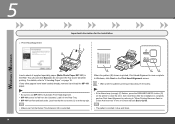
Contents
1 Preparation 2 Turn the Power On 3 Install the Print Head 4 Install the Ink Tanks 5 Install the Software 6 Loading Paper
After Installing the Printer
iP4700 series Getting Started - Page 4
..., resulting in malfunction.
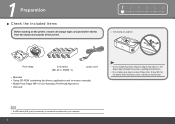
• Do not place any object on top of the printer. The object may fall on it. 1 Preparation
■ Check the Included Items
Before turning on the printer, remove all orange tapes and protective sheets from the inside the printer, resulting in malfunction.
• A USB cable (A-B type) is necessary to connect the...
iP4700 series Getting Started - Page 5
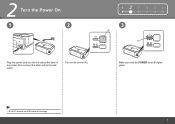
2 Turn the Power On
1
2
123 4 5 6
3
A B
Plug the power cord into the left side at this stage.
Turn on the printer (A). Make sure that the POWER lamp (B) lights green.
• Do NOT connect the USB cable at the back of the printer, then connect the other end to the wall outlet.
iP4700 series Getting Started - Page 6
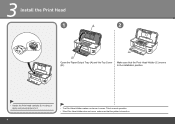
... Tray (A) and the Top Cover (B).
This is normal operation. • If the Print Head Holder does not move, make sure that the Print Head Holder (C) moves to it.
• The Print Head Holder makes a noise as it moves. Do not drop or apply excessive pressure to the installation position.
• Handle the...
iP4700 series Getting Started - Page 7

The printer may be some transparent or light blue ink on the inside of the bag the Print Head comes in, or the inside of the Print Head.
G
Remove the ...printer may not print properly if you touch them.
• There may not print properly if you touch it.
• Do not touch the inside of the Print Head Holder until it stops.
Be careful not to get ink on print quality. Remove...
iP4700 series Getting Started - Page 8
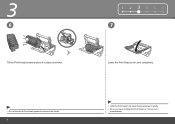
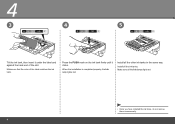
3
6
Tilt the Print Head forward and set it in place as shown.
• Do not knock the Print Head against the sides of the holder.
1 234 5 6 7
Lower the Print Head Lock Lever completely.
• Hold the Print Head Lock Lever firmly and lower it gently. • Once you have installed the Print Head, do not remove it
unnecessarily.
iP4700 series Getting Started - Page 9
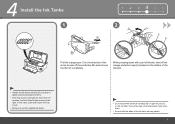
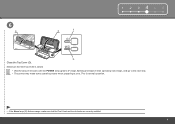
... ink may not print properly if you touch them .
• If the Top Cover is left thumb, twist off the protective film and remove the film (2) completely. While pressing down with your left open ink port (C) on the bottom of the ink tank; In this case, ... moves to them .
• Do not hold the sides of the ink tank.
• Handle the ink tanks carefully. The printer may splash.
iP4700 series Getting Started - Page 10
... the Ink lamps light red.
• Once you have installed the ink tanks, do not remove them unnecessarily.
Press the PUSH mark on the ink tank firmly until it under the label and against the back end of the label matches the ink tank. Make sure that the color of the slot. Make sure all...
iP4700 series Getting Started - Page 11
... closed.
• Wait for about 5 minutes until the POWER lamp (green) (F) stops flashing and stays lit then operating noise stops, and go to the next step. • The printer may make sure that the Print Head and the ink tanks are correctly installed. Make sure the Inner Cover (E) is normal operation.
• If the Alarm...
iP4700 series Getting Started - Page 12
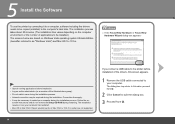
... Hardware or Found New Hardware Wizard dialog box appears:
• Quit all running applications before installation of applications to be installed.)
The screens below are not supported. 5 Install the Software
To use the printer by connecting it to a computer, software including the drivers needs to be copied (installed) to restart your computer during the...
iP4700 series Getting Started - Page 13
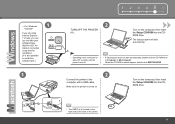
... appear, double-click MSETUP4.EXE.
2
Connect the printer to install this software later.)
1
1 2 3 456
2
TURN OFF THE PRINTER ... An internet connection is required for about 35 seconds until the printer turns off.
• If the program does not...Make sure the printer is located on the computer, then insert the Setup CD-ROM into the CDROM drive.
• The USB Port is turned on.
Turn...
iP4700 series Getting Started - Page 16
...have been loaded already, remove it in the on-screen manual: Basic Guide.
• Make sure that the cut corner (C) is complete, perform Print Head Alignment by referring to clear the error, then click ...ends (about 5 minutes).
• Be sure to "6 Loading Paper" on the printer to "When Printing Becomes Faint or Colors Are Incorrect" in the Rear Tray. • MP-101 has front and back ...
iP4700 series Getting Started - Page 17
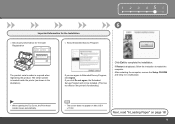
... The screen does not appear on Mac OS X v.10.3.9. If you click Do not agree, the Extended Survey Program will not be installed. (This has no effect on page 16!
15
Next, read "6 Loading Paper" on the printer's functionality.)
Click Exit to...If you can agree to Extended Survey Program, click Agree. After restarting the computer, remove the Setup CD-ROM and keep it in the illustration).
iP4700 series Getting Started - Page 18
B
D
E
2
3
G F
A H
C
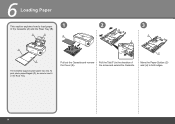
The Cassette supports plain paper (C) only.
Pull out the Cassette and remove the Cover (E). Pull the Tab (F) in the Cassette (A) and the Rear Tray (B).
Move the Paper Guides (G) and (H) to load it in the Rear Tray. 6 Loading ...
iP4700 series Getting Started - Page 19
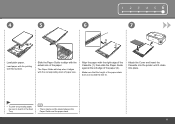
... mark of the paper (2). Attach the Cover and insert the Cassette into the printer until it clicks into place.
• To print on speciality paper, be sure to align with the printing side facing down.
The Paper Guide will stop when it in the Rear Tray.
• There may be a little space...
iP4700 series Getting Started - Page 20
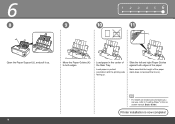
... paper stack does not exceed the line (L).
• For details on media sizes and types you can use, refer to both edges of the paper. Make sure that the height of the Rear Tray.
K
Move the Paper Guides (K) to "Loading Paper" in portrait orientation with the printing side facing up .
Slide...
iP4700 series Getting Started - Page 21
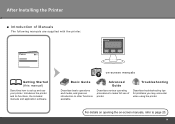
Introduces the printer and its functions, the included manuals and application software.
For details... use of Manuals
The following manuals are supplied with the printer. Troubleshooting
Describes troubleshooting tips for problems you may encounter when using the printer. After Installing the Printer
■ Introduction of printer. on -screen manuals, refer to other functions available....
iP4700 series Getting Started - Page 22
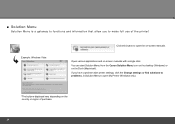
... a single click. Open various applications and on -screen manuals. If you to open the on -screen manuals with printer settings, click the Change settings or find solutions to problems. in Solution Menu to make full use of purchase.
20 You can start Solution Menu from the Canon Solution Menu icon on the...
iP4700 series Getting Started - Page 25
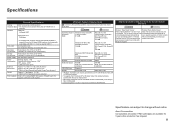
... to date with
Windows Update. Additional System Requirements for 5 years after production has stopped.
23 you keep your system up to date. Specifications are available for the On...8226; To upgrade from Windows XP to Windows Vista, first uninstall software bundled with the Canon inkjet printer.
• Macintosh: Hard Disk must Note: The on
not be displayed properly depending your
...
Similar Questions


What Is B-200 Error On Inkjet Printer Canon Pixma Ip4700
(Posted by duderredafe 10 years ago)

Both Power And Resume Lights Are Flashing Does Not Seem To Be A Paper Jam
Won't print both lights are flashing alteritively. Thanks Ken
Won't print both lights are flashing alteritively. Thanks Ken
(Posted by printerken 11 years ago)
Pixma Mp 150 Printer/copier/scan
this machine will copy fine but will not print from computer email .new ink cartridges have been in...
this machine will copy fine but will not print from computer email .new ink cartridges have been in...
(Posted by elkramer 12 years ago)

How Can I,myself, Clear The Ink Sump On My Canon Pixma Mp 210 Printer?
(Posted by nineak 12 years ago)