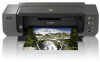
Canon PIXMA Pro9500 Mark II Support Question
Canon PIXMA Pro9500 Mark II Support Question
Find answers below for this question about Canon PIXMA Pro9500 Mark II.Need a Canon PIXMA Pro9500 Mark II manual? We have 1 online manual for this item!
Question posted by lgruber1 on September 19th, 2012
Blank Pages From Printhead Alignment
Just go the printer and ran installation. Got to the part of printhead alignment and get two blank pages. Comes back with error. Ran cleaning and deep cleaning the alignment again. Still blank pages. What do I do next besides returning printer.
Current Answers
Related Canon PIXMA Pro9500 Mark II Manual Pages
Getting Started - Page 1

Please keep it in hand for future reference. Photo Printer
series
Getting Started
Read Me First
Make sure to read this manual before using the printer.
Getting Started - Page 2

Contents
1 Preparation 2 Turn the Power On 3 Install the Print Head 4 Install the Ink Tanks 5 Install the Software 6 Loading Paper
After Installing the Printer
Getting Started - Page 3

... or material damage.
Observe these instructions. Caution Instructions that must be observed for operations that take some time to mark important instructions. Descriptions for safe operation. and other countries. Model Number: K10336 (Pro9500 Mark II) and/or other countries. • Windows Vista is a trademark or registered trademark of Apple Inc., registered in the...
Getting Started - Page 4

1 Preparation
■ Check the Included Items
Before turning on -screen manuals) • Warranty
• A USB cable is necessary to connect the printer with your computer.
power cord Print Head
ink tanks
• Manuals • Setup CD-ROM (containing the drivers, applications and on the printer, remove all the orange tapes and the protective sheets.
Getting Started - Page 5

... in malfunction.
• There are wheels on the back corners of the printer. It may fall into the printer when opening covers, resulting in the Front Tray. ■ Choosing a Location
12 3 4 5 6
15.7"/40 cm behind the printer.
• Do not install the printer where an object may fall on it back and forth easily. In...
Getting Started - Page 6

Confirm that the POWER lamp (B) lights blue.
• Do NOT connect the USB cable at this stage.
2 Turn the Power On
1
2
2 1
123 4 5 6
3
A
B
Plug the power cord into the back left of the printer, then connect the other end to the wall outlet. Turn on the printer (A).
Getting Started - Page 11

3 Install the ink tank
4
1 2 345 6
Insert the ink tank. Make sure the Ink lamp lights red.
Press the PUSH mark on the ink tank until it clicks into place.
Getting Started - Page 12

... (E) flashes orange, make sure that the Print Head and the ink tanks are correctly installed. The printer vibrates while the lamp is flashing because ink is stirred inside the printer.
• Match the labels when installing. • Once you have installed the ink tanks, do not remove them unnecessarily.
10
• Make sure the Inner...
Getting Started - Page 13

The screens below are not supported.
1 2 3 456
Windows (P.12) Macintosh (P.21)
11 5 Install the Software
To use the printer by connecting it left off when your computer during the installation process. • It may be copied (installed) to log on -screen instructions and do not remove the Setup CD-ROM during restarting. Follow
the on...
Getting Started - Page 14

...; Make sure that the POWER lamp (B) has stopped flashing and is off.
• It takes about 1 minute until the printer turns off. When the CD-ROM contents appear, double-click MSETUP4.EXE.
The setup program should start automatically, double-click the CD-ROM icon on ...
Getting Started - Page 19
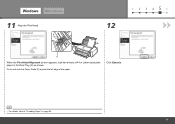
Click Execute.
• For details, refer to "6 Loading Paper" on page 28. 17 Windows Macintosh
11 Align the Print Head
12
1 2 3 456
C
D
When the Print Head Alignment screen appears, load two sheets of the paper.
Pinch and slide the Paper Guide (D) against the left edge of A4 or Letter-sized plain paper in the Rear Tray (C) as shown.
Getting Started - Page 20

... to the next step.
• Do not open the Top Cover (E) while printing. Printing of patterns printed on the Print Head Alignment screen. G
Make sure that the pattern shown is printed, then click Next on the first page are faint.
• Pull out the Front Tray Extension (F) beforehand. 18
• If you...
Getting Started - Page 21

Click Next only once. Follow the on-screen instructions to "Solution Menu" on the inside of the printer.
• Internet connection is located on page 31.
• If you are already registered, the Product Registration screen appears.
19 For details, refer to register your product serial number, which is required. (...
Getting Started - Page 22
...
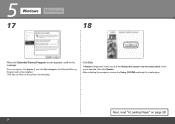
Macintosh
17
18
When the Extended Survey Program screen appears, confirm the message. If you can agree, click Agree. Next, read "6 Loading Paper" on the printer's functionality.)
Click Exit.
If you click Do not agree, the Extended Survey Program will not be installed. (This has no effect on page 28!
20
Getting Started - Page 25

The Print Head Alignment screen appears after the computer has been restarted.
• During installation, follow any on-screen instructions to install the software.
23
Installation starts. When the Start Setup screen appears, click Execute.
Windows Macintosh
7
8
1 2 3 456
9
Read the License Agreement screen carefully and click Yes. Click Restart.
Getting Started - Page 26

Pinch and slide the Paper Guide (B) against the left edge of A4 or Letter-sized plain paper in the Rear Tray (A) as shown. Click Execute.
• For details, refer to "6 Loading Paper" on page 28. 24 5 Windows
Macintosh
10 Align the Print Head
11
A
B
When the Print Head Alignment screen appears, load two sheets of the paper.
Getting Started - Page 27

... the next step.
• Do not open the Top Cover (C) while printing. Printing of patterns printed on the first page are faint.
• Pull out the Front Tray Extension (D) beforehand.
• If you align the Print Head automatically again, patterns different from those shown above may be printed.
• When Print Head...
Getting Started - Page 28

...details, refer to
"Solution Menu" on the inside of the printer.
• Internet connection is located on page 31. • If you are already registered, the Product Registration.... 26
Click Next. Follow the on-screen instructions to the Internet, the user registration page appears. If connected to register your product serial number, which is required. (Connection fees apply.) • ...
Getting Started - Page 29

If you click Do not agree, the Extended Survey Program will not be installed. (This has no effect on the printer's functionality.)
Click Exit.
Remove the Setup CD-ROM and keep it in a safe place.
• The screen does not appear on page 28!
27 Next, read "6 Loading Paper" on Mac OS X v.10.3.9.
If...
Getting Started - Page 32

on -screen manuals, refer to page 31.
Safety and Environment Information
For proper use of printer. Introduces the printer and its functions, the included manuals and application software.
Describes various operating procedures to set up and use your printer.
30 After Installing the Printer
■ Manuals
Safety Precautions
For details on opening the on -screen manuals
Basic...
Similar Questions

Printing Top Of Cover.
Hi; How can I get my canon 410 Pixma to print several pages from the top of the printer.Thanks so mu...
Hi; How can I get my canon 410 Pixma to print several pages from the top of the printer.Thanks so mu...
(Posted by BevnLes 8 years ago)

Will The Pixma Mg2100 Work With Just A Black Cartridge
(Posted by joneseagrog 9 years ago)

Canon Pixma Mp495 Won't Print After I Installed Ink
(Posted by seldosiso 10 years ago)


Serial Number
Where is the serial number on the canon PIXMA Pro 9500 Mark II printer?
Where is the serial number on the canon PIXMA Pro 9500 Mark II printer?
(Posted by basanders 12 years ago)