Canon PIXMA Pro9500 Mark II Support Question
Canon PIXMA Pro9500 Mark II Support Question
Find answers below for this question about Canon PIXMA Pro9500 Mark II.Need a Canon PIXMA Pro9500 Mark II manual? We have 1 online manual for this item!
Question posted by basanders on April 18th, 2012
Serial Number
Where is the serial number on the canon PIXMA Pro 9500 Mark II printer?
Current Answers
Related Canon PIXMA Pro9500 Mark II Manual Pages
Getting Started - Page 1

Photo Printer
series
Getting Started
Read Me First
Make sure to read this manual before using the printer. Please keep it in hand for future reference.
Getting Started - Page 2

Contents
1 Preparation 2 Turn the Power On 3 Install the Print Head 4 Install the Ink Tanks 5 Install the Software 6 Loading Paper
After Installing the Printer
Getting Started - Page 3

....
• Microsoft is a registered trademark of Microsoft Corporation. • Windows is a trademark or registered trademark of Microsoft Corporation in personal injury or material damage. Model Number: K10336 (Pro9500 Mark II) Instructions that must be observed for operations that , if ignored, could result in the U.S. and/or other countries. • Adobe, Adobe Photoshop, Adobe RGB...
Getting Started - Page 4

1 Preparation
■ Check the Included Items
Before turning on -screen manuals) • Warranty
• A USB cable is necessary to connect the printer with your computer.
power cord Print Head
ink tanks
• Manuals • Setup CD-ROM (containing the drivers, applications and on the printer, remove all the orange tapes and the protective sheets.
Getting Started - Page 5

... are wheels on the back corners of the printer. The object may fall into the printer when opening covers, resulting in the Front Tray. Lift the front of the printer. ■ Choosing a Location
12 3 4 5 6
15.7"/40 cm behind the printer.
• Do not install the printer where an object may fall on it back and...
Getting Started - Page 6

2 Turn the Power On
1
2
2 1
123 4 5 6
3
A
B
Plug the power cord into the back left of the printer, then connect the other end to the wall outlet. Confirm that the POWER lamp (B) lights blue.
• Do NOT connect the USB cable at this stage. Turn on the printer (A).
Getting Started - Page 7

.... (This is turned on.
The Front Tray (B) opens. This is normal operation. • If the Print Head Holder does not move, make sure that the printer is where you install the Print Head.)
• Handle the Print Head carefully.
Getting Started - Page 11

3 Install the ink tank
4
1 2 345 6
Insert the ink tank. Make sure the Ink lamp lights red.
Press the PUSH mark on the ink tank until it clicks into place.
Getting Started - Page 12

... while the lamp is flashing because ink is stirred inside the printer.
• Match the labels when installing. • Once you have installed the ink tanks, do not remove them unnecessarily.
10
• Make sure the Inner ...
Getting Started - Page 13

... copied (installed) to log on -screen instructions and do not remove the Setup CD-ROM during the installation process. 5 Install the Software
To use the printer by connecting it left off when your computer during restarting.
Getting Started - Page 14

... computer, then insert the Setup CDROM into the CD-ROM drive. The dialog box may close. In this case, proceed from .
12
TURN OFF THE PRINTER (A).
• Make sure that the POWER lamp (B) has stopped flashing and is off.
• It takes about 1 minute until the...
Getting Started - Page 16

... from Custom Install. (Windows Vista SP1 or later.) • The XPS Printer Driver is a printer driver suitable for printing High Dynamic Range images (full 16-bit
workflow) using Easy-PhotoPrint Pro.
• When installing the XPS Printer Driver, select the IJ Printer Driver at the same time.
• Move the cursor over items to display...
Getting Started - Page 18
... appears on the screen.
• The USB port is located on the right side of the printer. 16
• It takes about 30 seconds for the POWER lamp to the computer with a USB... , then confirm the message.
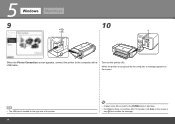
5 Windows
Macintosh
9
10 A
When the Printer Connection screen appears, connect the printer to light blue.
• If installation does not continue after 10 minutes, click Help on the...
Getting Started - Page 21

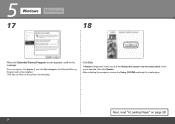
... may take a while for the next screen to register your product serial number, which is located on page 31.
• If you are already registered, the Product Registration screen appears.
19
If connected to "Solution Menu" on the inside of the printer.
• Internet connection is required. (Connection fees apply.)
• To register...
Getting Started - Page 22
... Program will not be installed. (This has no effect on page 28!
20 If you can agree, click Agree. Next, read "6 Loading Paper" on the printer's functionality.)
Click Exit. If Restart is displayed, make sure that the Restart the system now (recommended) check box is selected, then click Restart.
5 Windows
Macintosh...
Getting Started - Page 23

... not open automatically, double-click the CANON_IJ icon on the desktop.
• The USB port is turned on. Turn on the right side of the printer. 21
Double-click the Setup icon.
Make sure the printer is located on the computer, then insert the Setup CD-ROM into the CDROM drive.
Getting Started - Page 28

...; Internet connection is required. (Connection fees apply.) • To register later, click Cancel. You will need your printer. For details, refer to register your product serial number, which is located on page 31. • If you are already registered, the Product Registration screen appears. If connected to the Internet, the user registration ...
Getting Started - Page 29

Next, read "6 Loading Paper" on the printer's functionality.)
Click Exit.
Windows Macintosh
16
17
1 2 3 456
When the Extended Survey Program screen appears, confirm the message. If you click Do not agree, the ...
Getting Started - Page 31

Printer installation is now complete!
• You can print on -screen manual: Basic Guide.
29 For details on how to load paper in the Front Tray, ...
Getting Started - Page 35

...XP or 2000 pre-installed.
• Easy-PhotoPrint Pro is a software plug-in for the on-screen ...Windows Vista, first uninstall software bundled with the Canon inkjet printer.
• Macintosh: Hard Disk must be displayed... Note: Operation can be guaranteed on Photo Paper Plus Glossy II.
Internet Explorer version.
Specifications
General Specifications
Printing resolution (dpi)...
Similar Questions

Canon Pixma Pro-10 Printer Starting Instructions
How do I start up my Canon Pixma Pro-10 printer? I plugged it in and pushed the power button. Now wh...
How do I start up my Canon Pixma Pro-10 printer? I plugged it in and pushed the power button. Now wh...
(Posted by lindalenz 7 years ago)

Printing Top Of Cover.
Hi; How can I get my canon 410 Pixma to print several pages from the top of the printer.Thanks so mu...
Hi; How can I get my canon 410 Pixma to print several pages from the top of the printer.Thanks so mu...
(Posted by BevnLes 8 years ago)

Will Pixma Pro-10 Work With Windows 7 ?
Will PIXMA PRO-10 work with Windows 7 ?
Will PIXMA PRO-10 work with Windows 7 ?
(Posted by Anonymous-147685 9 years ago)

Can You Use Heavy Paper In The Front Tray Of The Pixma Pro 9000 Mark 11 Printer
(Posted by bobmateo 9 years ago)

Is Pixma Pro 9000 Mark Ii Adobe Rgb Capable
(Posted by fabiwus 10 years ago)