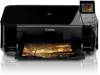
Canon PIXMA MG5120 Support Question
Canon PIXMA MG5120 Support Question
Find answers below for this question about Canon PIXMA MG5120.Need a Canon PIXMA MG5120 manual? We have 1 online manual for this item!
Question posted by fresca48 on April 4th, 2014
Pixma Mg5300 Scan Bed Cover Won't Close
Just started to set up after unpacking. Lifted the Scanner bed cover to remove plastic packing material, now the left white arm holding the bed won't close down. Is there another lever to push so it would close? Thanks in advance.
Current Answers
Related Canon PIXMA MG5120 Manual Pages
MG5120 series Getting Started - Page 1
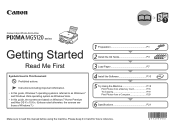
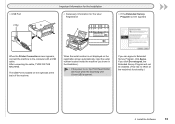
... sure to read this manual before using the machine. Please keep it in This Document
Prohibited actions.
Canon Inkjet Photo All-In-One
series
Getting Started
Read Me First
Symbols Used in hand for future reference.
MG5120 series Getting Started - Page 2
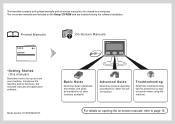
... details on opening the on a computer. Printed Manuals
On-Screen Manuals
•Getting Started (this manual)
Describes how to other functions available. Model Number: K10358 (MG5120)
Basic Guide
Describes basic operations and media, and gives an introduction to set up and use of machine. The on-screen manuals are included on the Setup...
MG5120 series Getting Started - Page 3
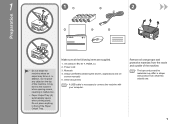
...and protective materials may ...the machine when opening covers, resulting in malfunction.
• Paper Output Tray (A) automatically opens when printing starts. It may fall ...on - Power cord 3. Other documents
• A USB cable is necessary to connect the machine with your computer. Manuals 4. Setup CD-ROM (containing the drivers, applications and on it. Remove...
MG5120 series Getting Started - Page 4
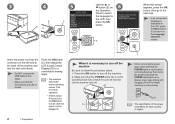
...region. Operating noise may continue for up or flashes may make sure that the POWER lamp is closed.
Press the ON button (C), then adjust the LCD (Liquid Crystal Display) (D) to work ... this stage.
• Make sure that the Document Cover (B) is not lit before removing the plug. Make sure that the POWER lamp (G) is displayed on the left side at the back of the Print Head, resulting ...
MG5120 series Getting Started - Page 5
... Scanning Unit (Cover) (B) until it with the Scanning Unit (Cover).
Go to on . For details, refer to to the next page.
The Print Head Holder (D) moves to the installation position. If the Print Head Holder does not move, make sure that the machine is turned on page 2 in "1 Preparation". Close the Document Cover (C) and lift it stops...
MG5120 series Getting Started - Page 6
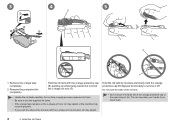
Remove the orange tape completely.
2. Do not push the sides of the ink tank.
• Do not touch the inside (G) of ...
3
4
5
E
F
G
H
1. The ink may stain your hands if you push the sides of the orange protective cap or the open ink port (H).
Remove the protective film completely. Hold the ink tank by its sides and slowly twist the orange protective cap 90 degrees horizontally...
MG5120 series Getting Started - Page 7
... remove them unnecessarily.
• If the Print Head Holder moves to the color order indicated on the ink tank firmly until it under the label and against the back end of the label matches the ink tank.
• Install in the same way according to the right, close and reopen the Scanning Unit (Cover...
MG5120 series Getting Started - Page 8

... shown in the Cassette by referring to "3 Load Paper" on the LCD, make some operating noises when preparing to the next step. 9
10
Lift the Scanning Unit (Cover) slightly, then gently close it. To restore the display, press any button except the ON button.
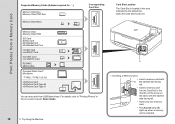
2 Install the Ink Tanks
Load plain paper in the illustration...
MG5120 series Getting Started - Page 9
To load specialty paper including photo paper, refer from on page 9.
31
2
3
C
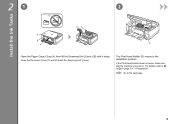
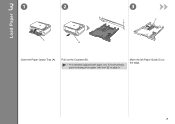
Load Paper
A B
Close the Paper Output Tray (A).
Move the left Paper Guide (C) to the edge.
Pull out the Cassette (B).
• The Cassette supports plain paper only.
MG5120 series Getting Started - Page 10
... the Cassette slowly into place.
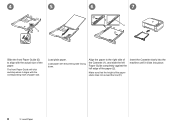
3 Load Paper 4
5
D
6
7
2 E
1
Slide the front Paper Guide (D) to the right side of the Cassette (1), and slide the left Paper Guide completely against the left edge of the paper (2). Load plain paper. Load paper with the actual size of the paper stack does not exceed the line (E). Make...
MG5120 series Getting Started - Page 11
... up.
• Load specialty paper including photo paper in the on how to handle paper, refer to both edges of the Rear Tray (H).
Slide the left and right Paper Guides against both edges. 8
9
3
2
F
1
G
10
11
I ).
• For details on -screen manual: Basic Guide after installation is complete.
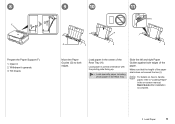
3 Load Paper
Make sure...
MG5120 series Getting Started - Page 12
... to on as the administrator (or a member of application software to the computer's hard disk. Remove the USB cable connected to "6 Specifications".
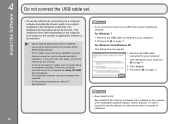
□ If you connect the machine via USB cable before...; Quit all running applications before installing the software:
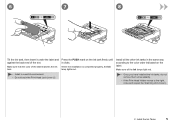
For Windows 7
1. If the dialog box closes, proceed to on page 11.
□ Easy-WebPrint EX Easy-WebPrint EX is Web print ...
MG5120 series Getting Started - Page 15
... for the User Registration
B
□ If the Extended Survey Program screen appears
When the Printer Connection screen appears, connect the machine to Extended Survey Program, click Agree.
When the serial... opened.
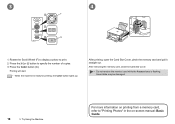
If you click Do not agree, the Extended Survey Program will move when the Scanning Unit (Cover) (B) is on the right side at the back of the machine. If you can ...
MG5120 series Getting Started - Page 16
... is necessary to restart the computer before scanning using the machine.
For Macintosh Solution Menu EX starts when clicking OK in the Custom Install screen. Remove the Setup CD-ROM and keep it... in , then select XPS Printer Driver in the Canon Solution Menu EX dialog. Proceed to start using the Operation Panel on the country or region of the XPS Printer Driver, refer to complete the...
MG5120 series Getting Started - Page 18
...A
□ Inserting a Memory Card • Insert a memory card with
B the labeled side facing left.
• Insert a memory card into the Card Slot in the direction of the arrow on the label, with the labeled... side facing left.
• Insert only one memory card.
• The Access lamp (B) lights up when a memory...
MG5120 series Getting Started - Page 19
... 15 cm) photo paper in the Rear Tray (C) in portrait orientation with the printing side facing up , then close the Card Slot Cover.
• For details, refer from in "3 Load Paper" on the memory card are read and the screen... the number of copies to print appears. While the HOME screen appears, open the Card Slot Cover, insert a memory card into the Card Slot, the photos on page 9.
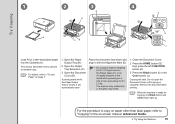
5 Try Using...
MG5120 series Getting Started - Page 20
Rotate the Scroll Wheel (F) to display a photo to specify the number of copies. 3.
Printing will start.
• When the machine is flashing. After removing the memory card, close the Card Slot Cover.
• Do not remove the memory card while the Access lamp is ready for printing, the Color button lights up. After printing, open the...
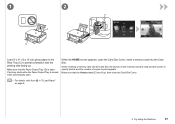
MG5120 series Getting Started - Page 21
... Paper Output Tray (B).
2. The scanner may malfunction or the glass may break.
1. Press the HOME button (G), then press the left FUNCTION button (H).
3. Remove the document after printing.
• When the machine is complete. If printing starts while the Paper Output Tray is closed, it with a force exceeding 4.4 lb / 2.0 kg.
Close the Document Cover.
2. Press the Black button...
MG5120 series Getting Started - Page 22
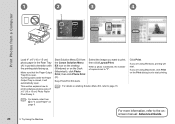
...Guide. When a photo is selected, the number of copies is set to "1".
• For details on starting Solution Menu EX, refer to print borderless photos using 4" x 6" (10 ...(A) in "3 Load Paper" on
page 9. If printing starts while the Paper Output Tray is open . Make sure that the Paper Output Tray (B) is closed, it will start printing.
20
5 Try Using the Machine
For more information...
MG5120 series Getting Started - Page 23
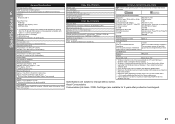
...- 400 % (1 % unit)
Scan Specifications
Scanner driver TWAIN/WIA (for Windows 7/Windows Vista/Windows XP) Maximum scanning size A4/Letter, 8.5'' X 11.7''/216 X 297 mm Scanning resolution Optical resolution (horizontal X vertical...or lower to Mac OS X
v.10.6, install software bundled with the Canon inkjet printer. • Internet Explorer 7 or later is required to change without notice. ...
Similar Questions

The Printer Door Just Started To Slam Down When Printing, Now It Will Not Close
This just happened all by itself. One day when I went to print the door slam down real hard, now the...
This just happened all by itself. One day when I went to print the door slam down real hard, now the...
(Posted by bnitzko 7 years ago)


