
Canon PC940 Support Question
Canon PC940 Support Question
Find answers below for this question about Canon PC940.Need a Canon PC940 manual? We have 1 online manual for this item!
Question posted by Anonymous-142534 on August 30th, 2014
Plugged In But Does Not Turn On Make A Cligging Sound
The person who posted this question about this Canon product did not include a detailed explanation. Please use the "Request More Information" button to the right if more details would help you to answer this question.
Current Answers
Related Canon PC940 Manual Pages
Service Manual - Page 29
...wipe it.
Caution: • You cannot start feeder cleaning mode while the machine is making copies or if an error
exists. • The auto power-off mechanism does not... key.
• Copy paper will indicate 'U6'. Feeding Belt (ADF type) b.1 Cleaning in Feeder Cleaning Mode 1) Turn on the original tray of blank copy paper (A4/LTR) on the machine, and hold down the Copy Density Mode Selection...
Service Manual - Page 62

Before starting the work, turn off the power switch and disconnect the power plug for
safety. 2.
CHAPTER 3 EXPOSURE SYSTEM
III. Identify the screws by reversing the steps used to disassemble
it. 3. A few of the screws used to ensure electrical ...
Service Manual - Page 81

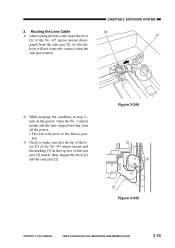
Removing the Lens Cable 1) Turn on the power; CHAPTER 3 EXPOSURE SYSTEM
[1]
[1]
[2]
Figure 3-336
COPYRIGHT © 1999 CANON INC. Lens Drive Assembly
1. CANON PC800s/900s REV.0 AUG. 1999 PRINTED IN JAPAN (IMPRIME AU JAPON)
3-31 when the lens has
moved to the Direct position, disconnect the power plug. 2) Remove the copyboard glass. (See Chapter...
Service Manual - Page 85
2. CHAPTER 3 EXPOSURE SYSTEM
[2] [1]
2) While keeping the condition in step 1), turn off the power. • The lens will move to the Direct position.
3) Check to make sure that the lever will not come into contact when the cam gear rotates). then, engage the lever [1] and the cam gear [2].
CANON PC800s/900s ...
Service Manual - Page 90
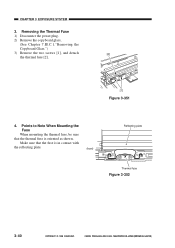
Make sure that the thermal fuse is in contact with
the reflecting plate.
(front)
Reflecting plate
Thermal fuse
Figure 3-352
3-40
COPYRIGHT © 1999 CANON INC. Removing the Thermal Fuse
1) Disconnect the power plug.
2) Remove the copyboard glass.
(See Chapter 7.III.C.1."Removing the
Copyboard Glass.")
3) Remove the two screws [1], and detach
[2]
the thermal...
Service Manual - Page 114
...place, place five blank sheets of copy paper, and close the copyboard cover.
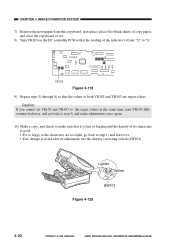
8) Turn VR103 on the DC controller PCB so that the reading of both VR102 and VR103 are too light, ...cannot set VR102 and VR103 to the target values at the same time, turn VR103 fully counterclockwise, and go back to step 5) and make adjustments once again.
10) Make a copy, and check to step 1) and start over. • If...
Service Manual - Page 116

... © 1999 CANON INC. CANON PC800s/900s REV.0 AUG. 1999 PRINTED IN JAPAN (IMPRIME AU JAPON) CHAPTER 4 IMAGE FORMATION SYSTEM
II. Before starting the work, turn off the power switch and disconnect the power plug for
safety. 2.
tors come with the following in mind: 1. !
Service Manual - Page 118
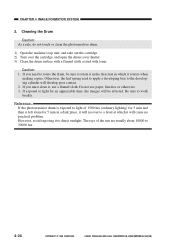
... or clean the photosensitive drum.
1) Open the machine's top unit, and take out the cartridge. 2) Turn over the cartridge, and open the drum cover shutter 3) Clean the drum surface with a flannel cloth coated...time, the images will develop poor contact. 2. If you must clean it rotates when
making copies. CHAPTER 4 IMAGE FORMATION SYSTEM
2. Do not use a flannel cloth. CANON PC800s/900s REV.0 AUG...
Service Manual - Page 120

..., and select a default ratio of 141%. • Press the Copy Start key. • When the lens has moved to the farthest left, turn off the power. • Disconnect the power plug.
2) Remove the front lower cover. (See Chapter 7.III.A.2."Removing the Front Lower Cover.")
3) Remove the cartridge. 4) Remove the DC controller PCB...
Service Manual - Page 130
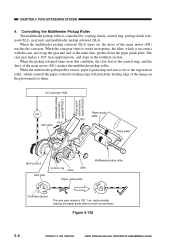
... the gear unit and, at the toothless section.
CHAPTER 5 PICK-UP/FEEDING SYSTEM
4.
The cam gear makes a 180° turn (approximate), causing the paper guide plate to rotate in this condition, the claw leaves the control ring, ... guide plate
Multifeeder pickup roller
Toothless section
The cam gear makes a 180˚ turn (approximate), and stops at the same time, pushes down .
Service Manual - Page 142

...
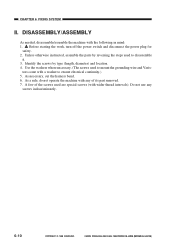
it. 3. Do not use any of the screws used are special screws (with the following in mind: 1. ! Before starting the work, turn off the power switch and disconnect the power plug for
safety. 2.
Unless otherwise instructed, assemble the parts by type (length, diameter) and location. 4. Use the washers where necessary. (The screws...
Service Manual - Page 145

...through the hole to push the claw while holding the shaft in place so as it can, turn off the power switch. 3) Mount the multifeeder; then, se-
lect the multifeeder, and ... unit, perform the next steps first: 1) Turn on the power switch;
Caution: When removing the pickup roller, be sure to remove the pickup roller [11]. then, make a copy using the multifeeder. Pickup gear unit...
Service Manual - Page 152

.... 2) Remove the two screws [1], and detach
the multifeeder unit [2].
[1] [2]
[1]
Figure 5-219
Caution: When mounting the multifeeder unit, perform the following first: 1) Turn on the power switch; then, se- then, make a copy using the multifeeder. CANON PC800s/900s REV.0 AUG. 1999 PRINTED IN JAPAN (IMPRIME AU JAPON) Multifeeder Assembly
1. lect the multifeeder, and...
Service Manual - Page 174
... any
screws indiscriminately.
6-10
COPYRIGHT © 1999 CANON INC. Unless otherwise instructed, assemble the parts by type (length, diameter) and location. 4.
Before starting the work, turn off the power switch and disconnect the power plug for
safety. 2. As necessary, cut the harness band. 6.
CHAPTER 6 FIXING SYSTEM
II.
Service Manual - Page 182
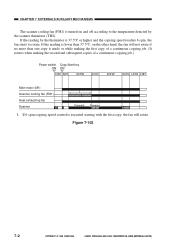
...If the reading is lower than one copy is made or while making the first copy of a continuous copying job. (It rotates when making the second and subsequent copies of a continuous copying job.)
Power ... the fan starts to rotate.
CHAPTER 7 EXTERNALS/AUXILIARY MECHANISMS
The scanner cooling fan (FM1) is turned on the other hand, the fan will not rotate if no more than 37.5°C, on and ...
Service Manual - Page 187
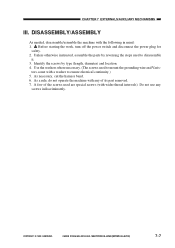
Use the washers where necessary. (The screws used to ensure electrical continuity.) 5.
As necessary, cut the harness band. 6.
Before starting the work, turn off the power switch and disconnect the power plug for
safety. 2.
CANON PC800s/900s REV.0 AUG. 1999 PRINTED IN JAPAN (IMPRIME AU JAPON)
7-7 tors come with wider thread intervals). DISASSEMBLY...
Service Manual - Page 224

... PC800S/900S REV.0 AUG. 1999 PRINTED IN JAPAN (IMPRIME AU JAPON) As necessary, cut the harness band. 6. Before starting the work, turn off the power switch and disconnect the power plug for
safety. 2.
Use the washers where necessary. (The screws used are special screws (with the following in mind: 1. ! A few of its...
Service Manual - Page 249

... only.
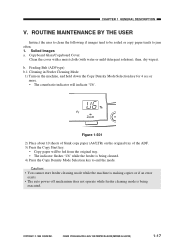
ADF auxiliary tray ADF auxiliary tray
18 Connect the power cord to the power cord connector.
19 Connect the power plug to make sure that the AE and DIRECT indica- tors turn on the Count/Zoom Set key will
indicate the correct ratio.
cates '1'.
• Press the Count/Zoom Set key and...
Service Manual - Page 254
...to fully close lever found on the power, and press the Default Ratio key to make sure that the machines is replaced.
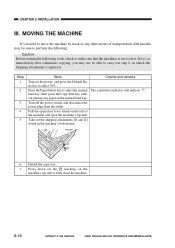
MOVING THE MACHINE
If you may not be sure...The count/ratio indicator will indicate ' '. Pull the open the machine's top unit.
Turn off the power switch, and disconnect the power plug from the outlet. If it is, as immediately after installation, be able to carry out...
Service Manual - Page 270

Leading Edge Non-Image Width
Make adjustments so that the width is copied in Direct. Mechanical
1. Copier a.
Caution: If you have performed this adjustment, be sure to adjust the image leading edge margin.
2.0 ± 1.5mm
Figure 11-201 1) Turn VR105 on the DC controller PCB so that the leading edge non-image width is...
Similar Questions

I Am Hearing A Grinding Sound When I Try To Use The Copier.
(Posted by Patrishr 1 year ago)

I Have A Canon Pc940 Copier Which Is Making A Noise Like Gears Slipping And The
The copies are coming out blurred and unreadable. What could be the cause of this ?
The copies are coming out blurred and unreadable. What could be the cause of this ?
(Posted by donsauto1 3 years ago)

Canon Pc940 Copier
The right door for paper feeding doesn't stay closed.
The right door for paper feeding doesn't stay closed.
(Posted by swoulf 8 years ago)

Error Eo When Turning On The Pc790 Copier Then It Shuts Off.
When I turn on the PC790 copier it flashes EO then immediately shuts down.
When I turn on the PC790 copier it flashes EO then immediately shuts down.
(Posted by vail4us 8 years ago)

Friction Wheel To Pick Up Sheet From Paper Tray In Canon Pc720 Is Not Turning.
The friction wheel that starts feeding the sheet from the paper tray in the Canon PC720 copier is no...
The friction wheel that starts feeding the sheet from the paper tray in the Canon PC720 copier is no...
(Posted by lfennell 11 years ago)