
Brother International SE 350 Support Question
Brother International SE 350 Support Question
Find answers below for this question about Brother International SE 350 - Compact Sewing & Embroidery Combo Machine.Need a Brother International SE 350 manual? We have 2 online manuals for this item!
Question posted by arnezsimmons on June 28th, 2012
Safty Devise Has Be Activated How Do We Turn This Off
The person who posted this question about this Brother International product did not include a detailed explanation. Please use the "Request More Information" button to the right if more details would help you to answer this question.
Current Answers
Related Brother International SE 350 Manual Pages
Users Manual - English - Page 3

... the instruction manual • To unplug the machine, switch the machine to the symbol "O" position to turn it off, then grasp
the plug and pull it out of electric shock
1 Always unplug the machine from the electrical outlet immediately after you have finished reading this embroidery and sewing machine. To reduce the risk of the electrical outlet...
Users Manual - English - Page 13

... presser foot is being used. a Handle Carry the sewing machine by its handle when transporting the machine. c Embroidery card slot (page 138) Insert the embroidery card. d Air vent The air vent allows the air...Use the main power switch to use your machine.
11
b Handwheel (page 50) Turn the handwheel toward you are learning to turn the sewing machine on the power supply cord into the bobbin...
Users Manual - English - Page 18
... extension cords or multi-plug adapters with wet hands. GETTING READY
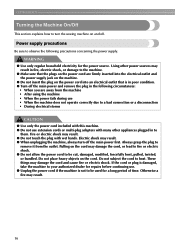
Turning the Machine On/Off
This section explains how to turn off the main power first. Power supply precautions
Be sure to ...for the power source. Pulling on the cord may result. ● When unplugging the machine, always turn the sewing machine on the power cord into an electrical outlet that is not to be cut, damaged...
Users Manual - English - Page 20

...Presser foot to be used c Stitches d Stitch settings and twin needle sewing e Stitch width f Stitch length g Number of the selected stitch h Number of the sewing machine. z Refer to "Operation panel" (page 13). For details, ...reinforcement l Single/twin needle sewing and needle stop
position
Memo
z A different screen is displayed when the embroidery unit is turned on, the LCD comes ...
Users Manual - English - Page 21
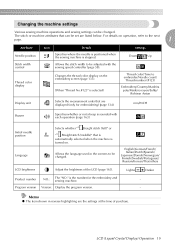
...
Thread color display
Icon
Details
Settings
Specifies where the needle is positioned when the sewing machine is turned on operation, refer to be changed . For details on . Thread color/Time...display on the embroidery screen (page 133).
Down
Up
Allows the stitch width to embroider/Needle count/
Thread number (#123)
(When "Thread No.#123" is selected)
Embroidery/Country/Madeira ...
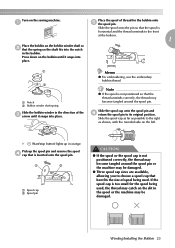
Users Manual - English - Page 23

...X The sewing machine help key) on the sewing machine.
a
X The LCD comes on the LCD.
LCD (Liquid Crystal Display) Operation 21
procedures
If you press
(Previous page key), you finish viewing, press e key) two times.
(Back
h g fe
a Upper threading b Bobbin winding c Bobbin installation d Needle replacement e Presser foot replacement f Embroidery foot attachment g Embroidery frame...
Users Manual - English - Page 25
...pin so that the spool is inserted onto the spool pin. Press down on the sewing machine. Memo
z For embroidering, use the embroidery bobbin thread. Note
z If the spool is not positioned so that is horizontal and... may become tangled around the spool pin or the machine may become tangled around the spool pin. Turn on the bobbin until it snaps into place.
Pick up in the bobbin.
Users Manual - English - Page 45
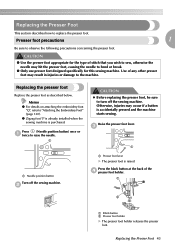
... the Presser Foot 43 Replacing the presser foot
Replace the presser foot as described below. Memo
z For details on attaching the embroidery foot "Q", refer to raise the needle.
c
a
a Needle position button
Turn off the sewing machine.
Presser foot precautions
1
Be sure to bend or break.
● Only use presser feet designed specifically for this...
Users Manual - English - Page 47
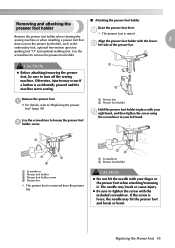
...Replacing the Presser Foot 45
z Be sure to loosen the presser foot b holder screw. embroidery foot, optional free-motion open toe
quilting foot "O" and optional walking foot.
c
a
d... and the machine starts sewing.
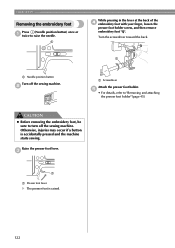
CAUTION
z Before attaching/removing the presser foot, be sure to turn off the sewing machine.
Remove the presser foot holder when cleaning the sewing machine or when ...
Users Manual - English - Page 122
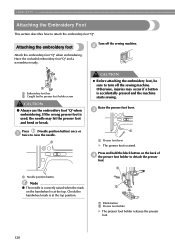
... correctly raised when the mark on the back of d the presser foot holder to turn off the sewing machine. Attaching the embroidery foot
Attach the embroidery foot "Q" when embroidering. b
a
b
a Embroidery foot bar b Caught by the presser foot holder screw
CAUTION
● Always use the embroidery foot "Q" when embroidering.
Check the handwheel mark is at the top position...
Users Manual - English - Page 123
... does not hit the presser foot. Hold the embroidery foot "Q" with the presser h foot holder screw. If the screw is loose, the needle may break or bend. The needle may hit the presser foot and break or bend.
● Before sewing, always turn the handwheel toward the front. Turn the screwdriver toward the back.
Users Manual - English - Page 124
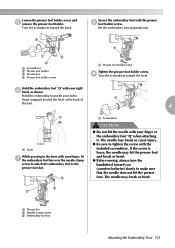
... lever
X The presser foot is accidentally pressed and the machine starts sewing. a
While pressing in the lever at the back of the d embroidery foot with your finger, loosen the
presser foot holder screw, and then remove embroidery foot "Q".
Turn the screwdriver toward the back. EMBROIDERY
Removing the embroidery foot
Press (Needle position button) once or a twice to...
Users Manual - English - Page 125
... frame.
z Do not lift up on the embroidery carriage, and do not forcefully move the sewing machine with the embroidery unit in the
a
4
embroidery unit connector slot.
Otherwise injury may cause
malfunctions. It may result. Note
z Always turn off the sewing machine before attaching the embroidery unit.
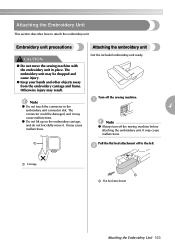
Attaching the Embroidery Unit
This section describes how to the left...
Users Manual - English - Page 126
... is displayed.
Note
z If the machine is initialized with hands or objects near the carriage, turn the power on the sewing machine. X The confirmation message is attached.
z For details on the carriage when attaching the embroidery unit to the machine, otherwise damage to the embroidery unit may return to fully insert the connector into the connection port...
Users Manual - English - Page 127
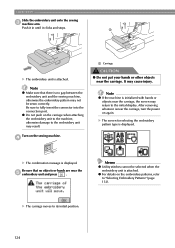
...on the bottom left . Turn off the sewing machine before removing the embroidery unit. It may cause malfunctions.
● Always turn off the sewing machine. Press , and then press
.
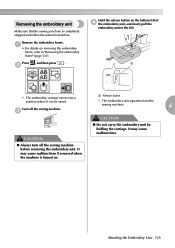
Removing the embroidery unit
Make sure that the sewing machine is turned on removing the embroidery frame, refer to the left of d the embroidery unit, and slowly pull the
embroidery unit to "Removing the...
Users Manual - English - Page 132
... the presser foot lever. b
a Embroidery frame guide tabs b Embroidery carriage frame holder slots
X The embroidery unit is accidentally pressed, the machine starts sewing, and your finger may be pricked with the needle or the needle may break.
130
Otherwise, the presser foot may not turn out correctly. If a button is attached. EMBROIDERY
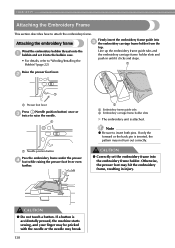
Attaching the Embroidery Frame
This section...
Users Manual - English - Page 137

... upper thread is not sewn or when restarting the sewing machine after power has been turned off in character embroidery. Selecting Embroidery Patterns 135
Press this key to select or cancel programmed thread cutting. Since the sewing machine stops at a time and changes the position for starting the embroidery. This is used . For details, refer to "Adjusting the...
Users Manual - English - Page 140
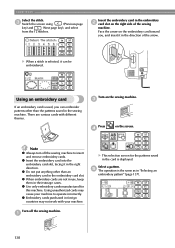
... same as in their storage cases. Note
z Always turn off the sewing machine.
Insert the embroidery card in the embroidery card slot. c
Press
d
on the sewing machine. z Do not put anything other than an
embroidery card in the embroidery b card slot on the embroidery card toward you, and insert it in the sewing machine.
e The operation is used, you can be embroidered...
Users Manual - English - Page 147
...key) to return to continue sewing. a
b
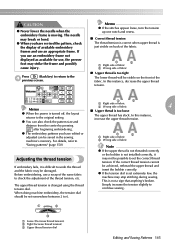
a Right side of fabric b Wrong side of the thread tension, etc. If the correct thread tension cannot
If embroidery fails, it
Adjusting the thread...page 150).
When doing machine embroidery, the tension dial
should be achieved, rethread the upper thread and insert the bobbin correctly. Memo
z If the stitches appear loose, turn the tension up one notch...
Users Manual - English - Page 150

.... For details, refer to the previous screen. c
If the needle count is turned off the sewing machine.
Memo
z If the needle count is complete, check the current needle count and layout before turning off , the embroidery size and layout return to stop the a sewing machine.
Restart the embroidery.
Press (Start/stop button) to the original setting. b
Stopping while...
Similar Questions

I Need To Purchase The Embroidery Arm Is It Available?
(Posted by srogers198 2 years ago)

Where Do I Find My Activation Code For Bes Embroidery Software
(Posted by baumsusi 9 years ago)

Why Wont My Activation Number Work Bes Embroidery Lettering Software
(Posted by Tuorimgcha 9 years ago)

Safety Featured Activated
My friends was sewing and the safety feature actived and she did not break a needle or anything to c...
My friends was sewing and the safety feature actived and she did not break a needle or anything to c...
(Posted by dragonflyeeyore1210 11 years ago)

Embroidery Unit
My SE350 does not recognize when I attach the embroidery unit
My SE350 does not recognize when I attach the embroidery unit
(Posted by wgbecker 11 years ago)