
Brother International PEDESIGN 5.0 Support Question
Brother International PEDESIGN 5.0 Support Question
Find answers below for this question about Brother International PEDESIGN 5.0.Need a Brother International PEDESIGN 5.0 manual? We have 1 online manual for this item!
Question posted by ginggaw on May 12th, 2017
I Installed Pedesign 5 On My Dell Laptop I Want To Install Pedesign 5.61 But Pe
I installed Pedesign 5 on my Dell XP I want to install Pedesign 5.61 Pedesign 5 won't uninstall
Current Answers
Answer #1: Posted by ankit2696 on May 18th, 2017 7:00 PM
ankit2696

Member since:
May 11th, 2017 Points: 16,580

Member since:
May 11th, 2017 Points: 16,580
Related Brother International PEDESIGN 5.0 Manual Pages
Users Manual - English - Page 2
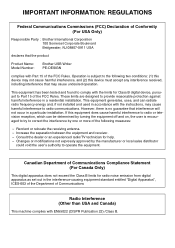
...Radio Interference (Other than USA and Canada)
This machine complies with the limits for Class B digital device,...to provide reasonable protection against harmful interference in a particular installation. Consult the dealer or an experienced radio/TV technician ...the product
Product Name: Model Number:
Brother USB Writer PE-DESIGN
complies with the instructions, may cause harmful interference...
Users Manual - English - Page 5

...Parts 1 I Package Contents 1 I Optional Supplies 1 I Installing the Software 2
System Requirements 2 Installation 2 Online Registration 7 Uninstallation 7 Technical Support 7
I Tips and Techniques for Creating Embroidery... 19 Editing Lines 20 Converting to Figure Handle Image 22 Moving to Sew Setting 23 Setting Sewing Attributes 23
• Setting the outlines 23 • Setting the ...
Users Manual - English - Page 10

...& Editing
Programmable Stitch Creator
Quick Reference Alphabetic Index
2
IMPORTANT: Be sure to perform the installation according to the following requirements.
The procedure and dialog boxes for Windows 98. Quit all... other operating systems may not operate correctly with a USB port Windows 98, ME, XP or 2000 Pentium 133 MHz or higher Minimum 32 MB (64 MB or more is recommended...
Users Manual - English - Page 11

Contents
Before Using
Getting Started
Design Center
Layout & Editing
3 After a short while, the first Add New Hardware Wizard dialog box appears. IMPORTANT: When using XP, select "Install from a list or specific location (Advanced)" on the first Wizard screen and click Next.
4 Make sure that "Search for the best driver for...
Users Manual - English - Page 12

...8 When the dialog box shown at the right appears, click Finish. however, the installation can be performed before continuing to step 9.
7 When UsbWriter appears, click Next. however, the ...operation described in step 9 may appear; This completes the installation of the driver software. Contents
Before Using
Getting Started
Design Center
Layout & Editing
6 ...
Users Manual - English - Page 13

... the InstallShield Wizard appears, click Next to start up . If the installer does not automatically start up the installer.
The Run dialog box appears.
• Type in the full path to the installer, and then click OK to continue with the installation.
5
Programmable Stitch Creator
Quick Reference Alphabetic Index
Select the desired language, and...
Users Manual - English - Page 14

...computer.
IMPORTANT: With Windows 98 and ME, the computer must be restarted. C When the installation is selected, click OK. • The "Choose Destination Location" shows the selected folder. ...NOTE: With other operating systems, it is not necessary to exit. Click Next to install the application
into another folder:
• Click Browse. This completes the entire setup operation....
Users Manual - English - Page 15

Uninstallation 1 Turn on the computer and start up the installed Web browser and open the online registration page on our Web site. IMPORTANT: Have the following information ready before contacting Technical Support.
• The make ...
Users Manual - English - Page 63

... mm, depending on the sewing area of the embroidery machine), first determine which of the three installation positions (indicated as the sewing field of its three installation positions, multi-position designs ...Although the size of the pattern that 260 × 160 mm size cannot be installed at each of the machine. N From the Size selector, choose a Design Page size of the data....
Users Manual - English - Page 64

... c.
3: The size of the areas.
4: This pattern must be found on the Sew menu.
N Specify the sewing order in front of a, b, and c:
a
a: Embroidering area when the
embroidery frame is installed at the
bottom installation position.
The setting is installed at the
b
middle installation position. b: Embroidering area when the
embroidery frame is turned on when a check mark...
Users Manual - English - Page 65

... the designs are minimizing the number of this time, the corresponding pattern
and embroidery frame position appear in the embroidery frame installation order.
• At this dialog.
Since turning on Sew.
2 Select Optimize Hoop Change. At the same time that you begin embroidering. When Optimize Hoop Change is turned off, each design...
Users Manual - English - Page 66
...mm, or 172 × 100 mm) is selected, you want to Card or click
card.
Contents
Before Using
Getting Started
2... saved file cannot be opened in the sewing order.)
NOTE: Make sure that no pattern has... all of the data for each embroidery frame installation position as a combination of multiple patterns. (For...PES Version 2.5, PES Version 3.0, or PES version 4.0 as one file...
Users Manual - English - Page 67

Therefore, the frame installation position sewing order for the pattern shown above is installed at the bottom installation position (position c). Contents
Before Using
Getting Started
Design Center
Layout & Editing
If the pattern shown below at the right is written to an original card and the written pattern is checked on the embroidering machine, it will appears...
Users Manual - English - Page 89

...(*.fpx), JPEG2000 (*.j2k). Select TWAIN device Selects which TWAIN device installed in the computer to Stage 2.
Save
Saves your Design Page (available...indicating the function of the button displays. Allows you want to control the way the pattern will be accessed by... Using
Using the Menu Bar and the Toolbar
File Edit Sew Display
Option
Stage Help
Handles file input/output, such...
Users Manual - English - Page 94

...which device to use and highlight that interface, make the settings for the TWAIN device you want to change the device and close the dialog. NOTE: For information on the Sources list.
... device. Shortcut key: No shortcut key for this function
Toolbar:
No button for this function after installing the driver software for importing an image, and import the image. N Click Select to use ....
Users Manual - English - Page 165

...the DST format, jump codes are used , this setting allows you want to an original card.
Shortcut key:
F4
Toolbar:
Operation:
1 ...to erase the data that is already stored on the sewing machine being used to indicate when the thread must be ...then Export. N Correct the problem, then click Retry.
NOTE: Some patterns installed from a card cannot be specified if the DST format is ...
Users Manual - English - Page 173

... be asked whether you will be sewn with the
second embroidery frame installation position
: This continues until all of the sewing data is printed. I Exit
Purpose:
Exits the application. See also..., the application closes immediately.
2 If the current Design Page is edited, you want to save the changes.
Contents
Before Using
Getting Started
5 Prints the color order...
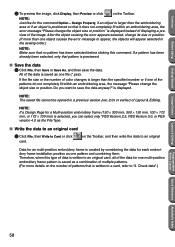
Users Manual - English - Page 187

...done when there is image data on
the clipboard.)
2 Your Design Page will be asked whether you want to save it. N Click Cancel to the one shown below appears. Shortcut key: No shortcut key... to save the data.
N Select the drive, the folder and the format in which TWAIN device installed in the Design Page is not saved, you will display the image.
If the current image is ...
Users Manual - English - Page 188

... key: No shortcut key for this function
Toolbar:
No button for this function after installing the driver software for scaling the height. Layout & Editing
Programmable Stitch Creator
Quick Reference...the cursor will appear surrounded with a red line and handles. is for the TWAIN device you want to .
I Modify
Purpose:
Adjusts the size and position of the handles. Scaling an image:...
Users Manual - English - Page 233

... (frame) on page 229
I Design Page Property
Purpose:
Allows you to be embroidered using a special embroidery frame attached to exit.
N Click Cancel to the sewing machine at three installation positions.
The Design Page sizes 130 × 300 mm, 300 × 130 mm, 100 × 172 mm, and 172 × 100 mm, indicated by...
Similar Questions

Why Can't I Remove Pedsign 5 From My Windows Xp
I installed Pedsign 5 with the CD and now I am trying to remove it and install PeDedsign 5.61 but I...
I installed Pedsign 5 with the CD and now I am trying to remove it and install PeDedsign 5.61 but I...
(Posted by ginggaw 6 years ago)
Why Can't I Remove Pedesign 5 From My Pc?
I installed Pe design 5 on my Dell laptop I want to install PeDesign 5.61 instead I cannot remove it...
I installed Pe design 5 on my Dell laptop I want to install PeDesign 5.61 instead I cannot remove it...
(Posted by ginggaw 6 years ago)
Pedesign 5.61 Istalled On My Windows Xp
pedesign 5.61 installed on Windows XP When I got it was set up to open with no user and password I r...
pedesign 5.61 installed on Windows XP When I got it was set up to open with no user and password I r...
(Posted by ginggaw 7 years ago)

How Do I Install Buttonhole Foot On Brother Se270d Sewing Machine
(Posted by bngrev 10 years ago)

Designs From Laptop To Sewing Machine.
How do I link up with downloaded designs from my laptop to my computerized sewing machine Brother S...
How do I link up with downloaded designs from my laptop to my computerized sewing machine Brother S...
(Posted by myrtatelson 11 years ago)