Brother International PC-8500 Support Question
Brother International PC-8500 Support Question
Find answers below for this question about Brother International PC-8500.Need a Brother International PC-8500 manual? We have 3 online manuals for this item!
Question posted by kathydj59 on November 11th, 2019
Saying Upper Thread Is Broken
I can sew about 1 inch of stitching and the computer says check upper thread and the thread is fine??
Current Answers
Answer #1: Posted by Odin on November 11th, 2019 6:25 PM
Odin

Member since:
April 10th, 2010 Points: 41,236,700

Member since:
April 10th, 2010 Points: 41,236,700
Follow the illustrated step-by-step instructions at https://www.manualslib.com/manual/355770/Brother-Pc-8500.html?page=183#manual. If the issue persists or if you require further advice, you'll have to consult the manufacturer, for which use the contact information at https://www.contacthelp.com/brother%20international/customer-service.
Hope this is useful. Please don't forget to click the Accept This Answer button if you do accept it. My aim is to provide reliable helpful answers, not just a lot of them. See https://www.helpowl.com/profile/Odin.
Related Brother International PC-8500 Manual Pages
Accessory Catalog - Page 6

... Foot
Designed to the end of the fabric. Increase upper thread tension. 2. Place the fabric with fabrics such as leather, vinyl and other novelty fabrics.
Attach the presser foot. 3. Place the fabric with the wrong side facing up under the presser foot. 2. Slowly sew 2-3 stitches, making sure the fabric is Project Book (See page...
Accessory Catalog - Page 12

... a drawn pattern line and sew (cut the center of the foot. 3. For gathering: 1. Create 3-D loops and fringe with dense stitches. Decrease the upper thread tension and test various settings to make or attach piping. Mark construction details by creating tailor tacks. Gathering Foot
Used for ULT series, PC-6500, PC-8200 and PC-8500 sewing machines. To attach the gathered...
Accessory Catalog - Page 39
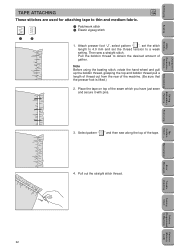
... (1/2 inch) wide bias tape. Set up your machine for 6 mm (approx. 1/4") wide stitch, two needles, three threads stitch.
2. Attach TB presser foot included in the machine. 3. Pull the fabric tape behind the presser foot. 5. www.brother.com Attach LC1 presser foot included in the machine. 3. You can use either self-made or store-bought bias tape.
1. Sew. Using...
Users Manual - English - Page 6
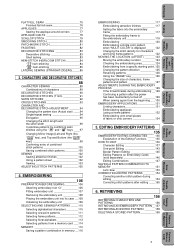
... DURING THE EMBROIDERY PROCESS 129
If the thread breaks during editing 154 Correcting stitch patterns after the power has been momentarily turned off ________129 When sewing again from a memory card ___114
MEMORY 116 Saving a pattern combination in Machine)
Sewing Chart
Trouble shooting
Error Maintenance Messages
My Custom Stitch TM
Retrieving
Editing Embroidery
Patterns
Embroidering...
Users Manual - English - Page 36
... injury may loosen due to touch the needle during button sewing as well.
CAUTION Be careful not to the left of the machine. Setting Up
Sewing
Utility Stitches
Characters and
Decorative Stitches
Embroidering
Editing Embroidery
Patterns
Retrieving
5
2. While pressing the black... raise.
* When the embroidery unit is not installed correctly, the thread
tension may result.
Users Manual - English - Page 40
... is running out. Setting Up
Sewing
Utility Stitches
Characters and
Decorative Stitches
Embroidering
Editing Embroidery
Patterns
1
2
5
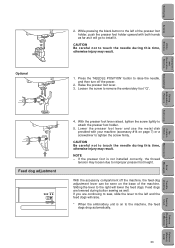
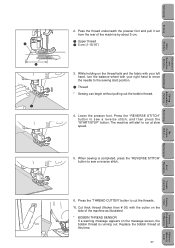
2. Press the "REVERSE STITCH" button to cut the threads .
*6. Cut thick thread (thicker than # 30) with the cutter on the side of the machine by about 5 cm.
1 Upper thread 2 5 cm (1-15/16")
3. Pass the thread underneath the presser foot and pull...
Users Manual - English - Page 42
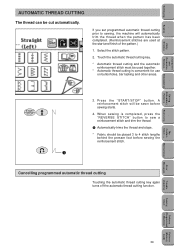
Touch the automatic thread cutting key.
* Automatic thread cutting and the automatic reinforcement stitch must be used at the start and finish of the pattern.)
1. When sewing is completed, press the "REVERSE STITCH" button to sew a reinforcement stitch and trim the thread.
1 Automatically trims the thread and stops.
* Fabric should be placed 3 to sewing, the machine will be cut automatically...
Users Manual - English - Page 48
... in Machine)
Patterns (Memory
Card)
45 Sew at the finish of sewing. Press the "REVERSE STITCH" button to sew a reinforcement stitch and trim the thread automatically at slow speed near the end and then press the "REVERSE STITCH" button to sew a reinforcement stitch and stop.
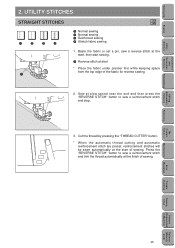
3. UTILITY STITCHES
STRAIGHT STITCHES
1
2
3
4
3 5
J
1 Normal sewing 2 Normal sewing 3 Reinforced sewing...
Users Manual - English - Page 51
... positioning the right hand needle drop point just outside the edge of fabric.
1 Upper fabric 2 Lower fabric
48
Patterns (Programmed in Machine)
Patterns (Memory
Card) Setting Up
Sewing
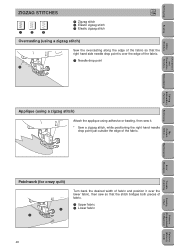
ZIGZAG STITCHES
J
1
2
3
1 Zigzag stitch 2 Elastic zigzag stitch 3 Elastic zigzag stitch
Overcasting (using adhesive or basting, then sew it over the edge of the fabric.
1 Needle drop point
Utility...
Users Manual - English - Page 52

... in Machine)
Patterns (Memory
Card)
49
CAUTION
After the stitch width has been adjusted,
turn the balance wheel by hand and check that the needle does not touch the presser
G
foot. If it does touch, the needle may break and
injury could result. Press the "REVERSE STITCH" button to sew a reinforcement stitch and trim the thread automatically...
Users Manual - English - Page 55
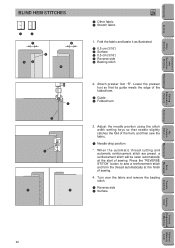
.... 1 0.5 cm (3/16") 2 Surface 3 0.5 cm (3/16") 4 Reverse side 5 Basting stitch
2. Press the "REVERSE STITCH" button to sew a reinforcement stitch and trim the thread automatically at the start of sewing.
4.
R
1 Needle drop position
* When the automatic thread cutting and automatic reinforcement stitch are preset, a reinforcement stitch will be sewn automatically at the finish of...
Users Manual - English - Page 59
... seam (" " buttonholes only). 1.
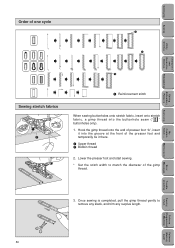
Once sewing is completed, pull the gimp thread gently to match the diameter of one cycle
1 1
1
Sewing stretch fabrics
5
5
1 Reinforcement stitch
When sewing buttonholes onto stretch fabric, insert onto stretch fabric, a gimp thread into the groove at the front of the presser foot and temporarily tie it there. 1 Upper thread 2 Bobbin thread
2.
Users Manual - English - Page 62
Place another piece of the upper thread.
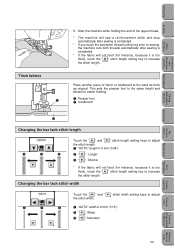
* The machine will sew a reinforcement stitch and stop automatically after sewing is completed.
* If you touch the automatic thread cutting key prior to sewing, the machine cuts both threads automatically after sewing is completed.
* If the fabric will not feed (for instance, because it is too thick), touch the " " stitch length setting key to adjust ...
Users Manual - English - Page 63
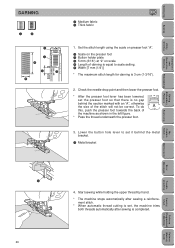
... Check the needle drop point and then lower the presser foot.
* After the presser foot lever has been lowered,
set the presser foot so that there is equal to set , the machine trims both threads automatically after sewing is 3 cm (1-3/16").
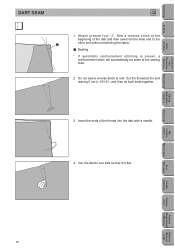
2. Start sewing while holding the upper thread by hand.
* The machine stops automatically after sewing a reinforcement stitch.
* When automatic thread...
Users Manual - English - Page 65
Pull out the straight stitch thread. Then sew a straight stitch. Select pattern " " and then sew along the top of the machine. (Be sure that the presser foot is lifted.)
2.
Note Before using the basting stitch, rotate the hand wheel and pull up the bobbin thread, grasping the top and bobbin thread pull a length of thread out from the rear of the...
Users Manual - English - Page 66
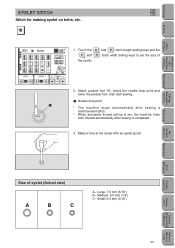
... of
2. Small: 5.0 mm (3/16")
63
Patterns (Memory
Card) Medium: 6.0 mm (1/4") C- Attach presser foot "N", check the needle drop point and lower the presser foot, then start sewing.
1 Needle drop point * The machine stops automatically after sewing a
reinforcement stitch. * When automatic thread cutting is set the size of eyelet (Actual size)
A
B
C
A-
Large: 7.0 mm (5/16") B-
Users Manual - English - Page 69
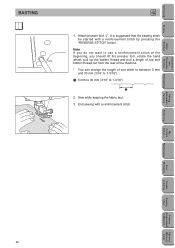
... taut. 3.
Setting Up
Sewing
Utility Stitches
Characters and
Decorative Stitches
BASTING
J
1. Note If you do not want to use a reinforcement stitch at the beginning, you should lift the presser foot, rotate the hand wheel, pull up the bobbin thread and pull a length of top and bobbin thread out from the rear of the machine. * You can change...
Users Manual - English - Page 71
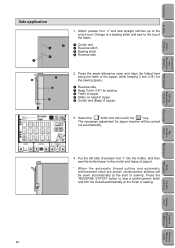
... of zipper 5 Crotch end (Base of sewing. I " into the holder, and then sew the bottom layer to sew a reinforcement stitch and trim the thread automatically at the start of zipper)
3. Attach presser foot "J" and sew straight stitches up to the top of sewing. Change to a basting stitch and sew to the crotch end.
Select the " " stitch and then touch the " " key...
Users Manual - English - Page 73
...then tie both ends together.
3.
Attach presser foot "J". Cut the thread at end. Setting Up
Sewing
Utility Stitches
Characters and
Decorative Stitches
Embroidering
DART SEAM
J
1. Editing Embroidery
Patterns
Retrieving
My Custom Stitch TM
Error Maintenance Messages
Trouble shooting
Sewing Chart
Patterns (Programmed in Machine)
Patterns (Memory
Card)
70 Iron the dart to the...
Users Manual - English - Page 76
... TM
Error Maintenance Messages
Trouble shooting
Sewing Chart
Patterns (Programmed in Machine)
Patterns (Memory
Card)
73 Setting Up
Sewing
Utility Stitches
Characters and
Decorative Stitches
Embroidering
Editing Embroidery
Patterns
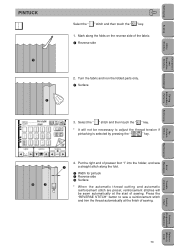
PINTUCK
I
* When the automatic thread cutting and automatic
reinforcement stitch are preset, reinforcement stitches will not be sewn automatically at...
Similar Questions


I Go To Sew A Button Hole It Says Lower Buttonhole Lever 1 And I Don't Understan
i go to sew a button hole it says lower buttonhole lever 1 and i don't understand what they want cau...
i go to sew a button hole it says lower buttonhole lever 1 and i don't understand what they want cau...
(Posted by victoryrocks 10 years ago)

Won't Zigzag
After not having used the machine as a regular sewing machine for many years we removed the embroide...
After not having used the machine as a regular sewing machine for many years we removed the embroide...
(Posted by ladyofpurple 11 years ago)

Machine Won't Sew But A Few Stitches
After sewing a few stitches I get a message, check if upper thread is broken. It isn't, I sew a few ...
After sewing a few stitches I get a message, check if upper thread is broken. It isn't, I sew a few ...
(Posted by candyapple49 11 years ago)
My Pc-420 Quit Picking Up Stitches. What Happened?
My sewing machine was fine and now the stitches won't secure. There is nothing in the manual about n...
My sewing machine was fine and now the stitches won't secure. There is nothing in the manual about n...
(Posted by sewcrazy444 11 years ago)