
Brother International PC 420 Support Question
Brother International PC 420 Support Question
Find answers below for this question about Brother International PC 420 - PRW Limited Edition Project Runway Sewing Machine.Need a Brother International PC 420 manual? We have 1 online manual for this item!
Question posted by sewcrazy444 on May 16th, 2012
My Pc-420 Quit Picking Up Stitches. What Happened?
My sewing machine was fine and now the stitches won't secure. There is nothing in the manual about not stitching at all. What happened and how can I fix it?
Current Answers
Related Brother International PC 420 Manual Pages
Users Manual - English - Page 2
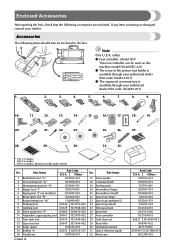
...Overcasting foot "G" 3 Monogramming foot "N" 4 Zipper foot "I" 5 Zigzag foot "J" (on this machine model NX-400/PC-420. ● The screw of the presser foot holder is available through your retailer. Part Name
... following items should also be used on machine) 6 Blind stitch foot "R" 7 Button fitting foot "M" 8 Walking foot 9 Quilting foot 10 Stitch guide foot "P" 11 Adjustable zipper/piping...
Users Manual - English - Page 3

CONTENTS
GETTING READY SEWING BASICS UTILITY STITCHES
Names of Machine Parts and Their Functions
The names of the various parts of the machine parts. When sewing cylindrical pieces, remove the flat bed attachment.
Before using the sewing machine, carefully read these descriptions to learn the names of the sewing machine and their functions are described below. C Needle threader lever...
Users Manual - English - Page 4
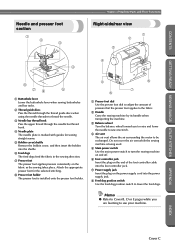
... needle bar thread hook.
4 Needle plate The needle plate is marked with guides for the selected stitching.
8 Presser foot holder The presser foot is being used.
5 Main power switch Use the main power switch to turn the sewing machine on and off.
6 Foot controller jack Insert the plug on the fabric as the...
Users Manual - English - Page 5
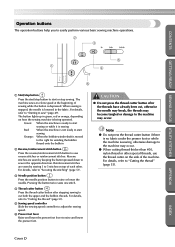
... details, refer to "Securing the stitching" (page 51).
3 Needle position button Press the needle position button to sew" (page 49). Pressing the button twice sews one stitch.
4 Thread cutter button Press the thread cutter button after the threads have already been cut both the upper and the bobbin threads. APPENDIX
INDEX
Cover D The
machine sews at a slow...
Users Manual - English - Page 6
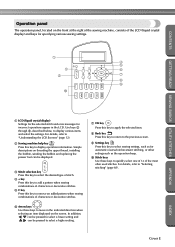
... on the front at the right of the sewing machine, consists of the LCD (liquid crystal display) and keys for specifying various sewing settings.
1
4
5
2
6
3
7
8 9
0
GETTING READY SEWING BASICS UTILITY STITCHES
APPENDIX
1 LCD (liquid crystal display) Settings for the selected stitch and error messages for automatic reverse/reinforcement stitching, or other settings such as the operation...
Users Manual - English - Page 7
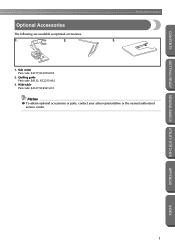
Quilting guide Part code: SA132, XC2215-002
3. GETTING READY SEWING BASICS UTILITY STITCHES
APPENDIX
INDEX
1 Side cutter Part code: SA177,XC3879-002
2.
Wide table Part code: SA537,XC4541-051
Memo
● To obtain optional accessories or parts, contact ...
Users Manual - English - Page 8
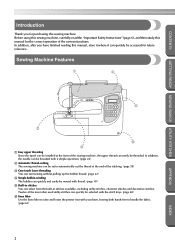
... using this sewing machine, carefully read the "Important Safety Instructions" (page 6), and then study this manual, store it where it can quickly and easily be wound with your knee, leaving both hands free to raise and lower the presser foot with thread. (page 18) 5 Built-in stitches available, including utility stitches, character stitches and decorative stitches. Twelve...
Users Manual - English - Page 9
...
GETTING READY SEWING BASICS UTILITY STITCHES
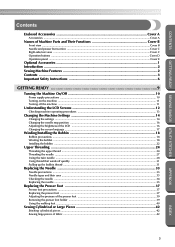
Contents
Enclosed Accessories Cover A
Accessories ...Cover A
Names of Machine Parts and Their Functions Cover B
Front view ...Cover B Needle and presser foot section ...Cover C Right-side/rear view ...Cover C Operation buttons ...Cover D Operation panel ...Cover E
Optional Accessories ...1 Introduction ...2 Sewing Machine Features ...2 Contents...
Users Manual - English - Page 10
...
GETTING READY SEWING BASICS UTILITY STITCHES
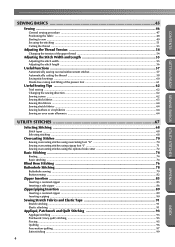
SEWING BASICS 45
Sewing ...46
General sewing procedure ...47 Positioning the fabric ...48 Starting to sew ...49 Securing the stitching ...51 Cutting the thread ...53
Adjusting the Thread Tension 54
Changing the tension of theupper thread ...54
Adjusting the Stitch Width and Length 55
Adjusting the stitch width ...55 Adjusting the stitch length...
Users Manual - English - Page 11
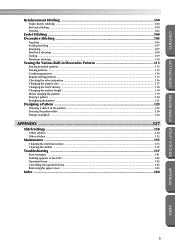
... ...121
Designing a Pattern ...123
Drawing a sketch of the pattern ...123 Entering the pattern data ...124 Design exampled ...126
APPENDIX ...127
Stitch Settings ...128
Utility stitches ...128 Other stitches ...133
Maintenance ...135
Cleaning the machine surface ...135 Cleaning the shuttle ...135
Troubleshooting ...137
Error messages ...141 Nothing appears in the LCD ...142 Operation beep ...142...
Users Manual - English - Page 12

... for its intended use by authorized dealer. Close attention is necessary when the machine is not intended for household use the proper needle plate. This sewing machine is used or where oxygen is being
administered. 8. CONTENTS
GETTING READY SEWING BASICS UTILITY STITCHES
Important Safety Instructions
When using . To reduce the risk of burns, fire, electric...
Users Manual - English - Page 13
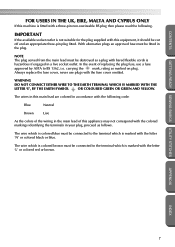
... the plug fuse, use plugs with the colored markings identifying the terminals in the plug. CONTENTS
GETTING READY SEWING BASICS UTILITY STITCHES
FOR USERS IN THE UK, EIRE, MALTA AND CYPRUS ONLY
If this machine is marked with the letter 'L' or colored red or brown.
APPENDIX
INDEX
7 IMPORTANT
If the available socket outlet...
Users Manual - English - Page 14

... Use only neutral soaps or detergents to clean the case.
For a longer service life 1. CONTENTS
GETTING READY SEWING BASICS UTILITY STITCHES
CONGRATULATIONS ON CHOOSING OUR MACHINE
Your machine is one of the operation manual to inspect and adjust the machine yourself. up lever, needle, or other parts • A power failure occurs during use extension cords. If...
Users Manual - English - Page 15
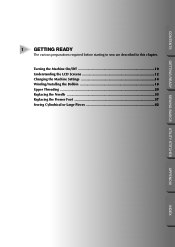
... LCD Screens 12 Changing the Machine Settings 14 Winding/Installing the Bobbin 18 Upper Threading ...24 Replacing the Needle 33 Replacing the Presser Foot 37 Sewing Cylindrical or Large Pieces 42
APPENDIX
INDEX CONTENTS
GETTING READY SEWING BASICS UTILITY STITCHES
1 GETTING READY
The various preparations required before starting to sew are described in this chapter...
Users Manual - English - Page 16
... regular household electricity for a long period of time. Fire or electric shock may damage the cord and cause fire or electric shock. CONTENTS
GETTING READY SEWING BASICS UTILITY STITCHES
GETTING READY
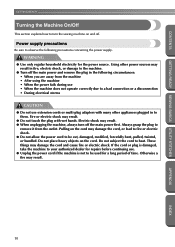
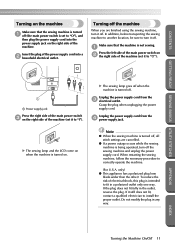
Turning the Machine On/Off
This section explains how to heat.
Users Manual - English - Page 17
... a polarized plug (one way. APPENDIX
INDEX
Turning the Machine On/Off 11
Note
● When the sewing machine is turned off, all stitch settings are finished using the sewing machine, turn it to "I"). CONTENTS
GETTING READY SEWING BASICS UTILITY STITCHES
Turning on the machine
Make sure that the machine is not sewing.
1
Press the left side of the main power switch...
Users Manual - English - Page 18
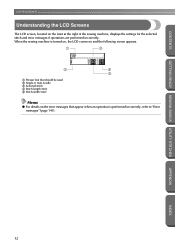
... screen, located on the error messages that should be used 2 Single or twin needle 3 Selected stitch 4 Stitch length (mm) 5 Stitch width (mm)
Memo
● For details on the front at the right of the sewing machine, displays the settings for the selected stitch and error messages if operations are performed incorrectly.
APPENDIX
INDEX
12 When the...
Users Manual - English - Page 19
...
2
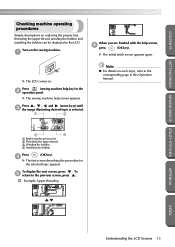
Note
● For details on . Press
(sewing machine help key) in the LCD. To
5 return to the corresponding page in this Operation Manual.
3
4
1 Replacing the presser foot 2 Threading ... X The initial stitch screen appears again.
CONTENTS
GETTING READY SEWING BASICS UTILITY STITCHES
Checking machine operating procedures
Simple descriptions on the sewing machine.
1
When you...
Users Manual - English - Page 55
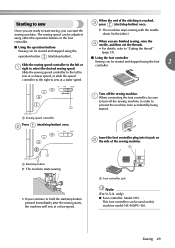
... into its jack on this machine model NX-400/PC-420. Sewing 49 Starting to start sewing, you can start the sewing machine. The sewing speed can be adjusted
X The machine stops sewing with the needle down (in order to hold the start/stop button pressed immediately after the sewing starts, the machine will sew at a faster speed.
1
1 Sewing speed controller
Press
2
(start/stop...
Users Manual - English - Page 68

... a corner, stop the 1 sewing machine.
Turn the fabric using a zigzag stitch, select a shorter stitch length in the fabric). APPENDIX
INDEX
Lower the presser foot lever and continue 3 sewing. 62 Refer to these tips when sewing your project, and check the thread tension and stitch length and width.
Since the results differ depending on sewing with your sewing projects are the same...
Similar Questions

Whats The Resale Value Of The Brother 2300 Prw Limited Edition Project Runway?
(Posted by Anonymous-139615 9 years ago)


How To Thread The Brother Limited Edition Project Runway Sewing Machine
ls2300prw manual
ls2300prw manual
(Posted by jjmaf0 10 years ago)
Brother Pc-420 Prw Limited Edition Project Runway Sewing Machine Will Not
thread needle
thread needle
(Posted by graphevaru 10 years ago)

How To Lubricate My Brothers Pc-420
I want to lubricate my brothers Project 420 sewing machine. I can't find the oiling points. I alread...
I want to lubricate my brothers Project 420 sewing machine. I can't find the oiling points. I alread...
(Posted by kountrygrrrl 11 years ago)