
Brother International EF4-B561 Support Question
Brother International EF4-B561 Support Question
Find answers below for this question about Brother International EF4-B561.Need a Brother International EF4-B561 manual? We have 2 online manuals for this item!
Question posted by mercedesc1 on October 23rd, 2012
I Need To Buy The Screws Tha Hold The Needles In Place And Also Needles.
The person who posted this question about this Brother International product did not include a detailed explanation. Please use the "Request More Information" button to the right if more details would help you to answer this question.
Current Answers
Related Brother International EF4-B561 Manual Pages
Parts Manual - English - Page 1

NAGOYA, JAPAN PARTS BOOK
FOR
BROTHER EF4-B561•B571
(P561102)
Single Needle Twin Needle
Overlock
Sewing
Machine
BROTHER INDUSTRIES, LTD.
Parts Manual - English - Page 3

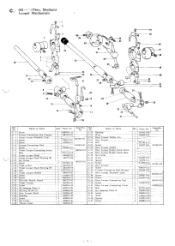
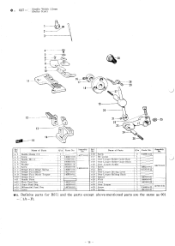
..., Medium) Machine Body
2
3
0 - 73
4 56 7
n
69 ED+ 0
' ago GF ---70
71
T
-- 72
68- Name of Parts
A- 1 A- 2 A- 3 A- 4 A- 5 A- 6 A- 7 A- 8 A- 9 A-10 A-11 A -I2 A-13 A-14 A-15 A-16 A-17 A-18 A-19 A-20 A-21 A-22 A-23 A-24 A-25 A-26 A-27 A-28 A-29 A-30 A-31 A-32 A-33 A-34 A-33 A-36 A-37 A-38 A-79 A-39
Screw Cover for Needle Driving Mechanism...
Parts Manual - English - Page 4

... of Parts
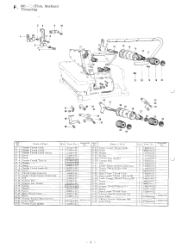
B- 1 Needle Bar Crank Shaft B- 2 Screw
B- 3 Needle Bar Link Shaft
B- 4 Needle Bar Link
B- 5 Screw
B- 6 Needle Bar Clamp
B- 7 Needle Bar Link Shaft
B- 8 Screw
B- 9 Needle Bar
Needle Clamp Nut
B-10 Needle Bar Bushing (D)
B-12 Needle DC X1
B-13 Cap
B-14 Needle Bar Bushing (U)
B15 Needle Shaft Bushing (Left)
B-16 Set Collar
B-17 Screw
B-18 Screw
B-1.9 Needle Arm Driving...
Parts Manual - English - Page 5
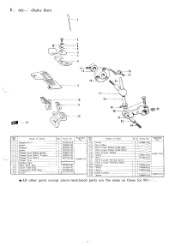
... Under Looper Shaft Bushing (F)
C-16 Bolt
C17 Under Looper Hodder
C-18 LScrew
C-19 [Screw
C-20 Movable Needle Guard
C-21 Under Looper
C-22 Screw
C-23 Oil Jumping Plate L
C-24 Oil Cap 20. 30 X10
C-25 Over Looper Shaft
C-26 Bushing
C-27 Screw
C-28 Set Collar
C-29 Thrust Collar
Q'ty I
2 148857-0-01
2 142658-0-01 :
1
181631E-01...
Parts Manual - English - Page 8
... F-45 Color Plate
1 149:368 001
I F-12 F-13 F-I4 F-15 F-16 F-17 F-19 F-20 F-21 F-18 F-4422 F-22
Name of Parts
Needle Thread Guide Needle Thread Guard Needle Thread Guard Spring Screw Screw Needle Thread Take-up Washer Screw Needle Thread Guide (A) Screw Thread Guide Supporter Looper Thread Tension Control Stud Felt Tension Disc Tension Disc Washer
Spring Washer...
Parts Manual - English - Page 9
No.
Name of Parts
I. 1 Needle DC X 1
2 Screw
- 3 Washer
I- 4 Screw
I- 5 Presser Foot Hinge Spring
I- 6 Presser Foot Stitch Tongue
I
Presser Foot (Rear)
I- 8 Presser Foot
I- 9 Needle Plate
1-I0 Main Feed Dog
1-11 Chain ...Looper Holder
146900-0-01
1-19 Screw
145774-0-01 146898 0 1
1-20 Bolt I-21 Over Looper Driving Lever
I-22 Over Looper Holding Shaft
148187-0.01
1.23 ...
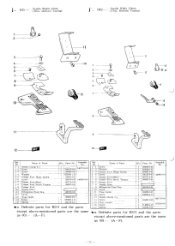
Parts Manual - English - Page 10
...
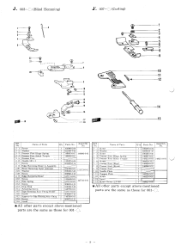
1 100080-0-04
J- 2 Washer
1 025030.1-32
J- 3 Presser Foot Hinge Spring
1 146887.0.01 146890-0-01
J- 4 Presser Foot Stitch Tongue
1 146892-0-01
J- 5 Presser Foot
1
J- 6 Needle 1)C X1
1 112297-0-09
J- 7 Screw
1 001670-6-14
5. 8 Edge Hemming Ruler A Assembly 1 _--------
Name of Parts
Q'ty Parts No. J. 3-c_) (Blind Hemming)
J. 007-0 (Curling)
6
2 3
•
22 -ft 21...
Parts Manual - English - Page 14

...Over Looper Holder Guide Base Over Looper Holder Screw Bolt Over Looper Driving Lever Over Looper Holding Shaft Spacer Wick Wick Over Looper Screw
Qty Parts No. Assembly No.
2 ...N-28 N-29
Name of Parts
Tape Guide Scre Needle DC X 1 Screw Washer Presser Foot Hinge Spring Screw Presser Foot Stich Tongue Presser Foot (Rear) Presser Foot Needle Plate Main Feed Dog Chain Feed Dog Differential Feed ...
Parts Manual - English - Page 20
... Base Over Looper Holder Guide Block Over Looper Holder Screw Bolt Over Looper Driving Lever Over Looper Holding Shaft Spacer Wick Wick Over Looper Screw Spring
Q'
Parts No. No. Definite parts for B571 and the parts except above-mentioned parts are the same as 001
- Needle Width 2.2tnin (Bulky Knit)
1 2 3
4 5 6
7 -
8-i 9 10
11 -
16 17...
Parts Manual - English - Page 21

...Looper Holder Guide Block
f-21 Oner Looper Holder
f-22 Screw
1-23 Bolt
f-24 Over Looper Driving Lever
f-26 Over Looper Holding Shaft
f-26 Spacer
f -27 Wick
f-28 Wick...f- 1 Needle Clamp 3
f- 2 Screw
f- 3 Needle DC X1
4 [Screw
.5 Screw
6 Presser Foot (Rear)
7 Washer
8 Presser Foot Hinge Spring
Presser Foot Stitch Tongue
f- 0 Screw-
. 1 Presser Foot
12 Presser Foot
13 Needle Plate
...
Parts Manual - English - Page 24
...4 I 146907-0-01
1
1
1 146749-0-01
1
1 146883-0-01
2 009669-4-12
1 144104-0-01
*a.
Name of Parts
Needle Clamp 2.2 Screw Screw Washer Presser Foot Hinge Spring Screw Presser Foot (Rear) Presser Foot Stitch Tongue Presser Foot Needle Plate Differential Feed Dog Lavel Tape Guide Screw Spring
Oty Parts No
Assembly No.
1 2 146427-0.01 146773-0.0
I 1 100080.0.04
1 025030-1-32
I 146887...
Parts Manual - English - Page 25

... Driving Lever
146907-0- 01
k-26 Over Looper Holding Shaft
1 017761-6-12 ______--
145774-0- 01
k-27 Spacer
1 148783-0-01
__-------- Assembly No. No. Name of Parts
Tape Guide Screw Needle Clamp 2.2 Screw Needle DC X1 Screw Washer Presser Foot Hinge Spring Screw Presser Foot Stitch Tongue Presser Foot (Rear) Presser Foot Needle Plate Main Feed Dog Chain Feed Dog...
Service Manual - Page 15
... O.
1
5 Turn the pulley until the needle bar is raised to the left direction, then tighten it by
hand. (Pull out spring for lower knife holder 1
also.)
8 Remove lower knife holder. S. 3 Remove upper knife holder O.
4 Remove nut
1
5 Remove lower knife as holding it by hand. 1
Q'ty of screw
6 Remove lower knife holder guide 0.
2
7 Remove...
Service Manual - Page 17

... 0.
1
4 Remove chain stitch needle thread guide 0
(B581).
1
5 Remove face plate 0.
4
(Stopper spring fp is naturally to be removed
out.)
3(B581)
Procedures
Q'ty of screw
6 Remove needle mechanism cover el, taking care
not to spoil the packing.
7
(Put feed mechanism cover on the machine
body.)
7 Loosen screw for needle bar clamp Q and pull-
out needle bar 0 lower.
1
- 15...
Service Manual - Page 18

... without 3 (13581)
cranky.)
4 Install needle mechanism cover Q to the machine body firmly putting of face plate (1) lightly, then
7
take care not make any clearance.
5 Install needle thread take-up supporter 0 to needle bar clamp O.
1
6 Install needle thread guide (A) 0 to face plate 0.
1
Q'ty of screw
7 Install needle thread take-up 0 to increase the needle thread tension. Raise its...
Service Manual - Page 19
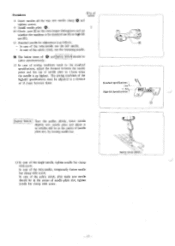
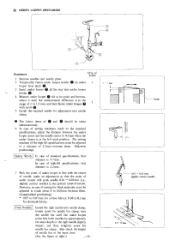
... case of sewing machines made to the standard specifications, adjust the distance between the needle point and the top of needle plate to a distance of 11.5mm between them.
In case of the twin-needle, temporarily fasten needle bar clamp with screw. Procedures
Q'ty of screw
8 Insert needles all the way into needle plate and adjust it so needles will be...
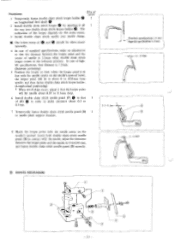
Service Manual - Page 20
...when the under looper is 4.7mm. 2 UNDER LOOPER MECHANISM
C2)
Procedures
Q'ty of screw
1 Remove needles and needle plate.
2 Temporarily fasten under looper holder 0 on under 1
looper lever shaft 0.
... of needle bar at the same time.
(See the figure at right.)
- 18 - The sewing machine of the high-lift specifications must be taken simultaneously.
6 In case of sewing machines made to...
Service Manual - Page 23
...)
5 Position the looper so that the distance between the looper point and the needle to 0 to the leftmost position. The
inclination of the looper depends on the needle's upward travel , hold double chain stitch needle guard (B) in contact with the needle center on the screw recess.
3 Install double chain stitch needle into double chain stitch looper holder 0.
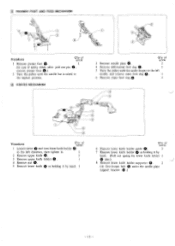
Service Manual - Page 25
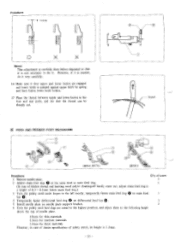
Thread
a FEED AND PRESSER FOOT MECHANISM
Cl)
e e
(B561, B571)
(B581)
Procedures
Q'ty of screw
I Remove needle plate.
2
2 Adjust chain feed dog 0 at the same level as main feed ...then fasten lower knife holder.
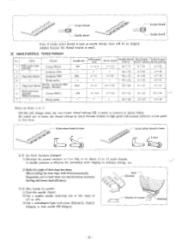
17 Place the thread between upper and lower knives in case of denim specification of safety stitch, its height is 1.3mm.
- 23 - However, if it is needed, do it that upper and ...
Service Manual - Page 31
... by about 12 to 15 screw threads. Be careful not to #9). 3) Use a well-shaped light ball point (Schmetz), S-point (Organ), or knit needle KN (Organ). A smaller ...pressure is effective for preventing work becomes damaged: 1) Decrease the presser pressure to 2 to 3kg, or by needle: 1) Cool the needle thread. 2) Use a smaller needle (selecting one in ordinary sewing,...
Similar Questions

Need An Instruction Manual For A Brother Embroifery &sewing Machine Se-350 Enthu
(Posted by Anonymous-147250 9 years ago)

I Need A Repair Manual For The Se270d Embroidery/sewing Machine. Error F05
I need a repair manual for the Brother SE270D Embroidery/Sewing Machine, to fix error F05. The cost ...
I need a repair manual for the Brother SE270D Embroidery/Sewing Machine, to fix error F05. The cost ...
(Posted by romaplovell 10 years ago)
I Need To Replace The Twin Needle, It Broke, Which One Should I Buy?
(Posted by liliosleepy 11 years ago)


How Do I Readjust The Place That Holds Needles?
I believe something is bent, becaue when I install my needles it doesn't line up correctly and break...
I believe something is bent, becaue when I install my needles it doesn't line up correctly and break...
(Posted by taraellison09 12 years ago)