

Parts Manual - English
Page 3
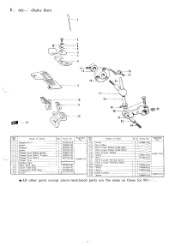
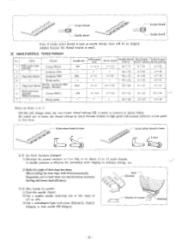
... -- 38 35 Itaar3W"Th. --- -79 36 Ref. Assembly Ref. Name of Parts 7 1 1 1 1 1 1 r 1 3 1 1 I ') Cap for Oil Feeding Hole Packing 'fop Cover Screw Packing La -el Model Plate B ;361 Model plate Pin Screw Oil Gauge Name Plate Machine Body Machine Body Leg Oil Cap Supporter for Front Cover Thread Bushing Screw Screw Stopper Spring fur Front Cover Threading )iagram Front Co Spring Front Cover Hinge Pin Shaft for Feed Mechanism WI hinge Pin Screw Cloth Plate Supporter Feed Mechanism Cover Hinge B Screw PacSkaing qty 1 No. so 73 74 41...
... -- 38 35 Itaar3W"Th. --- -79 36 Ref. Assembly Ref. Name of Parts 7 1 1 1 1 1 1 r 1 3 1 1 I ') Cap for Oil Feeding Hole Packing 'fop Cover Screw Packing La -el Model Plate B ;361 Model plate Pin Screw Oil Gauge Name Plate Machine Body Machine Body Leg Oil Cap Supporter for Front Cover Thread Bushing Screw Screw Stopper Spring fur Front Cover Threading )iagram Front Co Spring Front Cover Hinge Pin Shaft for Feed Mechanism WI hinge Pin Screw Cloth Plate Supporter Feed Mechanism Cover Hinge B Screw PacSkaing qty 1 No. so 73 74 41...
Parts Manual - English
Page 9
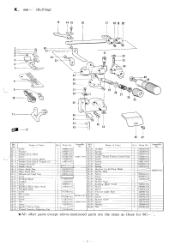
...-0-01 1-24 Wick 146750-0-01 1-25 Wick 1.26 Over Looper I-27 Screw .Q'ty Parts No. 2 014680-4-22 Assembly No. --..--:.- 7-.. -.=_ 1 146427-0-01 148217-0-01 017761-6-12 I -13 Lavel Q t parts No, Assembly Ref. No. Name of Parts I. 1 Needle DC X 1 2 Screw - 3 Washer I- 4 Screw I- 5 Presser Foot Hinge Spring I- 6 Presser Foot Stitch Tongue I Presser Foot (Rear) I- 8 Presser Foot I- 9 Needle Plate 1-I0 Main Feed Dog 1-11 Chain Feed Dog I-12 Differential Feed Dog I _.-- ----- 1 1 148783-0-01 1 108809-0-01 1 148249-0-00 1 -- 147937-0-01 1 014680-4-22...
...-0-01 1-24 Wick 146750-0-01 1-25 Wick 1.26 Over Looper I-27 Screw .Q'ty Parts No. 2 014680-4-22 Assembly No. --..--:.- 7-.. -.=_ 1 146427-0-01 148217-0-01 017761-6-12 I -13 Lavel Q t parts No, Assembly Ref. No. Name of Parts I. 1 Needle DC X 1 2 Screw - 3 Washer I- 4 Screw I- 5 Presser Foot Hinge Spring I- 6 Presser Foot Stitch Tongue I Presser Foot (Rear) I- 8 Presser Foot I- 9 Needle Plate 1-I0 Main Feed Dog 1-11 Chain Feed Dog I-12 Differential Feed Dog I _.-- ----- 1 1 148783-0-01 1 108809-0-01 1 148249-0-00 1 -- 147937-0-01 1 014680-4-22...
Parts Manual - English
Page 11
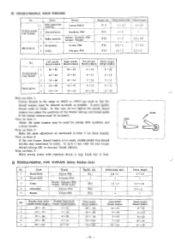
No. I ____-_----- Washer K- 3 Presser Foot Plate K- 4 Screw K- 5 1 Presser Foot Chain Shield K- 6 Presser Foot Stitch Tongue (11) K- 7 Pres_seerr Foot (U) 1477 K- 8 Needle Plate K- 9 Chain Feed Dog K- Name of Parts 1 100080-0-04 K-26 Washer I 025030-1-32 K-27 Spring 1 144091-0.01 K-28 Washer 1 10010o-0-05 144811-0-01 K-20 Looper Thread Tension Control Stud I 144100-0.01 H 144813-0-01 I Name o Parts K- 1 !Screw K- 2 ; K . 008- (Ruffling) 13 14 15 16 17 18 19 20 1 2 3 4 6- - 30 31 32 NN c--\'-', 33 •...
No. I ____-_----- Washer K- 3 Presser Foot Plate K- 4 Screw K- 5 1 Presser Foot Chain Shield K- 6 Presser Foot Stitch Tongue (11) K- 7 Pres_seerr Foot (U) 1477 K- 8 Needle Plate K- 9 Chain Feed Dog K- Name of Parts 1 100080-0-04 K-26 Washer I 025030-1-32 K-27 Spring 1 144091-0.01 K-28 Washer 1 10010o-0-05 144811-0-01 K-20 Looper Thread Tension Control Stud I 144100-0.01 H 144813-0-01 I Name o Parts K- 1 !Screw K- 2 ; K . 008- (Ruffling) 13 14 15 16 17 18 19 20 1 2 3 4 6- - 30 31 32 NN c--\'-', 33 •...

Parts Manual - English
Page 14
...N-22 N-23 N-24 N-25 N-26 N-27 N-28 N-29 Name of Parts Tape Guide Scre Needle DC X 1 Screw Washer Presser Foot Hinge Spring Screw Presser Foot Stich Tongue Presser Foot (Rear) Presser Foot Needle Plate Main Feed Dog Chain Feed Dog Differential Feed Dog Lavel IQ'ty 1 2 1 1 1 1 1 1 1 Parts No. Assembly No. 2 014680-4.22 146427.0.01 , 148217 0 01 1 017761.6-12... 9 N-10 N-11 N-12 N-13 N-14 N-15 Name of Parts Screw Set Collar Over Looper Holder Guide Base Over Looper Holder Guide Base Over Looper Holder Screw Bolt Over Looper Driving Lever Over Looper Holding Shaft Spacer Wick Wick Over Looper...
...N-22 N-23 N-24 N-25 N-26 N-27 N-28 N-29 Name of Parts Tape Guide Scre Needle DC X 1 Screw Washer Presser Foot Hinge Spring Screw Presser Foot Stich Tongue Presser Foot (Rear) Presser Foot Needle Plate Main Feed Dog Chain Feed Dog Differential Feed Dog Lavel IQ'ty 1 2 1 1 1 1 1 1 1 Parts No. Assembly No. 2 014680-4.22 146427.0.01 , 148217 0 01 1 017761.6-12... 9 N-10 N-11 N-12 N-13 N-14 N-15 Name of Parts Screw Set Collar Over Looper Holder Guide Base Over Looper Holder Guide Base Over Looper Holder Screw Bolt Over Looper Driving Lever Over Looper Holding Shaft Spacer Wick Wick Over Looper...

Parts Manual - English
Page 21
... the same as 001 - '(A-F). 19 Name of Parts f- 1 Needle Clamp 3 f- 2 Screw f- 3 Needle DC X1 4 [Screw .5 Screw 6 Presser Foot (Rear) 7 Washer 8 Presser Foot Hinge Spring Presser Foot Stitch Tongue f- 0 Screw- . 1 Presser Foot 12 Presser Foot 13 Needle Plate f-I4 Main Feed Dog f-15 Differential Feed Dog ty Parts No. Needle Width 3mm (Extra Heavy) ---3 0241 16 4 6 13 S 20 21 4..-a0 2 14 15 N 22-23 24 (c;) 26 27 -Me Ref No. f . 031 - Assembly No bly 1 2 -I 146773-0 01 2 112297-0-21 1 100080-0-04...
... the same as 001 - '(A-F). 19 Name of Parts f- 1 Needle Clamp 3 f- 2 Screw f- 3 Needle DC X1 4 [Screw .5 Screw 6 Presser Foot (Rear) 7 Washer 8 Presser Foot Hinge Spring Presser Foot Stitch Tongue f- 0 Screw- . 1 Presser Foot 12 Presser Foot 13 Needle Plate f-I4 Main Feed Dog f-15 Differential Feed Dog ty Parts No. Needle Width 3mm (Extra Heavy) ---3 0241 16 4 6 13 S 20 21 4..-a0 2 14 15 N 22-23 24 (c;) 26 27 -Me Ref No. f . 031 - Assembly No bly 1 2 -I 146773-0 01 2 112297-0-21 1 100080-0-04...

Parts Manual - English
Page 25
... k-15 k-16 Name of Parts Q'ty Parts No. Name of Parts Tape Guide Screw Needle Clamp 2.2 Screw Needle DC X1 Screw Washer Presser Foot Hinge Spring Screw Presser Foot Stitch Tongue Presser Foot (Rear) Presser Foot Needle Plate Main Feed Dog Chain Feed Dog Differential Feed Dog Q Parts No. k-28 Wick 108809-0-01 I k-29 Wick 148249-0-00 1 148187-0- 01 1 48189-0-01 k-3(rl Over Looper k-31 Screw 1 147937-0-01 014680-4-22 46750-0- 01 k-32 Spring , 1 144104-0-01 *a. k . 045 - No. Ref. Assembly No. 1 146883-0- 01...
... k-15 k-16 Name of Parts Q'ty Parts No. Name of Parts Tape Guide Screw Needle Clamp 2.2 Screw Needle DC X1 Screw Washer Presser Foot Hinge Spring Screw Presser Foot Stitch Tongue Presser Foot (Rear) Presser Foot Needle Plate Main Feed Dog Chain Feed Dog Differential Feed Dog Q Parts No. k-28 Wick 108809-0-01 I k-29 Wick 148249-0-00 1 148187-0- 01 1 48189-0-01 k-3(rl Over Looper k-31 Screw 1 147937-0-01 014680-4-22 46750-0- 01 k-32 Spring , 1 144104-0-01 *a. k . 045 - No. Ref. Assembly No. 1 146883-0- 01...
Parts Manual - English
Page 27
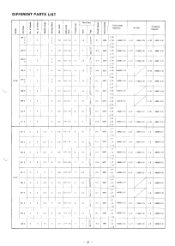
of Thread Needle Gauge Sewing Width Max Stitch Differential Ratio Presser Foot , Needle Speed Sewing Speed Feed Dog Front Cover Threa ding Assembly Oil Cap 5 D o>a6 Diagram to n I- 001 3 4 I 5 002- 5 1 3 I I A ...148985 0 01 A 27 1 I 1865 0 01 9 148098 0 01 I B 4 I 6 A 1 1 I 1865 0 01 a -9 148098 0 01 031-7 2 B 571 033 5 2 037-5 2 041 5 2 042 6 2 045 6 2 a_4 3.6 0 3- DIFFERENT PARTS LIST No. I 8 6 1.6 3 4 A 1 1 5000 a 8 148985 0-01 ' A 27 1 1 1865 0 01 a 9 148098 0 01 a 3 023 6 2 2.2 6 3.6 0.3-1.8 6 1 6 a I I 5000 4 a 8 148985 0 01 A-27 I I ...
of Thread Needle Gauge Sewing Width Max Stitch Differential Ratio Presser Foot , Needle Speed Sewing Speed Feed Dog Front Cover Threa ding Assembly Oil Cap 5 D o>a6 Diagram to n I- 001 3 4 I 5 002- 5 1 3 I I A ...148985 0 01 A 27 1 I 1865 0 01 9 148098 0 01 I B 4 I 6 A 1 1 I 1865 0 01 a -9 148098 0 01 031-7 2 B 571 033 5 2 037-5 2 041 5 2 042 6 2 045 6 2 a_4 3.6 0 3- DIFFERENT PARTS LIST No. I 8 6 1.6 3 4 A 1 1 5000 a 8 148985 0-01 ' A 27 1 1 1865 0 01 a 9 148098 0 01 a 3 023 6 2 2.2 6 3.6 0.3-1.8 6 1 6 a I I 5000 4 a 8 148985 0 01 A-27 I I ...
Service Manual
Page 2
... thread tension 36 Wrong chaining-off (Overlock Stitch) 36 Excessive wrinkles 37 Slipage of cloth 37 SPECIFICATIONS 2 3. SEWING INSTRUCTION 28 M Single needle two thread 28 W Single needle three thread 29 ❑3 Twin needle four thread 31 W Twin needle five thread 31 8. FEATURES 1 2. DESCRIPTION OF MECHANISM 9 REEEIREE Needle bar mechanism 9 Under looper mechanism 9 Over looper mechanism 9 Double chain stitch looper mechanism 10 Knives mechanism 10 Feed mechanism 11 Presser foot mechanism 12 4. DISASSEMBLING PROCEDURES 12 Cover...
... thread tension 36 Wrong chaining-off (Overlock Stitch) 36 Excessive wrinkles 37 Slipage of cloth 37 SPECIFICATIONS 2 3. SEWING INSTRUCTION 28 M Single needle two thread 28 W Single needle three thread 29 ❑3 Twin needle four thread 31 W Twin needle five thread 31 8. FEATURES 1 2. DESCRIPTION OF MECHANISM 9 REEEIREE Needle bar mechanism 9 Under looper mechanism 9 Over looper mechanism 9 Double chain stitch looper mechanism 10 Knives mechanism 10 Feed mechanism 11 Presser foot mechanism 12 4. DISASSEMBLING PROCEDURES 12 Cover...

Service Manual
Page 4
Tee shirts ' Blind hemming ruler 005-3 -4 -5 -6 4. 006-3 -4 -5 -6 007-2 -4 * II 008-5 * -1 14- 3 Serging 1 2 - 45 3.6 0.3-1.8 4 1.6 H H #14 5000 STrkoirutssers 6 3 1 3 - 4 3.6 0.3-1.8 4 1.6 ill 6 Serging #14 5000 STrkoirutssers IN •Kr 1 3 - BU1B , Negligee - 2 - EF4-B561 MADE IN JAPAN Z ry"t, qub 'class Na. of ;ihlor: c/ gurngle stitch l,e,,ng, th (mm( feed redo (a) m .-r-, (b) 0 olfught Pitch presser traimd ) of dog Differential Typedooi g feed _ 1 Maximum Needle1) r e ,4f7P7' I '' ' Usage (material) Attachmem 001...
Tee shirts ' Blind hemming ruler 005-3 -4 -5 -6 4. 006-3 -4 -5 -6 007-2 -4 * II 008-5 * -1 14- 3 Serging 1 2 - 45 3.6 0.3-1.8 4 1.6 H H #14 5000 STrkoirutssers 6 3 1 3 - 4 3.6 0.3-1.8 4 1.6 ill 6 Serging #14 5000 STrkoirutssers IN •Kr 1 3 - BU1B , Negligee - 2 - EF4-B561 MADE IN JAPAN Z ry"t, qub 'class Na. of ;ihlor: c/ gurngle stitch l,e,,ng, th (mm( feed redo (a) m .-r-, (b) 0 olfught Pitch presser traimd ) of dog Differential Typedooi g feed _ 1 Maximum Needle1) r e ,4f7P7' I '' ' Usage (material) Attachmem 001...
Service Manual
Page 14
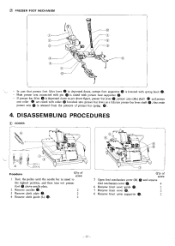
...@ knocked into presser bar lever as a fulcrum presser bar lever shaft 40, thus main presser arm Q is raised to the highest position, and then turn out presser foot 0 above needle plate. 2 Remove needles 0. 2 3 Remove cloth plate 0. 2 4 Remove cloth guide (L) O. 2 0190 10 Q'ty of presser bar spring 0 . 4. DISASSEMBLING PROCEDURES ❑I COVER e ceo DOX I --DCX I -DOX 13 Procedures Q'ty of screw 1 Turn the pulley until the needle bar is released from the pressure of screw 5 Open feed mechanism cover (B) 0 and remove feed mechanism cover 0. 4 6 Remove front cover guide...
...@ knocked into presser bar lever as a fulcrum presser bar lever shaft 40, thus main presser arm Q is raised to the highest position, and then turn out presser foot 0 above needle plate. 2 Remove needles 0. 2 3 Remove cloth plate 0. 2 4 Remove cloth guide (L) O. 2 0190 10 Q'ty of presser bar spring 0 . 4. DISASSEMBLING PROCEDURES ❑I COVER e ceo DOX I --DCX I -DOX 13 Procedures Q'ty of screw 1 Turn the pulley until the needle bar is released from the pressure of screw 5 Open feed mechanism cover (B) 0 and remove feed mechanism cover 0. 4 6 Remove front cover guide...

Service Manual
Page 17
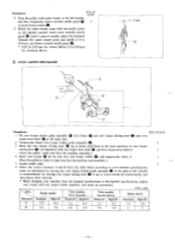
... screw.) 8 Remove double chain stitch looper take-up CV 2 O - • Procedures Q'ty of screw 1 Remove needle thread take-up 0. 1 2 Remove needle thread guide (A) Q. 1 3 Remove needle thread take-up supporter 0. 1 4 Remove chain stitch needle thread guide 0 (B581). 1 5 Remove face plate 0. 4 (Stopper spring fp is naturally to be removed out.) 3(B581) Procedures Q'ty of screw 6 Remove needle mechanism cover el, taking care not to spoil the packing. 7 (Put feed mechanism cover on the machine body.) 7 Loosen screw for needle bar clamp Q and pull- out needle bar 0 lower...
... screw.) 8 Remove double chain stitch looper take-up CV 2 O - • Procedures Q'ty of screw 1 Remove needle thread take-up 0. 1 2 Remove needle thread guide (A) Q. 1 3 Remove needle thread take-up supporter 0. 1 4 Remove chain stitch needle thread guide 0 (B581). 1 5 Remove face plate 0. 4 (Stopper spring fp is naturally to be removed out.) 3(B581) Procedures Q'ty of screw 6 Remove needle mechanism cover el, taking care not to spoil the packing. 7 (Put feed mechanism cover on the machine body.) 7 Loosen screw for needle bar clamp Q and pull- out needle bar 0 lower...
Service Manual
Page 21
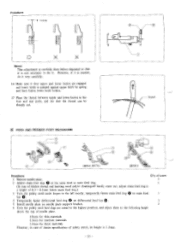
.... 1 (Turn the pulley, make sure that the machine smoothly.) 4 Insert over looper Q all the way into over looper holder assembly, and make sure that the machine runs smoothly. ) 5 Install needle plate. 2 6 Select the correct distance A and B from the standard specifications to 0.03mm for cotton fabrics; 0 to the high-lift specifications, replace over looper and over looper holder 0, and temporarily fasten it contacts needle, adjust the clearance between...
.... 1 (Turn the pulley, make sure that the machine smoothly.) 4 Insert over looper Q all the way into over looper holder assembly, and make sure that the machine runs smoothly. ) 5 Install needle plate. 2 6 Select the correct distance A and B from the standard specifications to 0.03mm for cotton fabrics; 0 to the high-lift specifications, replace over looper and over looper holder 0, and temporarily fasten it contacts needle, adjust the clearance between...
Service Manual
Page 25
Thread a FEED AND PRESSER FOOT MECHANISM Cl) e e (B561, B571) (B581) Procedures Q'ty of screw I Remove needle plate. 2 2 Adjust chain feed dog 0 at the same level as main feed dog. 1 (In case of thicker thread and knitting wool and/or chaining-off hardly come out, adjust chain feed dog to a height of 0.3 ^ 0.5mm below main feed dog.) 3 Turn the pulley until under looper to the left mostly, temporarily fasten main feed dog ID on main feed bar Q. 4 Temporarily...
Thread a FEED AND PRESSER FOOT MECHANISM Cl) e e (B561, B571) (B581) Procedures Q'ty of screw I Remove needle plate. 2 2 Adjust chain feed dog 0 at the same level as main feed dog. 1 (In case of thicker thread and knitting wool and/or chaining-off hardly come out, adjust chain feed dog to a height of 0.3 ^ 0.5mm below main feed dog.) 3 Turn the pulley until under looper to the left mostly, temporarily fasten main feed dog ID on main feed bar Q. 4 Temporarily...
Service Manual
Page 30
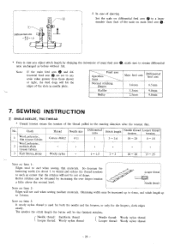
... 3.6mm. SEWING INSTRUCTION SINGLE-NEELDE, TWO-THREAD * Thread tension means the tension of the thread pulled in the running direction after the tension disc. Note on Item 2: Edges will not curl when se ng medium materials. Note: If the main feed arm 0 and differential feed arm 43) are set to such an extent that of the scale on main feed arm 0. _J * Even in case you adjust stitch length by...
... 3.6mm. SEWING INSTRUCTION SINGLE-NEELDE, TWO-THREAD * Thread tension means the tension of the thread pulled in the running direction after the tension disc. Note on Item 2: Edges will not curl when se ng medium materials. Note: If the main feed arm 0 and differential feed arm 43) are set to such an extent that of the scale on main feed arm 0. _J * Even in case you adjust stitch length by...
Service Manual
Page 31
... presser pressure to 2 to #9). 3) Use a well-shaped light ball point (Schmetz), S-point (Organ), or knit needle KN (Organ). - Be careful not to buff them horizontally. Remember not to lower the thread take -up so much because excessive buffing will be no skipped stitches because the thread tension is loose e 0 Lower C 0 C) If the work slipping in the range of corners I/ \I lI Feed dog - 29 - C) If fiber breaks...
... presser pressure to 2 to #9). 3) Use a well-shaped light ball point (Schmetz), S-point (Organ), or knit needle KN (Organ). - Be careful not to buff them horizontally. Remember not to lower the thread take -up so much because excessive buffing will be no skipped stitches because the thread tension is loose e 0 Lower C 0 C) If the work slipping in the range of corners I/ \I lI Feed dog - 29 - C) If fiber breaks...
Service Manual
Page 33
... be used for three threads. A poor quality thread tends to decrease thread delivery. 3. DOUBLE-NEEDLE, FOUR THREADS No. 1 Double needle four threads 2 Cloth Knit unddewrweeaarr material Thin knitwork 3 Bulky material Thread Cotton #60/2 Synthetic #60 Needle: Synthetic #60 Looper: Woolen Mock safety 4 Broadcloth 5 Jersey Cotton #80 Polyester #50 Needle size Differential ratio Stitch length # 9 1 --1.5 2 - 2.5 #11 # 14 1-- 2 2 .s. 3 PI 2.2 --2.8 #11 0.8 ^-1 #14 1.5 -- 2 2 -2.5 2.5 - 3 No. In such a case, raise the over looper thread tension...
... be used for three threads. A poor quality thread tends to decrease thread delivery. 3. DOUBLE-NEEDLE, FOUR THREADS No. 1 Double needle four threads 2 Cloth Knit unddewrweeaarr material Thin knitwork 3 Bulky material Thread Cotton #60/2 Synthetic #60 Needle: Synthetic #60 Looper: Woolen Mock safety 4 Broadcloth 5 Jersey Cotton #80 Polyester #50 Needle size Differential ratio Stitch length # 9 1 --1.5 2 - 2.5 #11 # 14 1-- 2 2 .s. 3 PI 2.2 --2.8 #11 0.8 ^-1 #14 1.5 -- 2 2 -2.5 2.5 - 3 No. In such a case, raise the over looper thread tension...

Service Manual
Page 34
.... Use gauge parts for efficient feeding. Change it for a new one . Blunt Flaws Adjust to proper timing, needle clearance 19 and position of good quality. Use thread of needle guard. - 32 - Use a single type presser foot for denim specification. 8. Remarks: If a single type presser foot is used except when sewing thin materials, initial stitches may skip, the thread may break, and chaining-off thread break may occur. Change needle for double chain stitches, it can resist stretching up . - 6 Needle thread passage has flaws. - 7 Needle plate has...
.... Use gauge parts for efficient feeding. Change it for a new one . Blunt Flaws Adjust to proper timing, needle clearance 19 and position of good quality. Use thread of needle guard. - 32 - Use a single type presser foot for denim specification. 8. Remarks: If a single type presser foot is used except when sewing thin materials, initial stitches may skip, the thread may break, and chaining-off thread break may occur. Change needle for double chain stitches, it can resist stretching up . - 6 Needle thread passage has flaws. - 7 Needle plate has...
Service Manual
Page 35
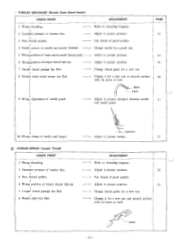
.... - 8 Double chain stitch looper has flaw. - 9 Wrong adjustment of tension disc. ---. Adjust to proper position. 16 Adjust to threading diagram. 1 2 Excessive pressure of needle guard. - Adjust to proper clearance between needle 21 and needle guard. Change thread guide for a good one or smooth surface 20 with oil stone or buff. - 33 - Blunt Flaws Adjust to proper timing. 21 ❑2 THREAD BREAK (Looper Thread) CHECK POINT ADJUSTMENT 1 Wrong threading. - Refer to proper position. 25 Change thread guide for a new one . 6 Needle plate has...
.... - 8 Double chain stitch looper has flaw. - 9 Wrong adjustment of tension disc. ---. Adjust to proper position. 16 Adjust to threading diagram. 1 2 Excessive pressure of needle guard. - Adjust to proper clearance between needle 21 and needle guard. Change thread guide for a good one or smooth surface 20 with oil stone or buff. - 33 - Blunt Flaws Adjust to proper timing. 21 ❑2 THREAD BREAK (Looper Thread) CHECK POINT ADJUSTMENT 1 Wrong threading. - Refer to proper position. 25 Change thread guide for a new one . 6 Needle plate has...
Service Manual
Page 38
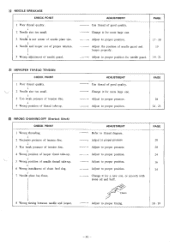
.... 1 2 Needle size too small. 1 3 Too weak pressure of tension disc. 4 4 Wrong position of needle guard. Adjust to proper position. ----.• Change it for a new one, or smooth with stone oil and buff. PAGE 28 24 • 25 WRONG CHAINING-OFF (Overlock Stitch) CHECK POINT 1 Wrong threading. 4 2 Excessive pressure of tension disc. 1 3 Too weak pressure of tension disc. 1 4 Wrong position of looper thead take-up. 1 5 Wrong position of needle thread take -up . 1 6 Wrong installment...
.... 1 2 Needle size too small. 1 3 Too weak pressure of tension disc. 4 4 Wrong position of needle guard. Adjust to proper position. ----.• Change it for a new one, or smooth with stone oil and buff. PAGE 28 24 • 25 WRONG CHAINING-OFF (Overlock Stitch) CHECK POINT 1 Wrong threading. 4 2 Excessive pressure of tension disc. 1 3 Too weak pressure of tension disc. 1 4 Wrong position of looper thead take-up. 1 5 Wrong position of needle thread take -up . 1 6 Wrong installment...

Service Manual
Page 39
.... --. ADJUSTMENT PAGE --. Adjust to proper ratio. 27 - ADJUSTMENT PAGE Adjust to proper pressure. 4 Wrong position of looper thread take-up. -.- • WRONG CHAINING-OFF (Double Chain Stitch) CHECK POINT ADJUSTMENT I Wrong threading. 4 2 Excessive pressure of main feed dog. Adjust to proper pressure. differential feed dog. Adjust to threading diagram. Refer to proper position. 5 Wrong position of needle thread guide. - Adjust to proper pressure. 28 - Change it for a proper one or reglind. 22 (In case of engagement of upper and lower knife...
.... --. ADJUSTMENT PAGE --. Adjust to proper ratio. 27 - ADJUSTMENT PAGE Adjust to proper pressure. 4 Wrong position of looper thread take-up. -.- • WRONG CHAINING-OFF (Double Chain Stitch) CHECK POINT ADJUSTMENT I Wrong threading. 4 2 Excessive pressure of main feed dog. Adjust to proper pressure. differential feed dog. Adjust to threading diagram. Refer to proper position. 5 Wrong position of needle thread guide. - Adjust to proper pressure. 28 - Change it for a proper one or reglind. 22 (In case of engagement of upper and lower knife...


