
Brother International CE-5000PRW Support Question
Brother International CE-5000PRW Support Question
Find answers below for this question about Brother International CE-5000PRW.Need a Brother International CE-5000PRW manual? We have 1 online manual for this item!
Question posted by angel1t on August 25th, 2014
How To Install Brother Ce-5000prw Foot
The person who posted this question about this Brother International product did not include a detailed explanation. Please use the "Request More Information" button to the right if more details would help you to answer this question.
Current Answers
Related Brother International CE-5000PRW Manual Pages
Users Manual - English - Page 2
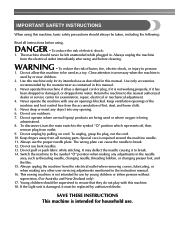
... fingers away from the accumulation of the machine and foot control free from all instructions before cleaning. Do not use outdoors. 7. Switch the machine to be replaced by young children or ... in the instruction manual. 16. Special care is intended for use . This sewing machine is not intended for household use by authorized dealer. IMPORTANT SAFETY INSTRUCTIONS
When using...
Users Manual - English - Page 4
... or installing any other parts to change without notice.
2 Do not drop or hit the machine. 4. For additional product information and updates, visit our web site at www.brother.com The contents of this manual and specifications of the most advanced computerized household sewing machines. If the problem persists, please consult your eye on the foot...
Users Manual - English - Page 5
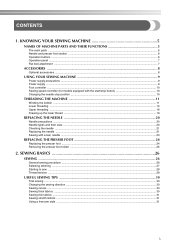
... Thread tension ...29
USEFUL SEWING TIPS ...30
Trial sewing ...30 Changing the sewing direction ...30 Sewing curves ...30 Sewing thick fabrics ...30 Sewing thin fabrics ...31 Sewing stretch fabrics ...31 Using a free-arm style ...31
3 CONTENTS
1. KNOWING YOUR SEWING MACHINE 5
NAMES OF MACHINE PARTS AND THEIR FUNCTIONS 5
The main parts ...5 Needle and presser foot section ...6 Operation buttons...
Users Manual - English - Page 7
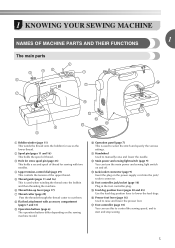
... 29) Pass the threads through the thread cutter to manually raise and lower the needle.
q Foot controller (page 10) You can turn the main power and sewing light switch on and off. 1 KNOWING YOUR SEWING MACHINE
1
NAMES OF MACHINE PARTS AND THEIR FUNCTIONS
The main parts
a Bobbin winder (page 11) This winds the thread onto...
Users Manual - English - Page 8
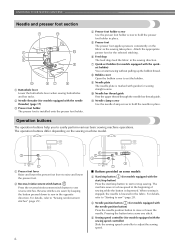
... the fabric.
Pressing the button twice sews one stitch. d Presser foot holder screw Use the presser foot holder screw to easily perform various basic sewing machine operations. k Needle clamp screw Use the needle clamp screw to raise or lower the needle. When sewing is stopped, the needle is installed onto the presser foot holder. d Needle position button (for...
Users Manual - English - Page 9

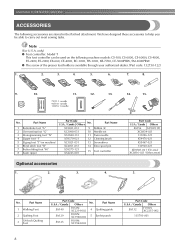
... to adjust the stitch width. (Press the "-" side to reduce the stitch width; Operation panel
The operation panel, located on the front of the sewing machine, allows you wish to use. a LCD (Liquid crystal display)
The selected stitch (1), presser foot that you to select a stitch and specify how the stitch will be sewn.
Users Manual - English - Page 10
... pin
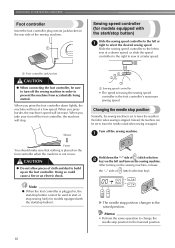
X59375-121 X54243-001
15 Foot controller
Optional accessories
1.
2.
3.
4. KNOWING YOUR SEWING MACHINE
ACCESSORIES
The following machine models: CS-100, CS-6000, CS-6000i, CS-4000, ES-2400, ES-2000, EX-660, CE-4000, BC-1000, HS-1000, XR-7700, CE-5000PRW, SM-6500PRW
● The screw of the presser foot holder is available through your authorized...
Users Manual - English - Page 11
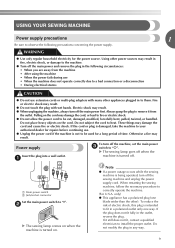
... main power and remove the plug in fire, electric shock, or damage to the machine.
● Turn off the main power first. Note
● If a power outage occurs while the sewing machine is damaged, take the machine to fit in to install the proper outlet. only) ● This appliance has a polarized plug (one way. If...
Users Manual - English - Page 12
...
CAUTION
● When connecting the foot controller, be used to select the desired sewing speed. When you take your foot off the foot controller, the machine will increase. a
Faster
You should make sure that nothing is placed on the foot controller when the machine is stopped. KNOWING YOUR SEWING MACHINE
Foot controller
Insert the foot controller plug into its jack/socket...
Users Manual - English - Page 14
... button) (for models equipped with the start/stop button) to wind the thread around the bobbin, the machine will make a clicking sound; KNOWING YOUR SEWING MACHINE
While holding the end of the thread, gently f press the foot controller or press (start/
stop button) (for models equipped with the
start/stop button) to start. Note...
Users Manual - English - Page 15
... thread is wound without cutting the thread using the foot controller, connect the foot controller before turning on the sewing machine. Note
● If the sewing machine is plugged in, the start/stop sewing (only for models equipped with built-in the bobbin. Turn on the machine.
● When the foot controller is to be used to the right.
Users Manual - English - Page 16
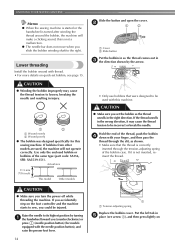
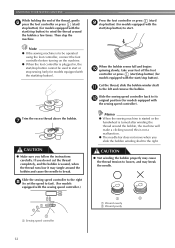
...Make sure you set bobbin, see arrow a), and then press lightly on the foot controller and the machine starts to be incorrect or break the needle. If it may cause the ...counterclockwise) or
press (needle position button) (for this sewing machine. Hold the end of the same type (part code: SA156, SFB: XA5539-151). Lower threading
Install the bobbin wound with this is turned after winding the...
Users Manual - English - Page 18
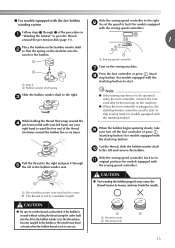
... thread could tangle and break the needle. a Presser foot lever
or
a Mark
b Needle position button
• If the needle is not correctly raised, the sewing machine can not be threaded. a Spool pin b Thread guide c Mark on the needle threader, see page 17. KNOWING YOUR SEWING MACHINE
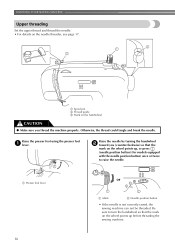
Upper threading
Set the upper thread and thread the...
Users Manual - English - Page 19
...foot lever and the thread take-up
1
lever before you feed the upper thread.
● If you incorrectly feed the thread you may tangle on the spool pin and cause the needle to left hand, then feeding the thread with home sewing machine... you guide the thread through 6 of the procedure in a "Upper threading" to thread the machine to back and pull g out about 5 cm (2 inch) of 90/14-100/16.
...
Users Manual - English - Page 22
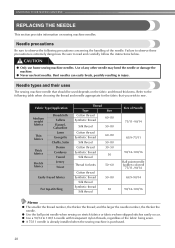
... the fabric and thread thickness.
Needle types and their uses
The sewing machine needle that you wish to read and carefully follow the instructions below. Be sure to sew. Use of the fabric being sewn. ● A 75/11 needle is already installed when the sewing machine is extremely dangerous. Fabric Type/Application
Medium weight fabrics
Thin...
Users Manual - English - Page 23

... the distance between the needle and the flat surface is even.
1 2
a Mark
b Needle position button
Turn off the sewing machine, otherwise injuries may be uneven or puckered or there may occur if the foot controller or the start/ stop button is extremely dangerous
since the needle may bend or break.
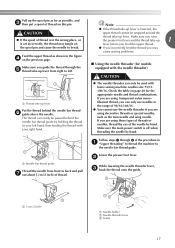
Before using the...
Users Manual - English - Page 24

...which holds the needle) may fall off. As seen from the front of the sewing machine may result.
■ Installing the needle clamp If the needle clamp is removed, follow the procedure below to attach... turn . (If the needle clamp screw is loosened too much .)
Install the twin needle in the same way.
KNOWING YOUR SEWING MACHINE
Hold the needle with your left hand, and then d use the ...
Users Manual - English - Page 26

... have been designed to turn off the sewing machine, otherwise injuries may cause injury. ● Only use the wrong presser
foot, the needle may strike the presser foot and bend or break, and may occur if the foot controller or the start and you change the presser foot. c
a Presser foot holder b Shank c Pin
Note
● The presser...
Users Manual - English - Page 27
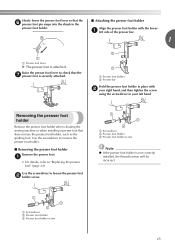
...a
• For details, refer to remove the presser foot holder.
■ Removing the presser foot holder Remove the presser foot.
a left hand.
Removing the presser foot holder
Remove the presser foot holder when cleaning the sewing machine or when installing a presser foot that the g presser foot is not correctly installed, the thread tension will be incorrect.
Use the screwdriver...
Users Manual - English - Page 28

...to "Selecting stitching" (page 27).
↓
3
Attach the presser foot. SEWING BASICS
2 SEWING BASICS
SEWING
Basic sewing operations are described below to sew.
1
Turn on the machine. General sewing procedure
Follow the basic procedures below . Attach the presser foot appropriate for the area to the needle location. When sewing is in injuries. ● Make sure that the needle...
Similar Questions

Where To Oil A Brother Ce-5000prw
(Posted by kidloBigboi 9 years ago)

How To Thread A Brother Ce-5000prw Sewing Machine
(Posted by nerandy0 10 years ago)

How To Thread A Brother Ce-5000prw
(Posted by Rhoaaalext 10 years ago)

How Do I Oil My Brother Pacesetter Pc-3000 Sewing Machine
my sewing machine is not working properly. I can't change the default sewing stitch. While I am usin...
my sewing machine is not working properly. I can't change the default sewing stitch. While I am usin...
(Posted by cjlvashon 10 years ago)

How To Clean Brother Nx-450-q Sewing Machine?
Cleaning Brothers NX-450 sewing machine
Cleaning Brothers NX-450 sewing machine
(Posted by CRButler1611 12 years ago)