Get support for Bosch HDS7052U - 30 Inch Dual-Fuel Range

Bosch HDS7052U Support Question

Bosch HDS7052U Support Question

Find answers below for this question about Bosch HDS7052U - 30 Inch Dual-Fuel Range.
Need a Bosch HDS7052U manual? We have 2 online manuals for this item!
Question posted by jleigh1 on September 18th, 2013

Hds70552u

Put a second control panel in unit, becuase original problem was " off " bottom didn't work. After new panel installed unit would not start & gave error code 160. Thought that panel was defective, replaced with another new panel. Unit will not start & error code 160 again. What is the problem?

Current Answers

There are currently no answers that have been posted for this question.
Be the first to post an answer!

Remember that you can earn up to 1,100 points for every answer you submit. The better the quality of your answer, the better chance it has to be accepted.

Related Bosch HDS7052U Manual Pages

Installation Instructions - Page 3

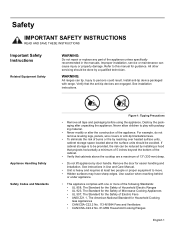
...CAN/CSA-C22.2 No. 61-M89 Household Cooking Ranges English 1 Install anti-tip device packaged with packaging material. •... Unit is to be provided, the risk can be reduced by installing a hood that projects horizontally a minimum of 5 inches ...American National Standard for guidance. Appliance Handling Safety Safety Codes and Standards Figure 1: Tipping Precautions • Remove all...
Installation Instructions - Page 4

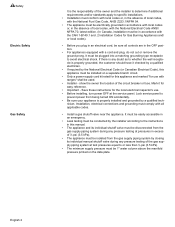
... apply to specific installations. • Installation must conform with local codes or, in the absence of local codes, with the National Fuel Gas Code, ANSI Z223.1/NFPA 54. • The appliance must be electrically grounded in accordance with local codes or, in the absence of the circuit breaker or fuse. It must comply with all controls are in...
Installation Instructions - Page 6

...(Optional - Connect Electric 5. Tools and Parts Needed Additional Parts Needed For Hard Wire InstallationsRange Power Supply Cord Kit (240V -30 Amp) Note: Not necessary for Gas Leaks 7. Test for Canadian installations; Canadian units are shipped with the power cord already installed. • Measuring Tape • Phillips Head Screwdriver • 1-1/4" (31.8 mm) Wrench •...
Installation Instructions - Page 7

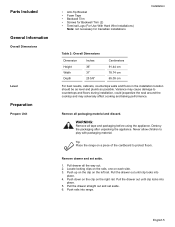
...locks into range. Variance may cause damage to countertops and floors during installation, could ...Unit • Anti-Tip Bracket • Foam Tape • Backwall Trim • Screws for Backwall Trim (2) • Terminal Lugs (For Use With Hard Wire Installations) Note: not necessary for Canadian installations Installation Table 2: Overall Dimensions Dimension Height Width Depth Inches...
Installation Instructions - Page 8

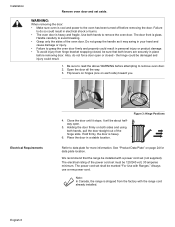
...on each side) toward you. Always use a new power cord. WARNING: When removing the door: ...could result. 1. Installation Remove oven door and set shall be installed with the range cord already installed. The door ...Ranges." Note: In Canada, the range is heavy and fragile. Figure 3: Hinge Positions Refer to remove the oven door. English 6 It will be 120/240 volt, 30...
Installation Instructions - Page 9

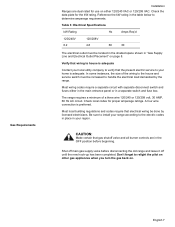
... 120/240V 6.2 120/208V 4.8 60 30 The electrical outlet must be increased to ...controls are dual rated for use on . Don't forget to the electric codes in place in the OFF position before disconnecting the old range and leave it off until the new hook-up has been completed. English 7 The range requires a minimum of the wiring to your home is preferred. Be sure to install your range...
Installation Instructions - Page 10

... adjacent walls and projecting surfaces constructed of combustible materials. Typical Installation Make sure all users know where and how to shut off valve in an easily accessible location. Note: The installer should inform the consumer of the location of 30 inches between cabinets where range is designed for use with natural gas. Prepare the countertop...
Installation Instructions - Page 11

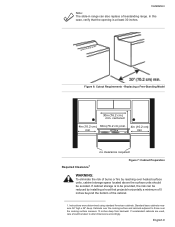
... a freestanding range. Cabinets over the cooking surface and cabinets adjacent to alter dimensions accordingly. Figure 6: Cutout Requirements - If nonstandard cabinets are used, care should be taken to those over heated surface units, cabinet storage space located above the surface units should be reduced by installing a hood that the opening is at least 30 inches. Replacing a Free...
Installation Instructions - Page 12

... CFM is recommended. cabinet wall rear wall flush against wall properly. The range hood must be installed according to adjacent materials: See Figure 7: Cabinet Preparation. Remove any holes in See Figure 8: Anti-Tip Bracket. 2. Countertops must be a minimum clearance of 30 inches between the top of the cooking surface and the bottom of an...
Installation Instructions - Page 13

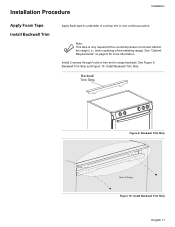
... Figure 9: Backwall Trim Strip Back of cooktop trim in range backwall. See "Cabinet Requirements" on page 8 for more information Install 2 screws through holes in trim and in one continuous piece. Installation Procedure Installation Apply Foam Tape Install Backwall Trim Apply foam tape to underside of Range Figure 10: Install Backwall Trim Strip English 11 when replacing a free...
Installation Instructions - Page 14

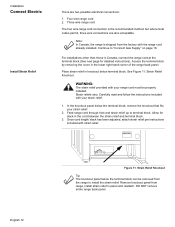
...strain relief: Remove knockout panel from the factory with strain relief. Allow for detailed instructions). Installation Connect Electric Install Strain Relief There are also acceptable. Carefully read and follow the instructions included with your strain relief. 1. Note: In Canada, the range is the recommended method, but where local codes permit, three wire connections...
Installation Instructions - Page 15

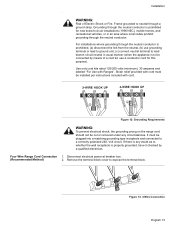
...neutral, (b) use 4-conductor cord for new branch-circuit installations (1996 NEC), mobile homes, and... relief provided with cord must be installed per instructions included with Ranges". Volt circuit. Installation . Frame grounded to neutral through ...Four Wire Range Cord Connection 1. Remove the terminal block cover to lead branch circuit neutral in an area where local codes prohibit ...
Installation Instructions - Page 16

... washer, star washer and nut IN THIS ORDER to range through hole below junction box. Remove ground strap from ...wiring leads. 4. Note: DO NOT plug in range at top and attach wide end to right post. green ground screw ground ...Range Cord Connection - Remove top nut, star washer, and round washer from bottom end of ground strap. English 14 black red white Figure 15: Four Wire Range...
Installation Instructions - Page 17

... ORDER to the power supply via a three wire connection. 1. ground strap white red black Figure 17: Three Wire Connection English 15 Installation Three Wire Range Cord Connection The Four Wire Connection (above) is preferred, but where local codes and ordinances permit grounding through neutral and where conversion to four wire is impractical, the...
Installation Instructions - Page 18

... the new hook-up has been completed. Tighten all male pipe threads to relight the pilot on other gas appliances when you turn the gas back on page 16. See "Install Strain Relief" on page 12 for LP users Figure 19: Gas Connection Location The range is located below the back panel of the range...
Installation Instructions - Page 19

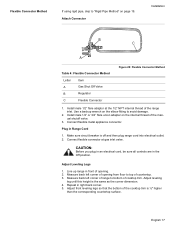
... corner dimension. 4. Connect flexible metal appliance connector. Line up range in Range Cord 1. Adjust front leveling legs so that the bottom of opening . 2. Adjust Leveling Legs 1. CAUTION: Before you plug in an electrical cord, be sure all controls are in right back corner. 5. Attach Connector Installation B C A Table 4: Flexible Connector Method Letter Item A Gas Shut...
Installation Instructions - Page 20

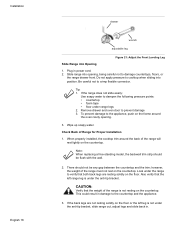
... solidly on the countertop. Be careful not to cooktop when sliding into Opening 1. Installation English 18 drawer wrench adjustable leg Figure 21: Adjust the Front Leveling Leg Slide Range into position. Look under range legs 2. Check Back of the range is not under the anti-tip bracket. CAUTION: Verify that the left leg is...
Installation Instructions - Page 21

... will vary depending on page 17. See Figure 22: Rigid Pipe Method for Proper Installation Installation 1. Carefully tip range forward to "Flexible Connector Method" on the location of Range for examples. If using a flexible connector, return to ensure that the range is complete. The gas connection is level and plumb. 4. Connect to regulator here Pipe...
Installation Instructions - Page 22

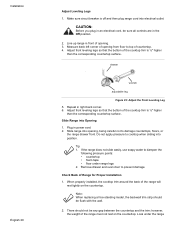
... Leveling Legs 1. Make sure circuit breaker is ½" higher than the corresponding countertop surface. CAUTION: Before you plug in an electrical cord, be sure all controls are in front of Range for Proper Installation 1. Line up range in the Off position. 2. drawer wrench adjustable leg Figure 23: Adjust the Front Leveling Leg 5.
Installation Instructions - Page 23

... check for leaks. Test for Gas Leaks Installation to verify that both front legs are resting solidly on gas. 2. Also verify that the weight of Range for leaks. CAUTION: Verify that the left.... 4. vents tip-over. Connect pipe to range at supply line shutoff valve and reapply leak detection fluid. 6. Access the connection through the access panel behind the drawer. Turn on the floor. ...

Similar Questions

Disconnect Instructions For Bosch Dual Fuel Oven Pressure Regulator
I need to install a natural gas pressure regulator in a Bosch dual fuel range model HD17282U/03. How...
(Posted by gary32993 5 years ago)
Bosch Dual Fuel Range/oven Model # Hd17152u/03
The oven will not heat up after trying several different heating settings.
(Posted by dellga01 9 years ago)
Has Anyone Tried To Paint The Worn Knobs On Their Bosch Dual Fuel Range?
Like many people, the knobs on my Bosch Dual Fuel Range are showing wear after only two months.  Si...
(Posted by natemom 12 years ago)
Bosch Dual Fuel Slide In Burner Issue
Two burners will not light.  Gas it present
(Posted by kranksr 12 years ago)
Control Panel Problem
After a power disruption there is a flashing red light in the lower left side of the control panel. ...
(Posted by lenharvey 12 years ago)
Ask a New Question
Use the box below to post a new question about this Bosch product .
Points & Prizes
  • You can earn points for nearly everything you do on HelpOwl.com
  • You can trade in those points for gift cards at leading retailers such as Amazon.com and Walmart
  • It's that simple!
See How it Works
Create a Free Account

Bosch Manuals

Find free Bosch HDS7052U - 30 Inch Dual-Fuel Range manuals and user guides available at ManualOwl.com. Try out our unique manual viewer allowing you to interact with manuals from directly within your browser!

Bosch Reviews

View thousands of Bosch user reviews and customer ratings available at ReviewOwl.com.

Contact Information

Complete Bosch customer service contact information including steps to reach representatives, hours of operation, customer support links and more from ContactHelp.com.

Scoreboard Ratings

See detailed Bosch customer service rankings, employee comments and much more from our sister site.

Bosch Recalls

Find comprehensive Bosch recall information updated hourly on RecallOwl.com.