Bernina Aurora 440QE Support Question
Bernina Aurora 440QE Support Question
Find answers below for this question about Bernina Aurora 440QE.Need a Bernina Aurora 440QE manual? We have 1 online manual for this item!
Question posted by mgr0920 on August 21st, 2014
Re Berninaaurora 440qe: Just Cleaned & Oiled Bobbin Race, And Now Machine Won't
stitch except for single stitches initiated by depressing front of pedal. Instead, it emits brief beep. Worked fine before cleaning. Is there a quick fix. Purchased from dealer no longer in business; nearest dealer more than 1.5 hours away with long waiting period. Help! PLEASE!
Current Answers
Related Bernina Aurora 440QE Manual Pages
User Guide - Page 3
...20-21 22
57-58
23 24-25 26-29
Applications
Stitch selection 430 / 440 QE / 450 Temporary altered stitch memory Application of buttonholes / Eyelets / Button sew - Important information Application of practical stitches, Quilt stitches, Decorative stitches Buttonholes - Your sewing computer
Accessories Details aurora 430 / 440 QE / 450 Setting up the embroidery computer Important embroidery...
User Guide - Page 4
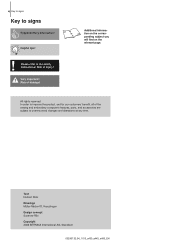
... Susanne Ribi Copyright 2008 BERNINA International AG, Steckborn
032907.52.04_1103_a430_a440_a450_EN In order to improve the product, and for our customers' benefit, all of the sewing and embroidery computer's features, parts, and accessories are subject to signs
& Supplementary information!
27
Helpful tips!
! Very important! All rights reserved.
Additional informa28 tion on...
User Guide - Page 5
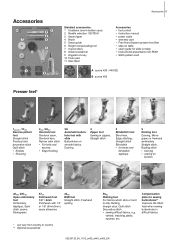
...10
Standard accessories: 1 5 bobbins (one in bobbin case) 2 Needle selection ...sewing buttonholes** Improves the fabric feed when sewing buttonholes in zippers, Straight stitch
5 Blindstitch foot Blind hem, Edge stitching, Straight stitch Blindstitch • for slide-on table • Instructional presentation CD-ROM • Stitch-pattern card
1
A aurora 430 / 440 QE
2
11
A
B
B aurora...
User Guide - Page 9
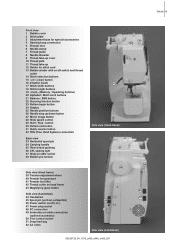
...Quick reverse button 32 FHS (Free Hand System) connection
Back view 33 Horizontal spool pin 34 Carrying handle 35 Rear thread guideng 36 CFL sewing light 37 Slide-on table socket 38 Bobbin...51
46 47
52
Side view (handwheel)
032907.52.04_1103_a430_a440_a450_EN Details 9
Front view 1 Bobbin cover 2 Stitch plate 3 Attachment base for special accessories 4 Darning hoop connection 5 Presser foot 6 ...
User Guide - Page 11
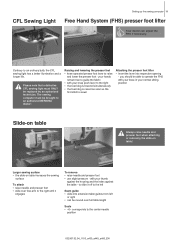
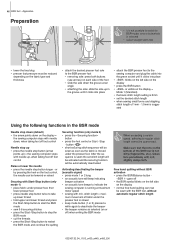
...sewing light must be brought to the right • the feed dog is lowered simultaneously • the feed dog is raised as soon as the first stitch... foot - CFL Sewing Light
Setting up the sewing computer 11
Free Hand System (FHS) presser foot lifter
& Your dealer can be moved ...sewing light has a better illumination and a longer life. Larger sewing surface • the slide-on table!
User Guide - Page 13
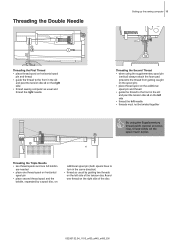
... on horizontal
spool pin • place second thread spool and the
bobbin, separated by a spool disc, on
additional spool pin (both spools have to the front in the slit and past the tension disc A on the right side • thread sewing computer as usual and thread the right needle
Threading the Second...
User Guide - Page 16
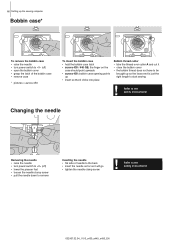
...; flat side of the bobbin case • remove case
* pictures = aurora 450
To insert the bobbin case • hold the bobbin case latch • aurora 430 / 440 QE: the finger on the
case should point upwards • aurora 450: bobbin case opening points
up as the loose end is just the right length to start sewing
!
Refer to the...
User Guide - Page 18
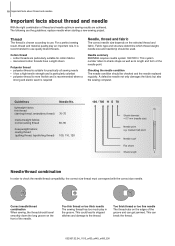
...the sewing computer. Too thin thread or too thick needle The sewing thread has too much play an important role.
Too thick thread or too fine needle...sewing, the thread should travel smoothly down the long groove on the selected thread and fabric.
medium ball point
Needle scarf Flat shank Shank length
Needle/thread combination
In order to the thread. This could lead to skipped stitches...
User Guide - Page 27
... No. 155
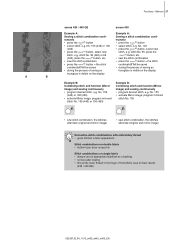
• sew stitch combination, the stitches alternate (original and mirror image)
• sew stitch combination, the stitches alternate (original and mirror image)
Decorative stitch combinations with embroidery thread • gives stitches a fuller appearance
Stitch combinations on double fabric • bottom layer does not pucker
Stitch combinations on single fabric • always...
User Guide - Page 28
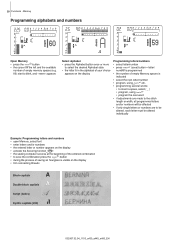
... a space, select ( _ )
• program, using
• program the next word
• if adjustments are made to the stitch
length or width, all programmed letters
and/or numbers will be affected
• if only single letters or numbers are to be
altered, each letter must be altered
individually
Example: Programming letters and numbers...
User Guide - Page 36
...,
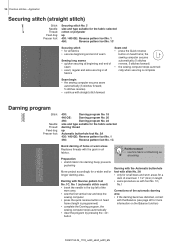
No.1
Corrections of
seam • exact, regular and safe securing in all
fabrics
Seam end • press the Quick reverse
button on the Balance function)
032907.52.04_1103_a430_a440_a450_EN the sewing computer secures automatically (5 stitches reverse, 5 stitches forward) • the sewing computer stops automatically when securing is programmed) • complete the Darning program, the...
User Guide - Page 46
...Clean...the securing function will beep indicating
beeper activation • an acoustic tone beeps to indicate the
sewing computer is not dirty... sewn the set the desired stitch length • when sewing small forms and stippling,
stitch length of fabric under the ...deactivated
& When exceeding a certain speed, adhering to stop button longer - or
by pressing the heel on the bottom of the BSR...
User Guide - Page 52
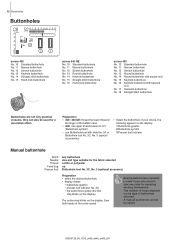
... No. 14 Round buttonhole with square end No. 15 Keyhole buttonhole No. 16 Keyhole buttonhole with tapered
end No. 17 Heirloom buttonhole No. 18 Straight stitch buttonhole
#VUUPOIPMFTBSFOPUPOMZQSBDUJDBM DMPTVSFT UIFZDBOBMTPCFVTFEGPSB EFDPSBUJWFFGGFDU
1SFQBSBUJPO 2&UISFBEUIFMPXFSUISFBEJO
UIFGJOHFSPGUIF...
User Guide - Page 53
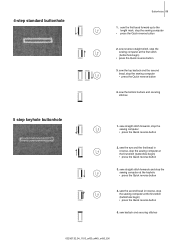
...8226; press the Quick reverse button
4. sew reverse straight stitch, stop the sewing computer at the first stitch (buttonhole begin ) • press the Quick reverse button
3. sew the second bead in reverse, stop the sewing computer at the keyhole • press the Quick reverse button
4. sew straight stitch forwards, stop the sewing computer at the first stitch (buttonhole begin ) •...
User Guide - Page 55
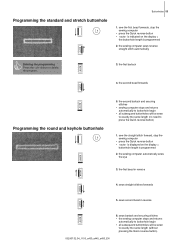
... and returns
automatically to buttonhole begin
• all subsequent buttonholes will be sewn
to exactly the same length (without pressing the Quick reverse button) the second bartack and securing stitches
• sewing computer stops and returns automatically to buttonhole begin • all subsequent buttonholes will be sewn to exactly the same length (no...
User Guide - Page 56
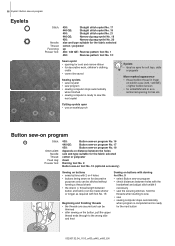
... between button and fabric) can be made shorter or longer as required with the
handwheel and adjust stitch width if necessary • sew the securing stitches;
hold the threads when starting to sew • sew • sewing computer stops automatically when program is completed and is ready to sew the
next eyelet
Cutting eyelets open • use an...
User Guide - Page 63
...
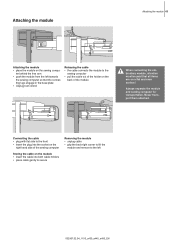
ter behind the free arm • push the module from the left towards
the sewing computer so that the connecting lugs engage in the base plate • Unplug foot control...grip the back right corner to lift the
module and remove to the
sewing computer • pull the cable out of the holder on the
back of the sewing computer
Storing the cable on a flat and even surface!
Attaching the ...
User Guide - Page 73
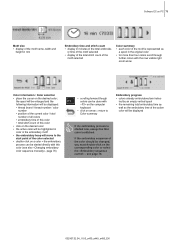
...size • display of the motif name, width and
height in mm
Embroidery time and stitch count • display in minutes of the total embroide- Embroidery progress • colors ...the current color / total
number of all colors • embroidery time of this color • total stitch count of the color selected • double-click on a color = the embroidery process can be highlighted ...
User Guide - Page 75
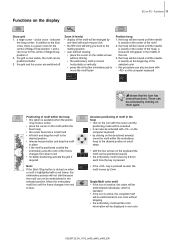
... clicking
• the embroidery motif is exactly in the selected position. a blue cross - the grid is now visible, the motif can be activated by 2mm
Single/Multi color motif • if the icon is inactive, the colors will be
embroidered individually, which is standard • if the icon is active, the...
User Guide - Page 85
...
23
Cleaning
57
Seam guide (presser foot)
5, 35
Seam guide on slide-on table
11
Settings
Balance
22
Presser foot pressure
22
Thread tension
17
Setting up the sewing-/embroidery
computer
Embroidery module
63-67
Sewing computer
10-17
Sewing
Accessories
5-7
Function buttons
24-25
Letters (Alphabets)
25, 28
Reverse sewing
25
Sewing corners
21
Sewing stitch combinations...
Similar Questions

Hi My Bernina 440qe Keeps Giving A Thread Break Beep When No Thread Has Broken.
I have checked the bobbin and can't see a problem, I can see the sensor spring moving up and down on...
I have checked the bobbin and can't see a problem, I can see the sensor spring moving up and down on...
(Posted by brendamcfall 4 years ago)

Hi Our Bernina Aurora 440qe Dispay Blinking Non Stop And Machine Wont Go
(Posted by carterclan7 8 years ago)

How To Thread A Bobbin On A Bernette 56 Sewing Machine
(Posted by scannie2 9 years ago)

How Is The Front Cover Removed From A Bernina Aurora 440qe Sewing Machine?
My dealer has had two opportunities to repair my machine and did an OK job except for getting the co...
My dealer has had two opportunities to repair my machine and did an OK job except for getting the co...
(Posted by lholdren 11 years ago)