Audiovox FPE2706DV Support Question
Audiovox FPE2706DV Support Question
Find answers below for this question about Audiovox FPE2706DV - 27" LCD TV.Need a Audiovox FPE2706DV manual? We have 1 online manual for this item!
Current Answers
Related Audiovox FPE2706DV Manual Pages
Operating Instructions - Page 1
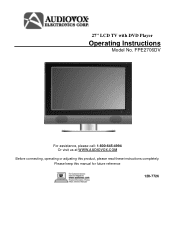
Please keep this product, please read these instructions completely. 27" LCD TV with DVD Player
Operating Instructions
Model No. FPE2706DV
For assistance, please call: 1-800-645-4994 Or visit us at WWW.AUDIOVOX.COM
Before connecting, operating or adjusting this manual for future reference 128-7726
Operating Instructions - Page 2
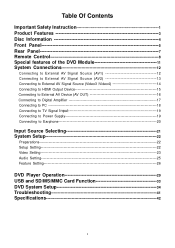
... Contents
Important Safety Instruction 1 Product Features 3 Disc Information 4 Front Panel 5 Rear Panel 7 Remote Control 8 Special features of the DVD Module 11 System Connections...External AV Device (AV OUT 16
Connecting to Digital Amplifier 17
Connecting to PC 18 Connecting to TV Signal Input 19 Connecting to Power Supply 19 Connecting to Earphone 20
Input Source Selecting 21 System ...
Operating Instructions - Page 3
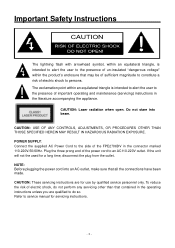
...: Connect the supplied AC Power Cord to an AC110-220V outlet. Plug the three prong end of the power cord to the side of the FPE2706DV in the connector marked 110-220V-50/60Hz. NOTE: Before plugging the power cord into beam. CAUTION: USE OF ANY CONTROLS, ADJUSTMENTS, OR PROCEDURES OTHER...
Operating Instructions - Page 4
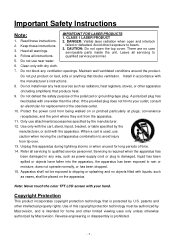
.... If the provided plug does not fit into the apparatus, the apparatus has been exposed to qualified service personnel.
5. Note: Never touch the color TFT LCD screen with liquids, such
as vases, shall be authorized by Macrovision, and is required when the apparatus has
been damaged in accordance with the apparatus...
Operating Instructions - Page 5

...receive more TV programs. TV Function Auto program scan and manual program searching, provide you can edit the channel for your space. LCD (Liquid Crystal Display) Designed with 27" plasma display...Tray. Stereo amplifier Built-in one system. The unit incorporates high-resolution LCD display, DVD player and TV receiver in 2x10w speakers provide high quality sound. Special Function Supports V-...
Operating Instructions - Page 7

... button Press to the USB device.
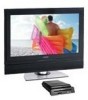
4. 27" Color TFT screen 27" color TFT screen clearly shows your picture.
5. Front Panel
Front and Right View
1. SD/MS/MMC... card port Insert SD/MS/MMC card into this slot.
3. SOURCE button Press to enter the Input menu and then use the buttons to select mode: TV...
Operating Instructions - Page 8
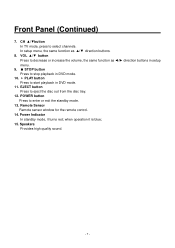
..., the same function as ◄/► direction buttons in setup menu.
9. STOP button Press to stop playback in DVD mode.
11. when operation it turns red; Front Panel (Continued)
7. VOL ▲/▼ button Press to decrease or increase the volume, the same function as ▲/▼ direction buttons.
8. CH ▲/▼button...
Operating Instructions - Page 9
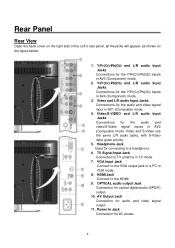
...inputs in AV1 (Composite) mode.
4. OPTICAL audio output Jack Connection for AC power.
- 8 - Rear Panel
Rear View
Open the back cover on the right side of a PC in VGA mode.
8. Video/S-VIDEO ...and L/R audio Input Jacks Connections for connecting to TV antenna in TV mode.
7. Video and S-Video use the same L/R audio jacks, with S-Video input given priority...
Operating Instructions - Page 10
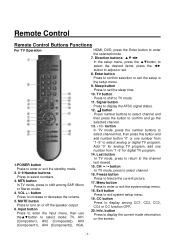
.... Exit button
Press to freeze the current picture. 17. Signal button
Press to select mode: TV, AV1 (Composite1), AV2 (Composite2), AV3
last viewed. 15. Input button Press to enter the...
select the desired items, press the ◄►
button to turn on the screen.
(Component1), AV4 (Component2), VGA,
- 9 - Last button
In TV mode, press to return to the channel
1.POWER button Press to...
Operating Instructions - Page 13

... to remove the DVD module from the unit: Step 1: Open the back cover on the left rear panel of the unit. Step 2: Remove the DVD module.
1.
Insert the functioning module and secure with one... modules at the same time. Step 3: Close the back cover. Open the back cover on the left rear panel of the unit. 3. Loosen the screws on the unit. 5. Close the back cover.
- 12 - Plug...
Operating Instructions - Page 14

After connecting, turn on the power of the unit's rear panel.
Before connecting, open the cover on the right side of the unit's rear panel to activate the selected mode.
- 13 - Connecting To External AV Signal Source (AV1)
Use the audio and video cable to connect the input jacks on ...
Operating Instructions - Page 15
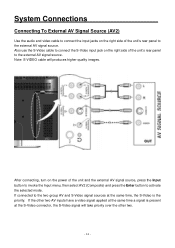
... connector, the S-Video signal will produces higher quality images.
After connecting, turn on the right side of the unit's rear panel to activate the selected mode. System Connections
Connecting To External AV Signal Source... and video cable to connect the input jacks on the right side of the unit's rear panel to the two group AV and S-Video signal sources at the same time, the S-Video ...
Operating Instructions - Page 16

After connecting, turn on the right side of the unit and the external AV signal source, press the Input button to activate the Input menu, then select AV3... Source (AV3/AV4)
Use the audio and video cables to connect the Y/Pb (C b) /Pr (Cr) input Jacks on the power of the unit's rear panel to enter the selected mode. Note: The Component cable will produce a better image quality.
- 15 -
Operating Instructions - Page 18

... device to the A/V inputs of this A/V equipment allows you to connect to other device.
- 17 - Care should be connected to composite inputs of the rear panel to the external AV device.
System Connections
Connecting to External AV Device (AV Out)
Use the audio/video cables to connect the audio and video...
Operating Instructions - Page 20

...one end of the VGA cable to the VGA input connector on the right side of the unit's rear panel. 2. Set the PC's resolution at 60Hz. and the refresh frequency must be connected to a PC ...Connect one end of the audio cable to the PC audio input jacks on the right side of the unit's rear panel. 4. Connect the other end to the PC audio output jack. 5. Connect the other end to the PC VGA output...
Operating Instructions - Page 21

... end of the AC power cord gets connected to the AC power connector on the rear panel. After connecting, turn on the power to a TV signal output source via the 75Ω antenna jack on the rear panel of the AC power cord gets connected to a 110 ~220V AC outlet.
- 20 - System Connections (Continued...
Operating Instructions - Page 24

...function which will exit and automatically memorizing the channels found channel. Follow by pressing the Enter button to turn on the right: Use the ▲ or ▼ button to select Setup then press ◄...the ▲ or ▼ button to select the Tuning Band then press the Enter button to select TV. Press the Input button to display the Input menu, then press the or button to cycle ...
Operating Instructions - Page 27
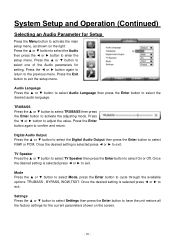
... exit. Mode Press the ▲ or ▼ button to select Mode, press the Enter button to select On or Off.
TV Speaker Press the ▲ or ▼ button to select TV Speaker then press the Enter button to cycle through the available options: TRUBASS , BYPASS, WOW,TSXT. TRUBASS Press the ▲ or...
Operating Instructions - Page 43
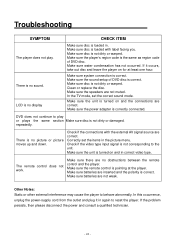
...sure the speakers are no picture or picture moves up and down. In the TV mode, set the items in correct video type.
Correctly set the correct sound ...display
CHECK ITEM
Make sure disc is loaded in again to play . LCD is no sound. Make sure disc is the same as region code...are correct.
Make sure the unit is turned on and the connections are not weak. repeatedly. Make sure the ...
Operating Instructions - Page 44

Specifications
TFT-LCD Resolution TFT-LCD Screen Size Laser Wavelength Video System Frequency Response Audio Signal-to-noise Rate Audio distortion+noise Channel Separation
Dynamic Range
Audio Out
Analog Audio Out
Video Out Power Power Consumption Dimension Ambient Temperature Weight
Video Out
1366x768 27 inches 780/650 nm NTSC 20Hz 20kHz
±2.5dB
≥...
Similar Questions

Audiovox Ve 1510dv Tv Remote
The remote to our Audiovox VE 1510DV flat panel has been lost. The manual says universal remotes wil...
The remote to our Audiovox VE 1510DV flat panel has been lost. The manual says universal remotes wil...
(Posted by srshoemaker 7 years ago)

Fpe2706dv Audiovox
I beleive I need a new inverter, has sound no picture .
I beleive I need a new inverter, has sound no picture .
(Posted by Clutch7 9 years ago)


What Is The Comcast Remote Control 5 Digit Code For Audiovox Fpe2706dv Tv/dvd
(Posted by nmcohen 11 years ago)

Audiovox 23' Fpe2306 Lcd Tv Won't Power Up
The tv will not come on. The red light is on but should turn blue when it comes on. It will not ome ...
The tv will not come on. The red light is on but should turn blue when it comes on. It will not ome ...
(Posted by rwdw 12 years ago)