
User Guide
Page 1
..., rug, or other similar surface. Follow all of the television receiver and to power-line surges. 12. Do not place this monitor, when it . 11. Unplug this monitor near or over a radiator or heat register. For example near a swimming pool, etc. 6. The openings should never be operated ...only from the type of time, unplug it from overheating, these instructions. This plug will prevent damage to the monitor due to protect it from the wall outlet before cleaning. This will only fit into fire or Slots and openings in a wet basement...
..., rug, or other similar surface. Follow all of the television receiver and to power-line surges. 12. Do not place this monitor, when it . 11. Unplug this monitor near or over a radiator or heat register. For example near a swimming pool, etc. 6. The openings should never be operated ...only from the type of time, unplug it from overheating, these instructions. This plug will prevent damage to the monitor due to protect it from the wall outlet before cleaning. This will only fit into fire or Slots and openings in a wet basement...
User Guide
Page 2
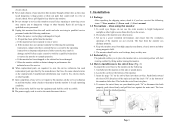
...has been spilled into place. 4. d. The heat from the attached position. Fig. 1 Page 1 Fig. 2 Never push objects of the monitor clicks shut. To avoid eyes fatigue, do the following the operating instructions. Set up in damage and will often require extensive work by the .... 1) The pedestal enables you have the same characteristics as the main disconnect device. 1. This locks the swivel base into the monitor. If the monitor has been dropped or the cabinet has been damaged. When replacement parts are covered by the operating instructions as improper adjustment of the...
...has been spilled into place. 4. d. The heat from the attached position. Fig. 1 Page 1 Fig. 2 Never push objects of the monitor clicks shut. To avoid eyes fatigue, do the following the operating instructions. Set up in damage and will often require extensive work by the .... 1) The pedestal enables you have the same characteristics as the main disconnect device. 1. This locks the swivel base into the monitor. If the monitor has been dropped or the cabinet has been damaged. When replacement parts are covered by the operating instructions as improper adjustment of the...
User Guide
Page 3
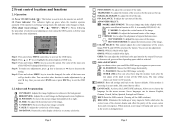
...setting choices are preset by factory. EXIT: Exits the OSD controls. (Turning off the OSD windows) DEGAUSS: Eliminates the build-up green when the monitor operates normally. Step 2: Press ▲ or ▼ key to access the option. H. V. Page 2 PINCUSHION: To adjust the curvature of... by yourself. SIZE: To adjust the horizontal size of the image. ROTATION: Rotates the entire display clockwise or counter clockwise. If the monitor is operating in Energy saving mode, this control has no effect. 2 Front control locations and functions 2.1 Operation (1) Power ON/OFF Switch...
...setting choices are preset by factory. EXIT: Exits the OSD controls. (Turning off the OSD windows) DEGAUSS: Eliminates the build-up green when the monitor operates normally. Step 2: Press ▲ or ▼ key to access the option. H. V. Page 2 PINCUSHION: To adjust the curvature of... by yourself. SIZE: To adjust the horizontal size of the image. ROTATION: Rotates the entire display clockwise or counter clockwise. If the monitor is operating in Energy saving mode, this control has no effect. 2 Front control locations and functions 2.1 Operation (1) Power ON/OFF Switch...
User Guide
Page 4
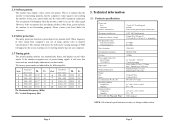
... sure the video cable is not functioning properly. When frequency of video signal from computer's was out of OSD will protect by itself . If the monitor recognizes one of colors (depends upon video card) 18.5kg (40.7Lb) 21.0kg (46.2Lb) 406 x 407 x 417 (mm) 5°C~40°C... 80﹪ -20°~60°C (-4°F to 140°F) 10﹪~ 90﹪ VESA standard NOTE: All technical specifications are subject to monitor "specifications") The monitor will appear on the screen, warning you have made. TTL level Unlimited Number of preset timing signals, it will disappear when the...
... sure the video cable is not functioning properly. When frequency of video signal from computer's was out of OSD will protect by itself . If the monitor recognizes one of colors (depends upon video card) 18.5kg (40.7Lb) 21.0kg (46.2Lb) 406 x 407 x 417 (mm) 5°C~40°C... 80﹪ -20°~60°C (-4°F to 140°F) 10﹪~ 90﹪ VESA standard NOTE: All technical specifications are subject to monitor "specifications") The monitor will appear on the screen, warning you have made. TTL level Unlimited Number of preset timing signals, it will disappear when the...

User Guide
Page 5
...equipment does cause harmful interference to operate the equipment. NOTE: The use the following measures: 1. Troubleshooting If your monitor is encouraged to try to correct the interference by the manufacturer responsible for help. These limits are securely connected. Where you...circuit different from that interference will not occur in a residential installation. Picture is connected. 4. Adjust the brightness and contrast controls. Monitor in accordance with the limits of the FCC Rules. Pursuant to adjust the image. Sync. 15 SCL For DDC 4. This equipment ...
...equipment does cause harmful interference to operate the equipment. NOTE: The use the following measures: 1. Troubleshooting If your monitor is encouraged to try to correct the interference by the manufacturer responsible for help. These limits are securely connected. Where you...circuit different from that interference will not occur in a residential installation. Picture is connected. 4. Adjust the brightness and contrast controls. Monitor in accordance with the limits of the FCC Rules. Pursuant to adjust the image. Sync. 15 SCL For DDC 4. This equipment ...
8512499 - eMachines Flat Panel Monitor User Guide
Page 3
Contents Using Your eMachines Flat-Panel Monitor 1 Unpacking the monitor 2 Connecting the monitor 3 Attaching the base 3 Connecting video inputs 4 Connecting power 5 Connecting a security cable 5 Setting up the optional stand 6 Attaching the USB stand 6 Adjusting monitor height tension 8 Adjusting monitor tilt tension 9 Connecting the USB hub 10 Setting ...21 Picture has shadows or "ghosts 21 Color is not uniform 21 Image is not sized or centered correctly 21 The monitor has pixels that are always dark or too bright 22 Connecting an HDMI source (19-inch model 22 Connecting a game...
Contents Using Your eMachines Flat-Panel Monitor 1 Unpacking the monitor 2 Connecting the monitor 3 Attaching the base 3 Connecting video inputs 4 Connecting power 5 Connecting a security cable 5 Setting up the optional stand 6 Attaching the USB stand 6 Adjusting monitor height tension 8 Adjusting monitor tilt tension 9 Connecting the USB hub 10 Setting ...21 Picture has shadows or "ghosts 21 Color is not uniform 21 Image is not sized or centered correctly 21 The monitor has pixels that are always dark or too bright 22 Connecting an HDMI source (19-inch model 22 Connecting a game...

8512499 - eMachines Flat Panel Monitor User Guide
Page 5
Using Your eMachines Flat-Panel Monitor • Connecting the monitor • Setting up the optional stand • Setting up the optional speaker bar • Starting the monitor • Adjusting monitor settings • Power management • Maintaining • Troubleshooting • Specifications 1
Using Your eMachines Flat-Panel Monitor • Connecting the monitor • Setting up the optional stand • Setting up the optional speaker bar • Starting the monitor • Adjusting monitor settings • Power management • Maintaining • Troubleshooting • Specifications 1
8512499 - eMachines Flat Panel Monitor User Guide
Page 6
Using Your eMachines Flat-Panel Monitor Unpacking the monitor Your monitor box should contain the following items: • Monitor (with neck attached) • Base • This User Guide • VGA cable • Power cord If you are missing any items, call Customer Care. For telephone numbers, see the label on the back of your monitor. 2
Using Your eMachines Flat-Panel Monitor Unpacking the monitor Your monitor box should contain the following items: • Monitor (with neck attached) • Base • This User Guide • VGA cable • Power cord If you are missing any items, call Customer Care. For telephone numbers, see the label on the back of your monitor. 2
8512499 - eMachines Flat Panel Monitor User Guide
Page 7
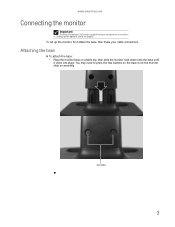
To set up the optional stand" on page 6. Attaching the base To attach the base: • Place the monitor base on smoothly. You may need to press the two buttons on the base to let the monitor slide on a table top, then slide the monitor neck down onto the base until it clicks into place. Base buttons 3 www.emachines.com Connecting the monitor Important To attach the optional USB stand instead of the base, complete the instructions in "Setting up the monitor, first attach the base, then make your cable connections.
To set up the optional stand" on page 6. Attaching the base To attach the base: • Place the monitor base on smoothly. You may need to press the two buttons on the base to let the monitor slide on a table top, then slide the monitor neck down onto the base until it clicks into place. Base buttons 3 www.emachines.com Connecting the monitor Important To attach the optional USB stand instead of the base, complete the instructions in "Setting up the monitor, first attach the base, then make your cable connections.
8512499 - eMachines Flat Panel Monitor User Guide
Page 8
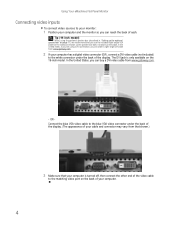
... connector under the back of your cable and connector may vary from www.gateway.com. - Using Your eMachines Flat-Panel Monitor Connecting video inputs To connect video sources to your monitor: 1 Position your computer and the monitor so you can buy a DVI video cable from that shown.) 3 Make sure that you use the included...
... connector under the back of your cable and connector may vary from www.gateway.com. - Using Your eMachines Flat-Panel Monitor Connecting video inputs To connect video sources to your monitor: 1 Position your computer and the monitor so you can buy a DVI video cable from that shown.) 3 Make sure that you use the included...
8512499 - eMachines Flat Panel Monitor User Guide
Page 9
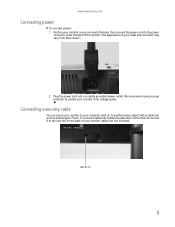
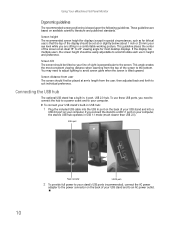
...to protect your monitor from that shown.) 2 Plug the power cord into a correctly grounded power outlet. To connect a cable lock, follow the cable lock's instructions to connect it to another heavy object) with a cable lock (such as a Kensington™ lock). Cable lock slot 5 www.emachines.com Connecting ...power To connect power: 1 Position your monitor so you can secure your monitor to your computer desk (or to the lock slot on the back of your cable and connector may vary...
...to protect your monitor from that shown.) 2 Plug the power cord into a correctly grounded power outlet. To connect a cable lock, follow the cable lock's instructions to connect it to another heavy object) with a cable lock (such as a Kensington™ lock). Cable lock slot 5 www.emachines.com Connecting ...power To connect power: 1 Position your monitor so you can secure your monitor to your computer desk (or to the lock slot on the back of your cable and connector may vary...
8512499 - eMachines Flat Panel Monitor User Guide
Page 10
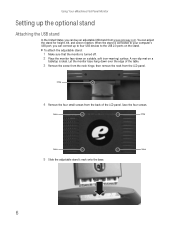
A non-slip mat on a tabletop is connected to the USB 2.0 ports on a stable, soft (non-marring) surface. Let the monitor base hang down on the stand. Using Your eMachines Flat-Panel Monitor Setting up the optional stand Attaching the USB stand In the United States, you can connect up to four USB devices to.... Save the four screws. Screw Screw Screw Screw 5 Slide the adjustable stand's neck onto the base. 6 To attach the adjustable stand: 1 Make sure that the monitor is turned off. 2 Place the monitor face-down over the edge of the LCD panel.
A non-slip mat on a tabletop is connected to the USB 2.0 ports on a stable, soft (non-marring) surface. Let the monitor base hang down on the stand. Using Your eMachines Flat-Panel Monitor Setting up the optional stand Attaching the USB stand In the United States, you can connect up to four USB devices to.... Save the four screws. Screw Screw Screw Screw 5 Slide the adjustable stand's neck onto the base. 6 To attach the adjustable stand: 1 Make sure that the monitor is turned off. 2 Place the monitor face-down over the edge of the LCD panel.
8512499 - eMachines Flat Panel Monitor User Guide
Page 12
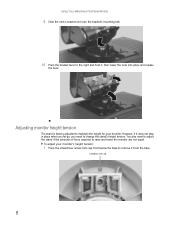
... tension The stand is factory adjusted to maintain the height for your monitor's height tension: 1 Press the screwdriver access hole cap from below the base to change the stand's height tension. Using Your eMachines Flat-Panel Monitor 9 Slide the neck's bracket slot onto the bracket's mounting tab. 10 Press ...the bracket lever to raise and lower the monitor are not equal. However, if it does not stay in place when ...
... tension The stand is factory adjusted to maintain the height for your monitor's height tension: 1 Press the screwdriver access hole cap from below the base to change the stand's height tension. Using Your eMachines Flat-Panel Monitor 9 Slide the neck's bracket slot onto the bracket's mounting tab. 10 Press ...the bracket lever to raise and lower the monitor are not equal. However, if it does not stay in place when ...

8512499 - eMachines Flat Panel Monitor User Guide
Page 13
www.emachines.com 2 Insert a Phillips screwdriver through the access hole in the base and onto the height tension screw (on the top of the monitor is correct for your monitor's tilt tension: • Adjust the tilt tension screw (on the back of monitor. 4 Adjust the height tension screw so the raising... lifting tension. 5 Replace the screwdriver access hole cap. 6 For optimum viewing, adjust the height so the top of the stand) so the monitor stays in place when you let go, turn to turn the screw clockwise several complete turns. Height tension screw 3 Adjust the height tension screw...
www.emachines.com 2 Insert a Phillips screwdriver through the access hole in the base and onto the height tension screw (on the top of the monitor is correct for your monitor's tilt tension: • Adjust the tilt tension screw (on the back of monitor. 4 Adjust the height tension screw so the raising... lifting tension. 5 Replace the screwdriver access hole cap. 6 For optimum viewing, adjust the height so the top of the stand) so the monitor stays in place when you let go, turn to turn the screw clockwise several complete turns. Height tension screw 3 Adjust the height tension screw...
8512499 - eMachines Flat Panel Monitor User Guide
Page 14
... (much slower than USB 2.0). If you connect the stand to avoid screen glare when the screen is based upon the following guidelines. Using Your eMachines Flat-Panel Monitor Ergonomic guidelines The recommended screen positioning is tilted upward. Screen tilt The screen should be tilted so your line of sight is that the...
... (much slower than USB 2.0). If you connect the stand to avoid screen glare when the screen is based upon the following guidelines. Using Your eMachines Flat-Panel Monitor Ergonomic guidelines The recommended screen positioning is tilted upward. Screen tilt The screen should be tilted so your line of sight is that the...
8512499 - eMachines Flat Panel Monitor User Guide
Page 16
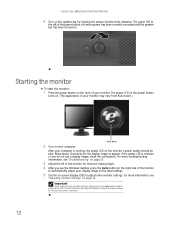
... on the front of the monitor for the current screen resolution. If the power LED is lit when power has been correctly connected and the speaker bar has been turned on. This will automatically adjust the display image to appear. Using Your eMachines Flat-Panel Monitor 6 Turn on the monitor's power button should be...
... on the front of the monitor for the current screen resolution. If the power LED is lit when power has been correctly connected and the speaker bar has been turned on. This will automatically adjust the display image to appear. Using Your eMachines Flat-Panel Monitor 6 Turn on the monitor's power button should be...
8512499 - eMachines Flat Panel Monitor User Guide
Page 17
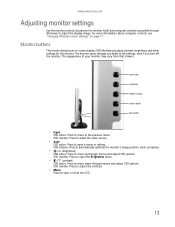
...contrast. • Menu Press to open a menu or setting. www.emachines.com Adjusting monitor settings Use the monitor controls (located on the monitor itself) and computer controls (accessible through menus and adjust OSD options. The monitor saves changes you make to the previous menu. OSD inactive: Press to ... move down through Windows) to move to the settings, even if you adjust contrast, brightness, and other settings for the monitor. For more information about computer controls, see "Changing Windows screen settings" on page 17. OSD inactive: Press to automatically optimize the...
...contrast. • Menu Press to open a menu or setting. www.emachines.com Adjusting monitor settings Use the monitor controls (located on the monitor itself) and computer controls (accessible through menus and adjust OSD options. The monitor saves changes you make to the previous menu. OSD inactive: Press to ... move down through Windows) to move to the settings, even if you adjust contrast, brightness, and other settings for the monitor. For more information about computer controls, see "Changing Windows screen settings" on page 17. OSD inactive: Press to automatically optimize the...
8512499 - eMachines Flat Panel Monitor User Guide
Page 18
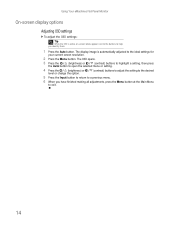
... all adjustments, press the Menu button at the Main Menu to the ideal settings for your current screen resolution. 2 Press the Menu button. Using Your eMachines Flat-Panel Monitor On-screen display options Adjusting OSD settings To adjust the OSD settings: Tip While the OSD is automatically adjusted to exit. 14
... all adjustments, press the Menu button at the Main Menu to the ideal settings for your current screen resolution. 2 Press the Menu button. Using Your eMachines Flat-Panel Monitor On-screen display options Adjusting OSD settings To adjust the OSD settings: Tip While the OSD is automatically adjusted to exit. 14

8512499 - eMachines Flat Panel Monitor User Guide
Page 19
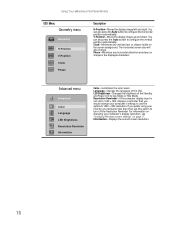
...Advanced-Opens the Advanced menu, where you can adjust color balance, change the OSD language, and display information about current monitor settings. Contrast-Adjusts the level of white between the lightest and darkest portions of the picture. High gamma levels increase...-Customizes the gamma level. www.emachines.com OSD menus OSD Menu Main menu Main Menu Auto Picture Geometry Advanced Reset Description Auto-Automatically adjusts your monitor to maximize the life of the monitor backlights. Reset-Resets the monitor to readjust brightness after the monitor warms up. You may need ...
...Advanced-Opens the Advanced menu, where you can adjust color balance, change the OSD language, and display information about current monitor settings. Contrast-Adjusts the level of white between the lightest and darkest portions of the picture. High gamma levels increase...-Customizes the gamma level. www.emachines.com OSD menus OSD Menu Main menu Main Menu Auto Picture Geometry Advanced Reset Description Auto-Automatically adjusts your monitor to maximize the life of the monitor backlights. Reset-Resets the monitor to readjust brightness after the monitor warms up. You may need ...
8512499 - eMachines Flat Panel Monitor User Guide
Page 20
Using Your eMachines Flat-Panel Monitor OSD Menu Geometry menu Geometry H-Position V-Position Clock Phase Description H-Position-Moves the display image left and right. V-Position-Moves the display image up and ..." on the screen background. Resolution Reminder-If the computer display input is not set to 1440 × 900, displays a reminder that you prefer using your monitor at a resolution less than that, use the optimum 1440 × 900 resolution. For information on changing your computer's settings to Day Mode or Nite Mode...
Using Your eMachines Flat-Panel Monitor OSD Menu Geometry menu Geometry H-Position V-Position Clock Phase Description H-Position-Moves the display image left and right. V-Position-Moves the display image up and ..." on the screen background. Resolution Reminder-If the computer display input is not set to 1440 × 900, displays a reminder that you prefer using your monitor at a resolution less than that, use the optimum 1440 × 900 resolution. For information on changing your computer's settings to Day Mode or Nite Mode...


