
User Guide
Page 3
... 18 Starting your computer 19 Waking up your computer 20 Turning off your computer 20 Restarting (rebooting) your computer 21 Adjusting the volume 21 Using the keyboard 22 Enhanced keyboard 22 Standard keyboard 22 Keyboard features 23 Using the mouse 24 Connecting the modem 26 Connecting to a wired Ethernet network 27 Installing a printer, scanner, or other peripheral device 28 4 Using Drives and Ports 29 Using the diskette drive 30 Using the memory card reader 31 www.eMachines.com...
... 18 Starting your computer 19 Waking up your computer 20 Turning off your computer 20 Restarting (rebooting) your computer 21 Adjusting the volume 21 Using the keyboard 22 Enhanced keyboard 22 Standard keyboard 22 Keyboard features 23 Using the mouse 24 Connecting the modem 26 Connecting to a wired Ethernet network 27 Installing a printer, scanner, or other peripheral device 28 4 Using Drives and Ports 29 Using the diskette drive 30 Using the memory card reader 31 www.eMachines.com...
User Guide
Page 4
... 45 Opening the case 46 Removing the side panel 46 Removing the front bezel 47 Closing the case 48 Replacing the side panel 48 Replacing the front bezel 49 Installing memory 50 Replacing the system battery 52 6 Troubleshooting 55 Safety guidelines 56 First steps 56 Troubleshooting 57 Add-in cards 57 Audio 57 Battery 57 CD or DVD drives 57 Computer 59 Diskette drive 59 DVD drives 60 File management 60 Hard drive 61 Internet 62 Keyboard 63 Memory 64...
... 45 Opening the case 46 Removing the side panel 46 Removing the front bezel 47 Closing the case 48 Replacing the side panel 48 Replacing the front bezel 49 Installing memory 50 Replacing the system battery 52 6 Troubleshooting 55 Safety guidelines 56 First steps 56 Troubleshooting 57 Add-in cards 57 Audio 57 Battery 57 CD or DVD drives 57 Computer 59 Diskette drive 59 DVD drives 60 File management 60 Hard drive 61 Internet 62 Keyboard 63 Memory 64...
User Guide
Page 15
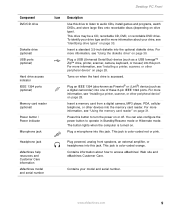
... diskette into the memory card reader. This jack is color-coded red or pink. This jack is color-coded orange. Plug a USB (Universal Serial Bus) device (such as a digital camcorder) into this port. For more information, see "Using the memory card reader" on page 31. Desktop PC Front Component DVD/CD drive Diskette drive (optional) USB ports (optional) Hard drive access indicator IEEE 1394 ports (optional) Memory card reader (optional) Power button / Power indicator Microphone jack Icon Description Use this button to turn the power on or off...
... diskette into the memory card reader. This jack is color-coded red or pink. This jack is color-coded orange. Plug a USB (Universal Serial Bus) device (such as a digital camcorder) into this port. For more information, see "Using the memory card reader" on page 31. Desktop PC Front Component DVD/CD drive Diskette drive (optional) USB ports (optional) Hard drive access indicator IEEE 1394 ports (optional) Memory card reader (optional) Power button / Power indicator Microphone jack Icon Description Use this button to turn the power on or off...
User Guide
Page 17
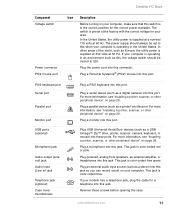
... switch Power connector PS/2 mouse port Icon Description Before turning on your computer, make sure that this switch is in the correct position for a telephone into this jack. In other peripheral device" on page 28. If your computer is supplied at 230 volts at 60 Hz. PS/2 keyboard port Serial port Parallel port Monitor port USB ports (optional) Microphone jack Audio output (Line out) jack Audio input (Line in) jack Telephone jack (optional) Case cover...
... switch Power connector PS/2 mouse port Icon Description Before turning on your computer, make sure that this switch is in the correct position for a telephone into this jack. In other peripheral device" on page 28. If your computer is supplied at 230 volts at 60 Hz. PS/2 keyboard port Serial port Parallel port Monitor port USB ports (optional) Microphone jack Audio output (Line out) jack Audio input (Line in) jack Telephone jack (optional) Case cover...
User Guide
Page 58
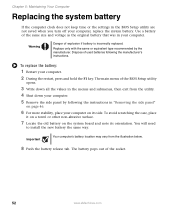
... scratching the case, place it on a towel or other non-abrasive surface. 7 Locate the old battery on its orientation. Use a battery of the BIOS Setup utility opens. 3 Write down your computer. 5 Remove the side panel by the manufacturer. You will need to install the new battery the same way. The battery pops out of the socket. 52 www.eMachines.com Replace only with the same or equivalent type recommended...
... scratching the case, place it on a towel or other non-abrasive surface. 7 Locate the old battery on its orientation. Use a battery of the BIOS Setup utility opens. 3 Write down your computer. 5 Remove the side panel by the manufacturer. You will need to install the new battery the same way. The battery pops out of the socket. 52 www.eMachines.com Replace only with the same or equivalent type recommended...
User Guide
Page 61
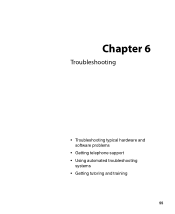
Chapter 6 Troubleshooting • Troubleshooting typical hardware and software problems • Getting telephone support • Using automated troubleshooting systems • Getting tutoring and training 55
Chapter 6 Troubleshooting • Troubleshooting typical hardware and software problems • Getting telephone support • Using automated troubleshooting systems • Getting tutoring and training 55
User Guide
Page 62
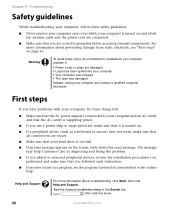
... Instead, unplug your hard drive is connected to troubleshoot your computer problem if: ■ Power cords or plugs are secure. ■ Make sure that you have problems with your computer, try these safety guidelines: ■ Never remove your computer case cover while your computer is turned on page 56. Help and Support For more information about troubleshooting, click Start, then click Help and Support. First steps If...
... Instead, unplug your hard drive is connected to troubleshoot your computer problem if: ■ Power cords or plugs are secure. ■ Make sure that you have problems with your computer, try these safety guidelines: ■ Never remove your computer case cover while your computer is turned on page 56. Help and Support For more information about troubleshooting, click Start, then click Help and Support. First steps If...
User Guide
Page 68
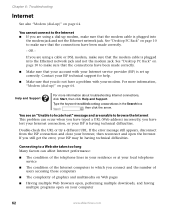
... ISP technical support for help. ■ Make sure that the connections have a problem with your modem. Help and Support For more information, "Modem (dial-up modem, make sure that your account with your Internet service provider (ISP) is plugged into the Ethernet network jack and not the modem jack. Type the keyword troubleshooting connections in your residence or at your browser, then reconnect and open on...
... ISP technical support for help. ■ Make sure that the connections have a problem with your modem. Help and Support For more information, "Modem (dial-up modem, make sure that your account with your Internet service provider (ISP) is plugged into the Ethernet network jack and not the modem jack. Type the keyword troubleshooting connections in your residence or at your browser, then reconnect and open on...
User Guide
Page 70
.... Memory card reader Drive letters for a dial tone by plugging a working telephone into the modem jack and not the Ethernet network jack. Also make sure that the modem cable is disabled before using the modem. Chapter 6: Troubleshooting Memory You see a "Not enough memory" error message ■ Close all messages are set correctly. 64 www.eMachines.com You see a "Memory error" message ■ Use a third-party diagnostic program to temporarily disable the service. Type the keyword memory error...
.... Memory card reader Drive letters for a dial tone by plugging a working telephone into the modem jack and not the Ethernet network jack. Also make sure that the modem cable is disabled before using the modem. Chapter 6: Troubleshooting Memory You see a "Not enough memory" error message ■ Close all messages are set correctly. 64 www.eMachines.com You see a "Memory error" message ■ Use a third-party diagnostic program to temporarily disable the service. Type the keyword memory error...
User Guide
Page 73
... Modem Options dialog box. To turn down the modem volume: 1 Click Start, then click Control Panel. The Control Panel window opens. Troubleshooting 4 Click your modem tries to connect to respond, the modem did not pass diagnostics. If information about modem troubleshooting, click Start, then click Help and Support. If no modem information is in the Search box , then click the arrow. Type the keyword modem troubleshooting in...
... Modem Options dialog box. To turn down the modem volume: 1 Click Start, then click Control Panel. The Control Panel window opens. Troubleshooting 4 Click your modem tries to connect to respond, the modem did not pass diagnostics. If information about modem troubleshooting, click Start, then click Help and Support. If no modem information is in the Search box , then click the arrow. Type the keyword modem troubleshooting in...
User Guide
Page 74
Your monitor may use a thin damper wire, located approximately 1/3 of the way down from the upper screen edge and 1/3 of the way up for brighter colors and greater luminescence. The text on the display is connected to the video port on , the power LED should be lit. ■ Adjust the brightness and contrast controls to the center position. ■ Make sure that the monitor cable is dim...
Your monitor may use a thin damper wire, located approximately 1/3 of the way down from the upper screen edge and 1/3 of the way up for brighter colors and greater luminescence. The text on the display is connected to the video port on , the power LED should be lit. ■ Adjust the brightness and contrast controls to the center position. ■ Make sure that the monitor cable is dim...
User Guide
Page 76
... damaged cables. Power Your computer will not turn on ■ Make sure that you may need to press so the printer can start printing. Many printers have an online/offline button that the printer is online. Chapter 6: Troubleshooting Networks You cannot connect to your computer is plugged into the outlet and turn it is connected to put the printer online. 70 www.eMachines.com Type...
... damaged cables. Power Your computer will not turn on ■ Make sure that you may need to press so the printer can start printing. Many printers have an online/offline button that the printer is online. Chapter 6: Troubleshooting Networks You cannot connect to your computer is plugged into the outlet and turn it is connected to put the printer online. 70 www.eMachines.com Type...

User Guide
Page 77
... Search box , then click the arrow. The Printers and Faxes window opens. 3 Right-click the name of the printer you want to use. If the menu shows a check mark next to Use Printer Offline, click Use Printer Offline to clear the check mark. www.eMachines.com 71 To set to work offline. Troubleshooting ■ Check the cable for instructions on installing the printer driver. The Control Panel window opens.
... Search box , then click the arrow. The Printers and Faxes window opens. 3 Right-click the name of the printer you want to use. If the menu shows a check mark next to Use Printer Offline, click Use Printer Offline to clear the check mark. www.eMachines.com 71 To set to work offline. Troubleshooting ■ Check the cable for instructions on installing the printer driver. The Control Panel window opens.
User Guide
Page 78
... to add additional memory to the printer. Type the keyword sound troubleshooter in the Search box , then click the arrow. 72 www.eMachines.com For more information about sound troubleshooting, click Start, then click Help and Support. Chapter 6: Troubleshooting ■ Wait until files have an online/offline button that the printer is out of paper" error message After adding paper, make sure that you need to...
... to add additional memory to the printer. Type the keyword sound troubleshooter in the Search box , then click the arrow. 72 www.eMachines.com For more information about sound troubleshooting, click Start, then click Help and Support. Chapter 6: Troubleshooting ■ Wait until files have an online/offline button that the printer is out of paper" error message After adding paper, make sure that you need to...
User Guide
Page 86
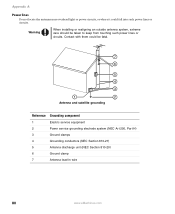
... grounding Reference Grounding component 1 Electric service equipment 2 Power service grounding electrode system (NEC Art 250, Part H) 3 Ground clamps 4 Grounding conductors (NEC Section 810-21) 5 Antenna discharge unit (NEC Section 810-20) 6 Ground clamp 7 Antenna lead-in wire 80 www.eMachines.com Appendix A: Power lines Do not locate the antenna near overhead light or power circuits, or where it could be...
... grounding Reference Grounding component 1 Electric service equipment 2 Power service grounding electrode system (NEC Art 250, Part H) 3 Ground clamps 4 Grounding conductors (NEC Section 810-21) 5 Antenna discharge unit (NEC Section 810-20) 6 Ground clamp 7 Antenna lead-in wire 80 www.eMachines.com Appendix A: Power lines Do not locate the antenna near overhead light or power circuits, or where it could be...
User Guide
Page 89
... 11 audio playback buttons 23 B battery replacing 52 bezel removing 47 replacing 49 broadband connection 27 connecting 12 buttons See keys and buttons C cable modem 27 connecting 12 Caps Lock indicator 23 cards inserting memory card 32 installing memory card 32 removing memory card 32 slots 31 troubleshooting add-in card 57 troubleshooting memory card 64 types of memory cards supported 31 case closing 48 opening 46 CD cleaning 44 inserting 34 playing audio 35 recording 35 troubleshooting 57 CD drive identifying 33 locating drive 9 troubleshooting 57 using 33 cellular phone memory cards 31...
... 11 audio playback buttons 23 B battery replacing 52 bezel removing 47 replacing 49 broadband connection 27 connecting 12 buttons See keys and buttons C cable modem 27 connecting 12 Caps Lock indicator 23 cards inserting memory card 32 installing memory card 32 removing memory card 32 slots 31 troubleshooting add-in card 57 troubleshooting memory card 64 types of memory cards supported 31 case closing 48 opening 46 CD cleaning 44 inserting 34 playing audio 35 recording 35 troubleshooting 57 CD drive identifying 33 locating drive 9 troubleshooting 57 using 33 cellular phone memory cards 31...
User Guide
Page 91
... folders opening 25 front bezel removing 49 replacing 49 function keys 23 H hard drive indicator 9 troubleshooting 61 headphone jack 9, 11 help online 5 using 3 Help and Support 3 searching 4 starting 3 Hibernate mode 9 I i.Link port 9, 12, 28 IEEE 1394 port 9, 12, 28 indicators Caps Lock 23 hard drive 9 Num Lock 23 numeric keypad 23 power 9 Scroll Lock 23 installing battery 52 devices 28 digital camera 28 digital video camera 28 front bezel 47 memory...
... folders opening 25 front bezel removing 49 replacing 49 function keys 23 H hard drive indicator 9 troubleshooting 61 headphone jack 9, 11 help online 5 using 3 Help and Support 3 searching 4 starting 3 Hibernate mode 9 I i.Link port 9, 12, 28 IEEE 1394 port 9, 12, 28 indicators Caps Lock 23 hard drive 9 Num Lock 23 numeric keypad 23 power 9 Scroll Lock 23 installing battery 52 devices 28 digital camera 28 digital video camera 28 front bezel 47 memory...
User Guide
Page 92
... M maintenance cleaning case 41 cleaning component exteriors 41 cleaning computer display 42 cleaning computer screen 42 cleaning keyboard 42 cleaning mouse 42 protecting from viruses 39 memory adding 50 installing 50 replacing 50 troubleshooting 64 memory card reader locating drive 9 memory card types supported 31 using 31 microphone jack 9, 11 Microsoft Certificate of Authenticity 13 model number 13 modem cable 27 connecting 26 DSL 27 jack 12, 26 protecting from power surge 18 troubleshooting 64 monitor cleaning 42 port...
... M maintenance cleaning case 41 cleaning component exteriors 41 cleaning computer display 42 cleaning computer screen 42 cleaning keyboard 42 cleaning mouse 42 protecting from viruses 39 memory adding 50 installing 50 replacing 50 troubleshooting 64 memory card reader locating drive 9 memory card types supported 31 using 31 microphone jack 9, 11 Microsoft Certificate of Authenticity 13 model number 13 modem cable 27 connecting 26 DSL 27 jack 12, 26 protecting from power surge 18 troubleshooting 64 monitor cleaning 42 port...
User Guide
Page 93
... memory cards 31 peripheral devices 28 playing audio CD 35 DVD 35 Plug and Play devices IEEE 1394 support for 28 USB support for 28 pointer 24 moving 25 ports See connections power button 9 connector 11 Hibernate mode 9 indicator 9 source problems 18 Standby/Resume 9 troubleshooting 70 turning off computer 20 turning on computer 19 power button 9 printer default 70 installing 28 parallel port 11 troubleshooting 70 USB port 9, 11 programs closing unresponsive 21 opening 25 PS/2 port keyboard 11 mouse 11 R RAM See memory rebooting...
... memory cards 31 peripheral devices 28 playing audio CD 35 DVD 35 Plug and Play devices IEEE 1394 support for 28 USB support for 28 pointer 24 moving 25 ports See connections power button 9 connector 11 Hibernate mode 9 indicator 9 source problems 18 Standby/Resume 9 troubleshooting 70 turning off computer 20 turning on computer 19 power button 9 printer default 70 installing 28 parallel port 11 troubleshooting 70 USB port 9, 11 programs closing unresponsive 21 opening 25 PS/2 port keyboard 11 mouse 11 R RAM See memory rebooting...
User Guide
Page 94
... panel 60, 68 memory 64 memory card reader 64 modem 64 monitor 68 mouse 69 network 70 passwords 70 power 70 printer 70 safety guidelines 56 screen 60, 68 screen area 68 screen resolution 68 technical support 73 telephone support 73 Web site connection speed 62 turning off computer 9, 20, 21 turning on computer 9, 19 tutoring fee-based 74 U uninterruptible power supply (UPS) 18 updating Norton AntiVirus 39 Windows 38 UPS 18 USB port 9, 11, 28 V video...
... panel 60, 68 memory 64 memory card reader 64 modem 64 monitor 68 mouse 69 network 70 passwords 70 power 70 printer 70 safety guidelines 56 screen 60, 68 screen area 68 screen resolution 68 technical support 73 telephone support 73 Web site connection speed 62 turning off computer 9, 20, 21 turning on computer 9, 19 tutoring fee-based 74 U uninterruptible power supply (UPS) 18 updating Norton AntiVirus 39 Windows 38 UPS 18 USB port 9, 11, 28 V video...


