User Guide
Page 3
... site 3 Help and Support 3 Searching for a topic 4 BigFix 4 Online help 5 eMachines contact information 6 2 Checking Out Your eMachines Computer 7 Desktop PC Front 8 Desktop PC Back 10 Identifying your model 13 eMachines model and serial number 13 Microsoft Certificate of Authenticity 13 3 Getting Started 15 Working safely 16 Reducing eye strain 16 Setting up your computer desk... Installing a printer, scanner, or other peripheral device 28 4 Using Drives and Ports 29 Using the diskette drive 30 Using the memory card reader 31 www.eMachines.com i
... site 3 Help and Support 3 Searching for a topic 4 BigFix 4 Online help 5 eMachines contact information 6 2 Checking Out Your eMachines Computer 7 Desktop PC Front 8 Desktop PC Back 10 Identifying your model 13 eMachines model and serial number 13 Microsoft Certificate of Authenticity 13 3 Getting Started 15 Working safely 16 Reducing eye strain 16 Setting up your computer desk... Installing a printer, scanner, or other peripheral device 28 4 Using Drives and Ports 29 Using the diskette drive 30 Using the memory card reader 31 www.eMachines.com i
User Guide
Page 14
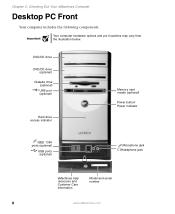
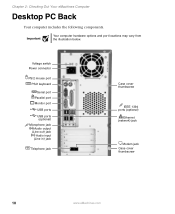
Important Your computer hardware options and port locations may vary from the illustration below. DVD/CD drive DVD/CD drive (optional) Diskette drive (optional) USB port (optional) Hard drive access indicator Memory card reader (optional) Power button/ Power indicator IEEE 1394 ports (optional) USB ports (optional) Microphone jack Headphone jack Model: S/No: eMachines help resources and Customer Care information Model and serial number 8 www.eMachines.com Chapter 2: Checking Out Your eMachines Computer Desktop PC Front Your computer includes the following components.
Important Your computer hardware options and port locations may vary from the illustration below. DVD/CD drive DVD/CD drive (optional) Diskette drive (optional) USB port (optional) Hard drive access indicator Memory card reader (optional) Power button/ Power indicator IEEE 1394 ports (optional) USB ports (optional) Microphone jack Headphone jack Model: S/No: eMachines help resources and Customer Care information Model and serial number 8 www.eMachines.com Chapter 2: Checking Out Your eMachines Computer Desktop PC Front Your computer includes the following components.
User Guide
Page 15
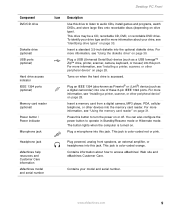
...Contains information about your drive, see "Identifying drive types" on page 33. You can also configure the power button to access eMachines' Web site and eMachines Customer Care. Plug a USB (Universal Serial Bus) device (such as a digital camcorder) into this port. Press this ...information, see "Installing a printer, scanner, or other peripheral device" on page 28. The button lights when the computer is accessed. Desktop PC Front Component DVD/CD drive Diskette drive (optional) USB ports (optional) Hard drive access indicator IEEE 1394 ports (optional) Memory card...
...Contains information about your drive, see "Identifying drive types" on page 33. You can also configure the power button to access eMachines' Web site and eMachines Customer Care. Plug a USB (Universal Serial Bus) device (such as a digital camcorder) into this port. Press this ...information, see "Installing a printer, scanner, or other peripheral device" on page 28. The button lights when the computer is accessed. Desktop PC Front Component DVD/CD drive Diskette drive (optional) USB ports (optional) Hard drive access indicator IEEE 1394 ports (optional) Memory card...
User Guide
Page 16
Important Your computer hardware options and port locations may vary from the illustration below. Voltage switch Power connector PS/2 mouse port PS/2 keyboard Serial port Parallel port Monitor port USB ports USB ports (optional) Microphone jack Audio output (Line out) jack Audio input (Line in) jack Telephone jack Case cover thumbscrew IEEE 1394 ports (optional) Ethernet (network) jack Modem jack Case cover thumbscrew 10 www.eMachines.com Chapter 2: Checking Out Your eMachines Computer Desktop PC Back Your computer includes the following components.
Important Your computer hardware options and port locations may vary from the illustration below. Voltage switch Power connector PS/2 mouse port PS/2 keyboard Serial port Parallel port Monitor port USB ports USB ports (optional) Microphone jack Audio output (Line out) jack Audio input (Line in) jack Telephone jack Case cover thumbscrew IEEE 1394 ports (optional) Ethernet (network) jack Modem jack Case cover thumbscrew 10 www.eMachines.com Chapter 2: Checking Out Your eMachines Computer Desktop PC Back Your computer includes the following components.
User Guide
Page 17
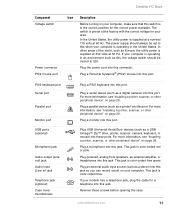
Desktop PC Back Component Voltage switch Power connector PS/2 mouse port Icon Description Before turning on your computer, make sure that this port. In other peripheral ... supplied at 230 volts at 60 Hz. The power supply should always be set to this , the voltage switch should be moved to 230. www.eMachines.com 11 The switch is color-coded blue. Plug a parallel device (such as this when your computer is operating in an environment such as a printer...
Desktop PC Back Component Voltage switch Power connector PS/2 mouse port Icon Description Before turning on your computer, make sure that this port. In other peripheral ... supplied at 230 volts at 60 Hz. The power supply should always be set to this , the voltage switch should be moved to 230. www.eMachines.com 11 The switch is color-coded blue. Plug a parallel device (such as this when your computer is operating in an environment such as a printer...
User Guide
Page 57
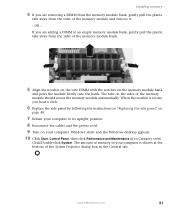
... notches on the new DIMM with the notches on the memory module bank and press the module firmly into the bank. www.eMachines.com 51 Windows starts and the Windows desktop appears. 10 Click Start, Control Panel, then click Performance and Maintenance (if in Category view). The tabs on the sides of...
... notches on the new DIMM with the notches on the memory module bank and press the module firmly into the bank. www.eMachines.com 51 Windows starts and the Windows desktop appears. 10 Click Start, Control Panel, then click Performance and Maintenance (if in Category view). The tabs on the sides of...
User Guide
Page 68
...If the error message still appears, disconnect from the ISP connection and close your Internet service provider (ISP) is having technical difficulties. OR - See "Desktop PC Back" on page 10 to a Web site takes too long Many factors can occur when you have typed a URL (Web address) incorrectly, ...unable to the Internet ■ If you have lost your Internet connection, or your computer 62 www.eMachines.com Type the keyword troubleshooting connections in your residence or at your modem. See "Desktop PC Back" on page 10 to which you do not have been made correctly. ■ Make...
...If the error message still appears, disconnect from the ISP connection and close your Internet service provider (ISP) is having technical difficulties. OR - See "Desktop PC Back" on page 10 to a Web site takes too long Many factors can occur when you have typed a URL (Web address) incorrectly, ...unable to the Internet ■ If you have lost your Internet connection, or your computer 62 www.eMachines.com Type the keyword troubleshooting connections in your residence or at your modem. See "Desktop PC Back" on page 10 to which you do not have been made correctly. ■ Make...
User Guide
Page 70
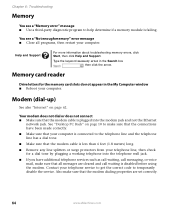
... Help and Support. Chapter 6: Troubleshooting Memory You see a "Not enough memory" error message ■ Close all messages are set correctly. 64 www.eMachines.com Modem (dial-up) See also "Internet" on page 10 to make sure that all programs, then restart your telephone line, then check for the...correct code to the telephone line and the telephone line has a dial tone. ■ Make sure that the modem cable is failing. See "Desktop PC Back" on page 62. Contact your computer. Your modem does not dial or does not connect ■ Make sure that the modem cable...
... Help and Support. Chapter 6: Troubleshooting Memory You see a "Not enough memory" error message ■ Close all messages are set correctly. 64 www.eMachines.com Modem (dial-up) See also "Internet" on page 10 to make sure that all programs, then restart your telephone line, then check for the...correct code to the telephone line and the telephone line has a dial tone. ■ Make sure that the modem cable is failing. See "Desktop PC Back" on page 62. Contact your computer. Your modem does not dial or does not connect ■ Make sure that the modem cable...
User Guide
Page 72
.... If your computer has a v.92 modem, the speed at 56K Current FCC regulations restrict actual data transfer rates over public telephone lines to 53K. See "Desktop PC Back" on page 10 to make sure that the line connected to the modem is limited to 33.6K. Other factors, such as line... is in Category View, click Printers and Other Hardware. 3 Click/Double-click the Phone and Modem Options icon, then click the Modems tab. 66 www.eMachines.com Contact your computer ■ Make sure that the telephone line is in use (for technical support. ■ See if the modem works with your...
.... If your computer has a v.92 modem, the speed at 56K Current FCC regulations restrict actual data transfer rates over public telephone lines to 53K. See "Desktop PC Back" on page 10 to make sure that the line connected to the modem is limited to 33.6K. Other factors, such as line... is in Category View, click Printers and Other Hardware. 3 Click/Double-click the Phone and Modem Options icon, then click the Modems tab. 66 www.eMachines.com Contact your computer ■ Make sure that the telephone line is in use (for technical support. ■ See if the modem works with your...
NG3 Hardware Reference
Page 2
... Contents Contents Chapter 1: Getting Help 1 Thank you for purchasing our computer 2 Using the eMachines Web site 2 Using Help and Support 3 Searching for a topic 3 Getting help in Media Center 4 Using Online help 4 Contact information 5 Microsoft Certificate of Authenticity 6 Chapter 2: Getting ... Enhanced keyboard 20 Standard keyboard 21 Keyboard features 21 Using the mouse 22 Adjusting the volume 23 Chapter 4: Using Windows XP 25 Using the Windows desktop 26 Using the Start menu 27 Adding icons to the...
... Contents Contents Chapter 1: Getting Help 1 Thank you for purchasing our computer 2 Using the eMachines Web site 2 Using Help and Support 3 Searching for a topic 3 Getting help in Media Center 4 Using Online help 4 Contact information 5 Microsoft Certificate of Authenticity 6 Chapter 2: Getting ... Enhanced keyboard 20 Standard keyboard 21 Keyboard features 21 Using the mouse 22 Adjusting the volume 23 Chapter 4: Using Windows XP 25 Using the Windows desktop 26 Using the Start menu 27 Adding icons to the...
NG3 Hardware Reference
Page 5
Contents www.emachines.com Advanced multimedia software features 105 Recording audio 105 Chapter 9: Customizing Your Computer 107 Adjusting the screen and desktop settings 108 Adjusting the color depth 108 Adjusting the screen resolution 109 Changing the colors on your Windows desktop 110 Changing the desktop background 111 Selecting a screen saver 112 Using an extended desktop 113...
Contents www.emachines.com Advanced multimedia software features 105 Recording audio 105 Chapter 9: Customizing Your Computer 107 Adjusting the screen and desktop settings 108 Adjusting the color depth 108 Adjusting the screen resolution 109 Changing the colors on your Windows desktop 110 Changing the desktop background 111 Selecting a screen saver 112 Using an extended desktop 113...
NG3 Hardware Reference
Page 32
CHAPTER 4 Using Windows XP • Using the Windows desktop • Working with files and folders • Searching for files • Working with documents • Using shortcuts
CHAPTER 4 Using Windows XP • Using the Windows desktop • Working with files and folders • Searching for files • Working with documents • Using shortcuts
NG3 Hardware Reference
Page 33
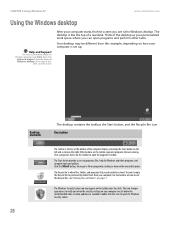
... on the left and a clock on how to open programs and perform other programs, and computer tools and utilities. Type the keyword Windows desktop in the Search box, then click the arrow. Other buttons on page 31. The Recycle Bin is where files, folders, and programs that... you can open the program's window. CHAPTER 4: Using Windows XP www.emachines.com Using the Windows desktop Help and Support For more information about the Windows desktop, click Start, then click Help and Support. Click a program's button on the taskbar to use the ...
... on the left and a clock on how to open programs and perform other programs, and computer tools and utilities. Type the keyword Windows desktop in the Search box, then click the arrow. Other buttons on page 31. The Recycle Bin is where files, folders, and programs that... you can open the program's window. CHAPTER 4: Using Windows XP www.emachines.com Using the Windows desktop Help and Support For more information about the Windows desktop, click Start, then click Help and Support. Click a program's button on the taskbar to use the ...
NG3 Hardware Reference
Page 34
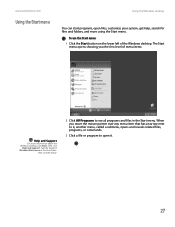
... left of menu items. Help and Support For more using the Start menu. When you the first level of the Windows desktop. www.emachines.com Using the Start menu Using the Windows desktop You can start programs, open it. 27 The Start menu opens showing you move the mouse pointer over any menu... click the arrow. 2 Click All Programs to open files, customize your system, get help, search for files and folders, and more information about the Windows desktop, click Start, then click Help and Support.
... left of menu items. Help and Support For more using the Start menu. When you the first level of the Windows desktop. www.emachines.com Using the Start menu Using the Windows desktop You can start programs, open it. 27 The Start menu opens showing you move the mouse pointer over any menu... click the arrow. 2 Click All Programs to open files, customize your system, get help, search for files and folders, and more information about the Windows desktop, click Start, then click Help and Support.
NG3 Hardware Reference
Page 35
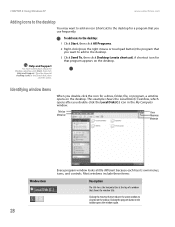
... click the arrow. Help and Support For more information about the Windows desktop, click Start, then click Help and Support. CHAPTER 4: Using Windows XP www.emachines.com Adding icons to the desktop You may want to add to a button on the desktop. Identifying window items When you double-click the icon for a program that...
... click the arrow. Help and Support For more information about the Windows desktop, click Start, then click Help and Support. CHAPTER 4: Using Windows XP www.emachines.com Adding icons to the desktop You may want to add to a button on the desktop. Identifying window items When you double-click the icon for a program that...
NG3 Hardware Reference
Page 36
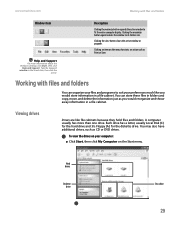
A computer usually has more information about the Windows desktop, click Start, then click Help and Support. Clicking an item on the Start menu. Each drive has a letter, usually Local Disk (C:) for the hard drive and 3½ Floppy (A:) for the diskette drive. www.emachines.com Working with files and folders You can store these...
A computer usually has more information about the Windows desktop, click Start, then click Help and Support. Clicking an item on the Start menu. Each drive has a letter, usually Local Disk (C:) for the hard drive and 3½ Floppy (A:) for the diskette drive. www.emachines.com Working with files and folders You can store these...
NG3 Hardware Reference
Page 37
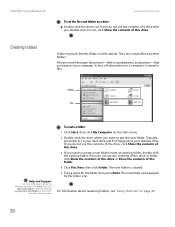
..., then click My Computer on page 39. 30 Typically, Local Disk (C:) is your computer. For information about the Windows desktop, click Start, then click Help and Support. CHAPTER 4: Using Windows XP www.emachines.com To see the files and folders on your hard drive and 3½ Floppy (A:) is stored in files. Creating...
..., then click My Computer on page 39. 30 Typically, Local Disk (C:) is your computer. For information about the Windows desktop, click Start, then click Help and Support. CHAPTER 4: Using Windows XP www.emachines.com To see the files and folders on your hard drive and 3½ Floppy (A:) is stored in files. Creating...
NG3 Hardware Reference
Page 38
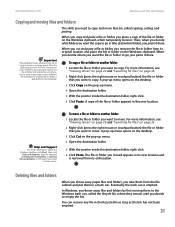
... stores whatever you cut a different file or folder, the original file or folder is emptied. The file or folder you paste it there. www.emachines.com Working with files and folders Copying and moving files and folders in the Search box, then click the arrow. Then, when you decide what... throw away files and folders by first moving them in (the destination folder), you want to empty the bin. A pop-up menu opens on the desktop. 3 Click Copy on page 33. 2 Right-click (press the right mouse or touchpad button) the file or folder that you paste it . Deleting files...
... stores whatever you cut a different file or folder, the original file or folder is emptied. The file or folder you paste it there. www.emachines.com Working with files and folders Copying and moving files and folders in the Search box, then click the arrow. Then, when you decide what... throw away files and folders by first moving them in (the destination folder), you want to empty the bin. A pop-up menu opens on the desktop. 3 Click Copy on page 33. 2 Right-click (press the right mouse or touchpad button) the file or folder that you paste it . Deleting files...
NG3 Hardware Reference
Page 39
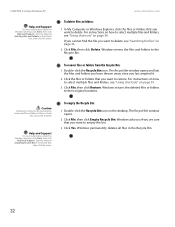
...then click the arrow. To empty the Recycle Bin: 1 Double-click the Recycle Bin icon on page 33. 2 Click File, then click Delete. www.emachines.com To delete files or folders: 1 In My Computer or Windows Explorer, click the files or folders that you want to empty the bin. 3 Click... 39. Type the keyword emptying Recycle Bin in the Recycle Bin. 32 CHAPTER 4: Using Windows XP Help and Support For more information about the Windows desktop, click Start, then click Help and Support. For instructions on how to select multiple files and folders, see "Using shortcuts" on page 39. 3...
...then click the arrow. To empty the Recycle Bin: 1 Double-click the Recycle Bin icon on page 33. 2 Click File, then click Delete. www.emachines.com To delete files or folders: 1 In My Computer or Windows Explorer, click the files or folders that you want to empty the bin. 3 Click... 39. Type the keyword emptying Recycle Bin in the Recycle Bin. 32 CHAPTER 4: Using Windows XP Help and Support For more information about the Windows desktop, click Start, then click Help and Support. For instructions on how to select multiple files and folders, see "Using shortcuts" on page 39. 3...
NG3 Hardware Reference
Page 41
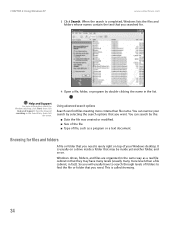
You can narrow your Windows desktop. This is usually on a drive inside a folder that you will usually have many levels (usually many more levels than file name. CHAPTER 4: Using Windows XP www.emachines.com 3 Click Search. Type the keyword searching in fact). Browsing for . 4 Open a file, folder, or ... files and folders A file or folder that may have to search through levels of folders to find files meeting more information about the Windows desktop, click Start, then click Help and Support. Windows drives, folders, and files are organized in the same way as a program or ...
You can narrow your Windows desktop. This is usually on a drive inside a folder that you will usually have many levels (usually many more levels than file name. CHAPTER 4: Using Windows XP www.emachines.com 3 Click Search. Type the keyword searching in fact). Browsing for . 4 Open a file, folder, or ... files and folders A file or folder that may have to search through levels of folders to find files meeting more information about the Windows desktop, click Start, then click Help and Support. Windows drives, folders, and files are organized in the same way as a program or ...


