
User Guide
Page 74
... the monitor is turned on, the power LED should be lit. ■ Adjust the brightness and contrast controls to the center position. ■ Make sure that the monitor cable is connected to the video port on . Type the keyword screen resolution in and turned on the back of the overall monitor design... 6: Troubleshooting Monitor The screen resolution is not correct Change the screen resolution from the lower screen edge, to read ■ Adjust the brightness and contrast controls. 68 www.eMachines.com
... the monitor is turned on, the power LED should be lit. ■ Adjust the brightness and contrast controls to the center position. ■ Make sure that the monitor cable is connected to the video port on . Type the keyword screen resolution in and turned on the back of the overall monitor design... 6: Troubleshooting Monitor The screen resolution is not correct Change the screen resolution from the lower screen edge, to read ■ Adjust the brightness and contrast controls. 68 www.eMachines.com
User Guide
Page 75
...the computer display or becomes difficult to make sure that the optical sensor is working to control precisely, cleaning the mouse will likely improve its accuracy. If you have an optical ..., such as televisions, unshielded speakers, microwaves, fluorescent lights, and metal beams or shelves. www.eMachines.com 69 Mouse The mouse does not work ■ Make sure that the mouse cable is...computer and monitor, leave them off for at least a half hour, then restart your monitor and video card documentation. Make sure that the mouse port works. For more information about display types, see ...
...the computer display or becomes difficult to make sure that the optical sensor is working to control precisely, cleaning the mouse will likely improve its accuracy. If you have an optical ..., such as televisions, unshielded speakers, microwaves, fluorescent lights, and metal beams or shelves. www.eMachines.com 69 Mouse The mouse does not work ■ Make sure that the mouse cable is...computer and monitor, leave them off for at least a half hour, then restart your monitor and video card documentation. Make sure that the mouse port works. For more information about display types, see ...
User Guide
Page 94
...39 Windows 38 UPS 18 USB port 9, 11, 28 V video playing 35 virus protecting against 39 removing with Norton AntiVirus 39 voltage switch 11 volume adjusting 21 adjusting modem 67 controls 21 muting 21 troubleshooting 72 W Web site eMachines 3 Windows Product Key Code 13 Windows key 23 Windows Media... Player 35 Windows Update 38 working safely 16 Z Zip drive port 9, 11 88 www.eMachines.com
...39 Windows 38 UPS 18 USB port 9, 11, 28 V video playing 35 virus protecting against 39 removing with Norton AntiVirus 39 voltage switch 11 volume adjusting 21 adjusting modem 67 controls 21 muting 21 troubleshooting 72 W Web site eMachines 3 Windows Product Key Code 13 Windows key 23 Windows Media... Player 35 Windows Update 38 working safely 16 Z Zip drive port 9, 11 88 www.eMachines.com
NG3 Hardware Reference
Page 83
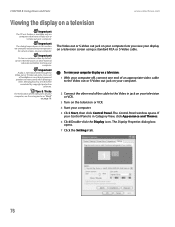
... or VCR. 3 Turn on the television or VCR. 4 Start your Control Panel is not transmitted through the Video out or S-Video out jacks. The Control Panel window opens. If your computer. 5 Click Start, then click Control Panel. The Display Properties dialog box opens. 7 Click the Settings tab... Tricks For the location of an appropriate video cable to the Video out or S-Video out jack on your computer. 2 Connect the other external video device) before starting your display on page 10. CHAPTER 8: Using Drives and Ports www.emachines.com Viewing the display on a television Important...
... or VCR. 3 Turn on the television or VCR. 4 Start your Control Panel is not transmitted through the Video out or S-Video out jacks. The Control Panel window opens. If your computer. 5 Click Start, then click Control Panel. The Display Properties dialog box opens. 7 Click the Settings tab... Tricks For the location of an appropriate video cable to the Video out or S-Video out jack on your computer. 2 Connect the other external video device) before starting your display on page 10. CHAPTER 8: Using Drives and Ports www.emachines.com Viewing the display on a television Important...
NG3 Hardware Reference
Page 86
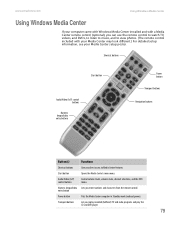
...Video (A/V) control buttons Control volume levels, volume mute, channel selections, and the DVD menu. entry button Power button Puts the Media Center computer in Standby mode (reduced power). Transport buttons Let you can use the remote control to watch TV, videos, and DVDs, to listen to music, and to Media Center features. www.emachines.... (The remote control included with a Media Center remote control (optional), you replay recorded (buffered) TV and radio programs and play the CD and DVD player. 79 Shortcut buttons Start button Audio/Video (A/V) control buttons Numeric keypad/...
...Video (A/V) control buttons Control volume levels, volume mute, channel selections, and the DVD menu. entry button Power button Puts the Media Center computer in Standby mode (reduced power). Transport buttons Let you can use the remote control to watch TV, videos, and DVDs, to listen to music, and to Media Center features. www.emachines.... (The remote control included with a Media Center remote control (optional), you replay recorded (buffered) TV and radio programs and play the CD and DVD player. 79 Shortcut buttons Start button Audio/Video (A/V) control buttons Numeric keypad/...
NG3 Hardware Reference
Page 93
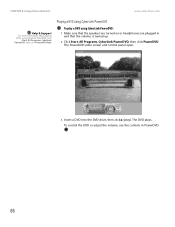
CHAPTER 8: Using Drives and Ports www.emachines.com Help & Support For more information about playing DVDs using CyberLink PowerDVD: 1 Make sure that the speakers are turned on or headphones are plugged in PowerDVD. 86 Playing a DVD using CyberLink PowerDVD To play ). The DVD plays. The PowerDVD video screen and control panel open. 3 Insert a DVD...
CHAPTER 8: Using Drives and Ports www.emachines.com Help & Support For more information about playing DVDs using CyberLink PowerDVD: 1 Make sure that the speakers are turned on or headphones are plugged in PowerDVD. 86 Playing a DVD using CyberLink PowerDVD To play ). The DVD plays. The PowerDVD video screen and control panel open. 3 Insert a DVD...
NG3 Hardware Reference
Page 104
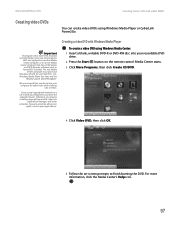
... on the remote control. For more information, click the Media Center's Help icon. 97 Otherwise, you do not use your recordable DVD drive. 2 Press the Start button on a CD or DVD, you are uncertain about your rights, contact your legal advisor. Creating a video DVD with Service ...other remedies. We recommend that have Windows XP with Windows Media Player To create a video DVD using Windows Media Player or CyberLink Power2Go. www.emachines.com Creating music CDs and video DVDs Creating video DVDs You can be subject to finish burning the DVD. Media Center starts. 3 Click...
... on the remote control. For more information, click the Media Center's Help icon. 97 Otherwise, you do not use your recordable DVD drive. 2 Press the Start button on a CD or DVD, you are uncertain about your rights, contact your legal advisor. Creating a video DVD with Service ...other remedies. We recommend that have Windows XP with Windows Media Player To create a video DVD using Windows Media Player or CyberLink Power2Go. www.emachines.com Creating music CDs and video DVDs Creating video DVDs You can be subject to finish burning the DVD. Media Center starts. 3 Click...
NG3 Hardware Reference
Page 115
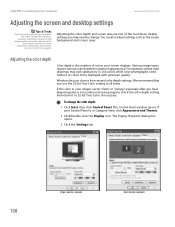
...and screen saver. Windows lets you use the 32-bit True Color setting at all times. To change . CHAPTER 9: Customizing Your Computer www.emachines.com Adjusting the screen and desktop settings Tips & Tricks If you are two of your images seems "false" or "jumpy," especially after ...you have played a game or run a video-intensive program, check the color depth setting and return it to change the color depth: 1 Click Start, then click Control Panel. The Display Properties dialog box opens. 3 Click the Settings tab. 108 Single-monitor...
...and screen saver. Windows lets you use the 32-bit True Color setting at all times. To change . CHAPTER 9: Customizing Your Computer www.emachines.com Adjusting the screen and desktop settings Tips & Tricks If you are two of your images seems "false" or "jumpy," especially after ...you have played a game or run a video-intensive program, check the color depth setting and return it to change the color depth: 1 Click Start, then click Control Panel. The Display Properties dialog box opens. 3 Click the Settings tab. 108 Single-monitor...
NG3 Hardware Reference
Page 194
...click the arrow. Make sure that the monitor cable is not correct Change the screen resolution from the lower screen edge, to the video port on page 108. Your monitor may use a thin damper wire, located approximately 1/3 of the way down from the upper screen... device driver. ■ Connect a monitor that the monitor warms up from the Display Properties dialog box. www.emachines.com Troubleshooting 4 Click the Modem tab, then adjust the Speaker volume control. 5 Click OK twice to another monitor, electric fan, fluorescent light, metal shelf, or laser printer. ■...
...click the arrow. Make sure that the monitor cable is not correct Change the screen resolution from the lower screen edge, to the video port on page 108. Your monitor may use a thin damper wire, located approximately 1/3 of the way down from the upper screen... device driver. ■ Connect a monitor that the monitor warms up from the Display Properties dialog box. www.emachines.com Troubleshooting 4 Click the Modem tab, then adjust the Speaker volume control. 5 Click OK twice to another monitor, electric fan, fluorescent light, metal shelf, or laser printer. ■...
NG3 Hardware Reference
Page 195
...clean, damp cloth. Most routers have the same workgroup name. 188 CHAPTER 14: Troubleshooting www.emachines.com Tips & Tricks For more information about troubleshooting, click Start, then click Help and ... Adjust the brightness and contrast controls. ■ Use the monitor degauss feature (see your network ■ Make sure that all computers are working to control precisely, cleaning the mouse will... other computers on the display is unique. The text on your monitor and video card documentation. For more information about display types, see your monitor documentation) or turn...
...clean, damp cloth. Most routers have the same workgroup name. 188 CHAPTER 14: Troubleshooting www.emachines.com Tips & Tricks For more information about troubleshooting, click Start, then click Help and ... Adjust the brightness and contrast controls. ■ Use the monitor degauss feature (see your network ■ Make sure that all computers are working to control precisely, cleaning the mouse will... other computers on the display is unique. The text on your monitor and video card documentation. For more information about display types, see your monitor documentation) or turn...
NG3 Hardware Reference
Page 211
Index www.emachines.com serial number 9 serial port 10 setting up safety precautions 194 ...39 shutting down computer 19, 20 side panel removing 154 replacing 154 software See programs sound adjusting 23, 81 controls 23, 81 muting 23, 81 Sound Recorder making audio recordings 105 playing file 83, 105 recording audio 87 speaker...menu 27 starting computer 9, 19 programs 23 starting programs 27 static electricity 154 subnet mask entering 53 surge protector 18 S-Video (TV) out jack 76 switch voltage selection 10 system battery replacing 159 system board replacing 172 system identification label 9...
Index www.emachines.com serial number 9 serial port 10 setting up safety precautions 194 ...39 shutting down computer 19, 20 side panel removing 154 replacing 154 software See programs sound adjusting 23, 81 controls 23, 81 muting 23, 81 Sound Recorder making audio recordings 105 playing file 83, 105 recording audio 87 speaker...menu 27 starting computer 9, 19 programs 23 starting programs 27 static electricity 154 subnet mask entering 53 surge protector 18 S-Video (TV) out jack 76 switch voltage selection 10 system battery replacing 159 system board replacing 172 system identification label 9...
NG3 Hardware Reference
Page 212
... switch 10 volume adjusting 23, 81 adjusting modem 186 controls 23, 81 muting 23, 81 troubleshooting 191 W WAN IP Address 57 WAV file 83 Web browser 42, 43 Web page 43 Web site 43 connecting to 44 downloading files 45 eMachines 2 window 28 close button 29 closing 29, 39 ...to Internet radio 105 playing audio CD 84 playing audio file 83 viewing video file 83 watching Internet TV 105 Windows Movie Maker capturing video to computer 91 editing video 90, 92 saving video 92 transferring video to computer 91 Video Capture Wizard 92 Windows Security Alert dialog box 66, 67 Windows Security Center...
... switch 10 volume adjusting 23, 81 adjusting modem 186 controls 23, 81 muting 23, 81 troubleshooting 191 W WAN IP Address 57 WAV file 83 Web browser 42, 43 Web page 43 Web site 43 connecting to 44 downloading files 45 eMachines 2 window 28 close button 29 closing 29, 39 ...to Internet radio 105 playing audio CD 84 playing audio file 83 viewing video file 83 watching Internet TV 105 Windows Movie Maker capturing video to computer 91 editing video 90, 92 saving video 92 transferring video to computer 91 Video Capture Wizard 92 Windows Security Alert dialog box 66, 67 Windows Security Center...


