
User Guide
Page 7
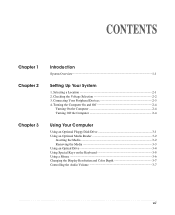
... 3-1 Using an Optional Media Reader 3-2 Inserting the Media 3-2 Removing the Media 3-3 Using an Optical Drive 3-4 Using Special Keys on the Keyboard 3-5 Using a Mouse ...3-6 Changing the Display Resolution and Color Depth 3-7 Controlling the Audio Volume 3-7 vii CONTENTS Chapter 1 Chapter 2 Chapter 3 Introduction System Overview...1-1 Setting Up Your System 1.
... 3-1 Using an Optional Media Reader 3-2 Inserting the Media 3-2 Removing the Media 3-3 Using an Optical Drive 3-4 Using Special Keys on the Keyboard 3-5 Using a Mouse ...3-6 Changing the Display Resolution and Color Depth 3-7 Controlling the Audio Volume 3-7 vii CONTENTS Chapter 1 Chapter 2 Chapter 3 Introduction System Overview...1-1 Setting Up Your System 1.

User Guide
Page 8
... 6-2 Appendix A. Approval Statements Battery Warning Instruction B-1 Fuse Warning Instruction B-1 Laser Product ...B-2 viii Solving Common Problems Power ...A-1 Hard Disk Drive ...A-1 Optical Drive ...A-2 Audio ...A-2 Floppy Disk Drive A-3 Display & Monitor A-3 Keyboard ...A-4 Mouse ...A-4 Appendix B.
... 6-2 Appendix A. Approval Statements Battery Warning Instruction B-1 Fuse Warning Instruction B-1 Laser Product ...B-2 viii Solving Common Problems Power ...A-1 Hard Disk Drive ...A-1 Optical Drive ...A-2 Audio ...A-2 Floppy Disk Drive A-3 Display & Monitor A-3 Keyboard ...A-4 Mouse ...A-4 Appendix B.

User Guide
Page 14
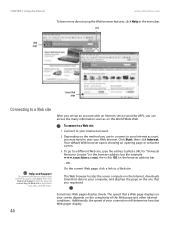
NOTE If the Restore CD is in the optical drive (D:) while your computer is displayed, click Turn Off to your computer. 2. Before turning off . When the Turn Off Computer dialog box is booting, the computer will appear. Turning the Computer ...
NOTE If the Restore CD is in the optical drive (D:) while your computer is displayed, click Turn Off to your computer. 2. Before turning off . When the Turn Off Computer dialog box is booting, the computer will appear. Turning the Computer ...
User Guide
Page 19
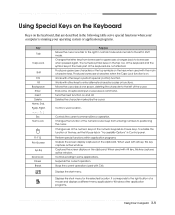
... keys from lowercase to uppercase; Control cursor location. Controls the current command line or operation. Captures the screen display on the numeric keypad as mouse keys. Displays the short menu for the selected location. Stops the current operation (used with the main character keys. Changes... in Shift mode. The numeric/symbol keys on the keyboard, that are not affected. To enable the function of a mouse and displays a different menu applicable to Windows other keys to enter alternate character codes or functions. Deletes the character marked by the cursor. It...
... keys from lowercase to uppercase; Control cursor location. Controls the current command line or operation. Captures the screen display on the numeric keypad as mouse keys. Displays the short menu for the selected location. Stops the current operation (used with the main character keys. Changes... in Shift mode. The numeric/symbol keys on the keyboard, that are not affected. To enable the function of a mouse and displays a different menu applicable to Windows other keys to enter alternate character codes or functions. Deletes the character marked by the cursor. It...
User Guide
Page 21
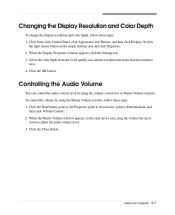
...to Accessories, point to adjust the audio volume level. 3. Click the Close button. Using Your Computer 3-7 Click the OK button. When the Display Properties window appears, click the Settings tab. 3. When the Master Volume window appears, in the each device area, drag the volume bar up ...or down to Entertainment, and then click Volume Control. 2. Changing the Display Resolution and Color Depth To change the display resolution and color depth, follow these steps: 1. Click Start, click Control Panel, click Appearance and Themes, and then ...
...to Accessories, point to adjust the audio volume level. 3. Click the Close button. Using Your Computer 3-7 Click the OK button. When the Display Properties window appears, click the Settings tab. 3. When the Master Volume window appears, in the each device area, drag the volume bar up ...or down to Entertainment, and then click Volume Control. 2. Changing the Display Resolution and Color Depth To change the display resolution and color depth, follow these steps: 1. Click Start, click Control Panel, click Appearance and Themes, and then ...

User Guide
Page 39
.... 11. If there is no executable installation file. message appears, replace the Restore CD #2 with Microsoft for installation, use it to your computer, follow the displayed messages. NOTE Depending on the model, your hard disk. 8. 7. Using the Restore CDs 5-3 The restoration process will appear. And press Enter to continue..." After the...
.... 11. If there is no executable installation file. message appears, replace the Restore CD #2 with Microsoft for installation, use it to your computer, follow the displayed messages. NOTE Depending on the model, your hard disk. 8. 7. Using the Restore CDs 5-3 The restoration process will appear. And press Enter to continue..." After the...
User Guide
Page 41
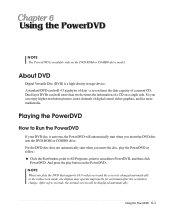
...The PowerDVD is changed automatically to the widescreen mode, the display may operate improperly for an instant after the resolution change. a seven times the data capacity of a CD on a single side. Playing the PowerDVD How to emachines PowerDVD, and then click PowerDVD. And press the play ...COMBO drive model. A standard DVD can hold more multimedia. About DVD Digital Versatile Disc (DVD) is auto-run, the PowerDVD will be displayed automatically. Chapter 1 Dual-layer DVDs can enjoy higher-resolution pictures, more channels of digital sound, richer graphics, and far more than twelve ...
...The PowerDVD is changed automatically to the widescreen mode, the display may operate improperly for an instant after the resolution change. a seven times the data capacity of a CD on a single side. Playing the PowerDVD How to emachines PowerDVD, and then click PowerDVD. And press the play ...COMBO drive model. A standard DVD can hold more multimedia. About DVD Digital Versatile Disc (DVD) is auto-run, the PowerDVD will be displayed automatically. Chapter 1 Dual-layer DVDs can enjoy higher-resolution pictures, more channels of digital sound, richer graphics, and far more than twelve ...
User Guide
Page 42
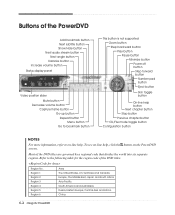
... of the PowerDVD Add bookmark button Next subtitle button Show/Hide button Next audio stream button Next angle button Karaoke button Increase volume button Status display panel Video position slider Mute button Decrease volume button Capture frame button Go-up button Repeat button Menu button Go to bookmark button This button...
... of the PowerDVD Add bookmark button Next subtitle button Show/Hide button Next audio stream button Next angle button Karaoke button Increase volume button Status display panel Video position slider Mute button Decrease volume button Capture frame button Go-up button Repeat button Menu button Go to bookmark button This button...

User Guide
Page 45
... any key or move your computer entered power management mode. Click Start, click Control Panel, click Appearance and Themes, and then click Display. To open Windows Help, click the Start button, and then click Help and Support.) Diskette is firmly plugged into the wall outlet and... Diskette is incorrectly inserted. Click the OK button. Your current screen will reappear. Remove the write-protection or use the Display Properties window. To change the display resolution or color depth? Format the diskette. (Refer to your Windows Help in Windows. Select the color depth from the...
... any key or move your computer entered power management mode. Click Start, click Control Panel, click Appearance and Themes, and then click Display. To open Windows Help, click the Start button, and then click Help and Support.) Diskette is firmly plugged into the wall outlet and... Diskette is incorrectly inserted. Click the OK button. Your current screen will reappear. Remove the write-protection or use the Display Properties window. To change the display resolution or color depth? Format the diskette. (Refer to your Windows Help in Windows. Select the color depth from the...
NG3 Hardware Reference
Page 4
www.emachines.com Contents Chapter 7: Sending and Receiving Faxes 63 Installing and configuring Fax 64 Installing Fax 64 Configuring Fax 65 Sending a simple fax 67 Setting up ... a memory card 73 Using the CD or DVD drive 73 Identifying drive types 73 Inserting a CD or DVD 74 Using a second monitor 75 Viewing the display on a television 76 Modifying television settings 78 Using Windows Media Center 79 Manually updating the Media Center Program Guide 80 Using multimedia 81 Adjusting the...
www.emachines.com Contents Chapter 7: Sending and Receiving Faxes 63 Installing and configuring Fax 64 Installing Fax 64 Configuring Fax 65 Sending a simple fax 67 Setting up ... a memory card 73 Using the CD or DVD drive 73 Identifying drive types 73 Inserting a CD or DVD 74 Using a second monitor 75 Viewing the display on a television 76 Modifying television settings 78 Using Windows Media Center 79 Manually updating the Media Center Program Guide 80 Using multimedia 81 Adjusting the...
NG3 Hardware Reference
Page 29
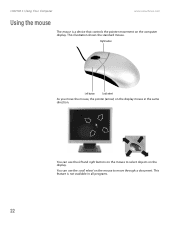
This illustration shows the standard mouse. You can use the left and right buttons on the mouse to move the mouse, the pointer (arrow) on the display moves in all programs. 22 You can use the scroll wheel on the mouse to select objects on the computer display. Right button Left button Scroll wheel As you move through a document. This feature is a device that controls the pointer movement on the display. CHAPTER 3: Using Your Computer www.emachines.com Using the mouse The mouse is not available in the same direction.
This illustration shows the standard mouse. You can use the left and right buttons on the mouse to move the mouse, the pointer (arrow) on the display moves in all programs. 22 You can use the scroll wheel on the mouse to select objects on the computer display. Right button Left button Scroll wheel As you move through a document. This feature is a device that controls the pointer movement on the display. CHAPTER 3: Using Your Computer www.emachines.com Using the mouse The mouse is not available in the same direction.
NG3 Hardware Reference
Page 30
.... This action is called double-clicking. For instructions on how to clean the mouse, see "Changing the mouse settings" on the computer display. Quickly press and release the left mouse button once. This action is called right-clicking. You can use the volume controls to move ...the pointer farther, pick up the mouse, set it down in your computer. www.emachines.com Adjusting the volume To... Quickly press and release the right mouse button once. This action is called clicking. Move (drag) the object...
.... This action is called double-clicking. For instructions on how to clean the mouse, see "Changing the mouse settings" on the computer display. Quickly press and release the left mouse button once. This action is called right-clicking. You can use the volume controls to move ...the pointer farther, pick up the mouse, set it down in your computer. www.emachines.com Adjusting the volume To... Quickly press and release the right mouse button once. This action is called clicking. Move (drag) the object...
NG3 Hardware Reference
Page 33
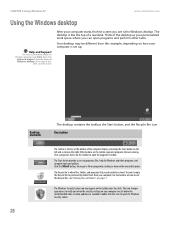
The desktop is the bar at the bottom of the computer display containing the Start button on the left and a clock on the menu that are running. Desktop elements The desktop contains the taskbar, the Start button, ... programs that you see "Deleting files and folders" on the taskbar to programs, files, help for Windows and other tasks. CHAPTER 4: Using Windows XP www.emachines.com Using the Windows desktop Help and Support For more information about the Windows desktop, click Start, then click Help and Support. Type the keyword...
The desktop is the bar at the bottom of the computer display containing the Start button on the left and a clock on the menu that are running. Desktop elements The desktop contains the taskbar, the Start button, ... programs that you see "Deleting files and folders" on the taskbar to programs, files, help for Windows and other tasks. CHAPTER 4: Using Windows XP www.emachines.com Using the Windows desktop Help and Support For more information about the Windows desktop, click Start, then click Help and Support. Type the keyword...
NG3 Hardware Reference
Page 36
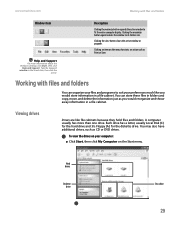
... Help and Support. Type the keyword window in a file cabinet. Clicking the maximize button again restores the window to fit the entire computer display. You can organize your files and programs to suit your computer: ■ Click Start, then click My Computer on the Start menu. Hard... 3½ Floppy (A:) for the diskette drive. Working with files and folders Window item Help and Support For more than one drive. www.emachines.com Working with files and folders You can store these files in a file cabinet. Description Clicking the maximize button expands the active window to...
... Help and Support. Type the keyword window in a file cabinet. Clicking the maximize button again restores the window to fit the entire computer display. You can organize your files and programs to suit your computer: ■ Click Start, then click My Computer on the Start menu. Hard... 3½ Floppy (A:) for the diskette drive. Working with files and folders Window item Help and Support For more than one drive. www.emachines.com Working with files and folders You can store these files in a file cabinet. Description Clicking the maximize button expands the active window to...
NG3 Hardware Reference
Page 49
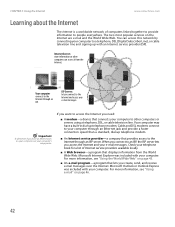
...want to your e-mail messages. Cable and DSL modems connect to access the Internet you need: ■ A modem-a device that displays information from the Internet. ISP Servers let you access the Internet and your computer through an Ethernet jack and provide a faster connection ... (ISP). Important To determine if you create, send, and receive e-mail messages over the Internet. CHAPTER 5: Using the Internet www.emachines.com Learning about the Internet The Internet is a worldwide network of Internet service providers available locally. ■ A Web browser-a program that...
...want to your e-mail messages. Cable and DSL modems connect to access the Internet you need: ■ A modem-a device that displays information from the Internet. ISP Servers let you access the Internet and your computer through an Ethernet jack and provide a faster connection ... (ISP). Important To determine if you create, send, and receive e-mail messages over the Internet. CHAPTER 5: Using the Internet www.emachines.com Learning about the Internet The Internet is a worldwide network of Internet service providers available locally. ■ A Web browser-a program that...
NG3 Hardware Reference
Page 50
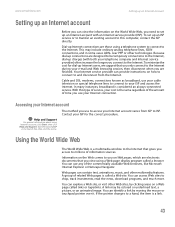
...Contact your Internet account Help and Support For general information about using Internet accounts, click Start, then click Help and Support. www.emachines.com Setting up an Internet account Setting up an Internet account Before you can view the information on the World Wide Web, you ...need to you on Web pages, which are electronic documents that you view using a Web page display program called a browser. With this type of the commercially available Web browsers, like Microsoft Internet Explorer or Netscape Navigator. You can contain text...
...Contact your Internet account Help and Support For general information about using Internet accounts, click Start, then click Help and Support. www.emachines.com Setting up an Internet account Setting up an Internet account Before you can view the information on the World Wide Web, you ...need to you on Web pages, which are electronic documents that you view using a Web page display program called a browser. With this type of the commercially available Web browsers, like Microsoft Internet Explorer or Netscape Navigator. You can contain text...
NG3 Hardware Reference
Page 51
...), you may need to a Web site. Sometimes Web pages display slowly. OR - Type the keyword connecting to a different Web site, type the address (called a URL for "Universal Resource Locator") in the browser address bar (for example www.emachines.com), then click GO on the method you requested. Click ...Start, then click Internet. The speed that you use to connect to your connection will determine how fast Web pages display. 44 CHAPTER 5: Using the Internet www.emachines.com To learn more about using the Web browser features, click Help in the menu bar. Your default Web browser ...
...), you may need to a Web site. Sometimes Web pages display slowly. OR - Type the keyword connecting to a different Web site, type the address (called a URL for "Universal Resource Locator") in the browser address bar (for example www.emachines.com), then click GO on the method you requested. Click ...Start, then click Internet. The speed that you use to connect to your connection will determine how fast Web pages display. 44 CHAPTER 5: Using the Internet www.emachines.com To learn more about using the Web browser features, click Help in the menu bar. Your default Web browser ...
NG3 Hardware Reference
Page 78
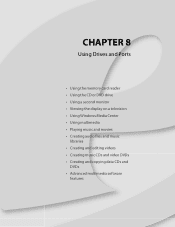
CHAPTER 8 Using Drives and Ports • Using the memory card reader • Using the CD or DVD drive • Using a second monitor • Viewing the display on a television • Using Windows Media Center • Using multimedia • Playing music and movies • Creating audio files and music libraries • Creating and editing videos • Creating music CDs and video DVDs • Creating and copying data CDs and DVDs • Advanced multimedia software features
CHAPTER 8 Using Drives and Ports • Using the memory card reader • Using the CD or DVD drive • Using a second monitor • Viewing the display on a television • Using Windows Media Center • Using multimedia • Playing music and movies • Creating audio files and music libraries • Creating and editing videos • Creating music CDs and video DVDs • Creating and copying data CDs and DVDs • Advanced multimedia software features
NG3 Hardware Reference
Page 82
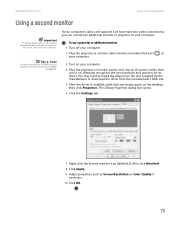
Windows recognizes the new hardware and searches for its driver. The Display Properties dialog box opens. 6 Click the Settings tab. 7 Right-click the second monitor icon (labeled 2), then click Attached. 8 Click Apply. 9 Adjust properties such as Screen ... driver is installed, right-click any empty space on your computer. You may not represent the actual screens on the desktop, then click Properties. www.emachines.com Using a second monitor Using a second monitor Important The dialog boxes shown in this section are examples only and may need to your computer. If...
Windows recognizes the new hardware and searches for its driver. The Display Properties dialog box opens. 6 Click the Settings tab. 7 Right-click the second monitor icon (labeled 2), then click Attached. 8 Click Apply. 9 Adjust properties such as Screen ... driver is installed, right-click any empty space on your computer. You may not represent the actual screens on the desktop, then click Properties. www.emachines.com Using a second monitor Using a second monitor Important The dialog boxes shown in this section are examples only and may need to your computer. If...
NG3 Hardware Reference
Page 83
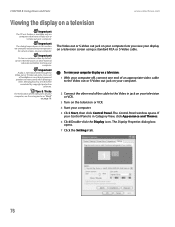
... not represent the actual screens on computers that have a Video out or S-Video out jack. CHAPTER 8: Using Drives and Ports www.emachines.com Viewing the display on a television Important The TV out feature is available only on your computer. computer. The Video out or S-Video out jack on... cable. DVD playback to the Video out or S-Video out jack on your computer. 2 Connect the other external video device) before starting your display on external video by copyright protection software. Tips & Tricks For the location of the cable to hear sound while playing a DVD. To view ...
... not represent the actual screens on computers that have a Video out or S-Video out jack. CHAPTER 8: Using Drives and Ports www.emachines.com Viewing the display on a television Important The TV out feature is available only on your computer. computer. The Video out or S-Video out jack on... cable. DVD playback to the Video out or S-Video out jack on your computer. 2 Connect the other external video device) before starting your display on external video by copyright protection software. Tips & Tricks For the location of the cable to hear sound while playing a DVD. To view ...


