

User Guide
Page 8
... A-3 Keyboard ...A-4 Mouse ...A-4 Appendix B. Approval Statements Battery Warning Instruction B-1 Fuse Warning Instruction B-1 Laser Product ...B-2 viii Chapter 4 Installing and Removing Drives Removing the Cover 4-1 Replacing the Cover 4-3 Installing an Expansion Card 4-4 Installing an Additional Hard Disk Drive 4-6 Installing the 5.25-inch Device in the Peripheral Bay 4-9 Chapter 5 Using the Restore CDs Restoring Your Original Software...
... A-3 Keyboard ...A-4 Mouse ...A-4 Appendix B. Approval Statements Battery Warning Instruction B-1 Fuse Warning Instruction B-1 Laser Product ...B-2 viii Chapter 4 Installing and Removing Drives Removing the Cover 4-1 Replacing the Cover 4-3 Installing an Expansion Card 4-4 Installing an Additional Hard Disk Drive 4-6 Installing the 5.25-inch Device in the Peripheral Bay 4-9 Chapter 5 Using the Restore CDs Restoring Your Original Software...

User Guide
Page 9
Introduction 1-1 Introduction System Overview Optical drive Optical drive (optional) USB connector (optional) Power button Emergency eject hole Load/Eject button Floppy disk drive(optional) Media reader slots(optional) Power indicator Hard disk drive access indicator IEEE 1394 connectors (optional) USB 2.0 connectors (optional) Headphone jack Microphone jack USB 2.0 connectors (optional) NOTE Chapter 1 Your optical drives may differ from the illustrations described in this user's guide.
Introduction 1-1 Introduction System Overview Optical drive Optical drive (optional) USB connector (optional) Power button Emergency eject hole Load/Eject button Floppy disk drive(optional) Media reader slots(optional) Power indicator Hard disk drive access indicator IEEE 1394 connectors (optional) USB 2.0 connectors (optional) Headphone jack Microphone jack USB 2.0 connectors (optional) NOTE Chapter 1 Your optical drives may differ from the illustrations described in this user's guide.
User Guide
Page 18
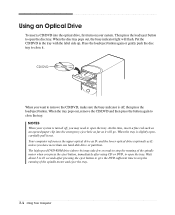
... the label side up. then press the load/eject button. At this time, insert a fine rod such as an opened paper clip into the optical drive, first turn on your system is slightly open, carefully pull it will flash. When the tray pops out, remove the CD/DVD and then press... press the load/eject button to stop the running of the spindle motor when you have more than one hard disk drive or partition. NOTES When your system. The high speed DVD-ROM drive (above 6x) may need to open the tray. When the disc tray pops out, the busy indicator light will...
... the label side up. then press the load/eject button. At this time, insert a fine rod such as an opened paper clip into the optical drive, first turn on your system is slightly open, carefully pull it will flash. When the tray pops out, remove the CD/DVD and then press... press the load/eject button to stop the running of the spindle motor when you have more than one hard disk drive or partition. NOTES When your system. The high speed DVD-ROM drive (above 6x) may need to open the tray. When the disc tray pops out, the busy indicator light will...
User Guide
Page 28
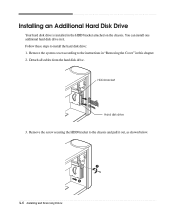
Remove the screw securing the HDD bracket to the chassis and pull it . Installing an Additional Hard Disk Drive Your hard disk drive is installed in this chapter. 2. You can install one additional hard disk drive in it out, as shown below. 4-6 Installing and Removing Drives Remove the system cover according to install the hard disk drive: 1. Detach all cables from the hard disk drive. HDD bracket Hard disk drive 3. Follow these steps to the instructions in "Removing the Cover" in the HDD bracket attached on the chassis.
Remove the screw securing the HDD bracket to the chassis and pull it . Installing an Additional Hard Disk Drive Your hard disk drive is installed in this chapter. 2. You can install one additional hard disk drive in it out, as shown below. 4-6 Installing and Removing Drives Remove the system cover according to install the hard disk drive: 1. Detach all cables from the hard disk drive. HDD bracket Hard disk drive 3. Follow these steps to the instructions in "Removing the Cover" in the HDD bracket attached on the chassis.

User Guide
Page 29
4. Slide the hard disk drive into the HDD bracket. 6. Set the jumper of the new hard disk drive to the HDD bracket. Installing and Removing Drives 4-7 With using the screws, secure the hard disk drive to CS (Cable Select). 5.
4. Slide the hard disk drive into the HDD bracket. 6. Set the jumper of the new hard disk drive to the HDD bracket. Installing and Removing Drives 4-7 With using the screws, secure the hard disk drive to CS (Cable Select). 5.

User Guide
Page 30
Replace the system cover according to your hard disk drive. (If you removed the hard disk drive cable from the motherboard, replace it with the retaining screw, as shown below. 8. 7. Slide the HDD bracket into the chassis and secure it .) 9. Connect the power and hard disk drive cable to the instructions in "Replacing the Cover" in this chapter. 4-8 Installing and Removing Drives
Replace the system cover according to your hard disk drive. (If you removed the hard disk drive cable from the motherboard, replace it with the retaining screw, as shown below. 8. 7. Slide the HDD bracket into the chassis and secure it .) 9. Connect the power and hard disk drive cable to the instructions in "Replacing the Cover" in this chapter. 4-8 Installing and Removing Drives
User Guide
Page 31
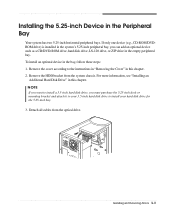
...inch dock or mounting bracket and attach it to your 3.5-inch hard disk drive to install your hard disk drive for the 5.25-inch bay. 3. Installing and Removing Drives 4-9 For more information, see "Installing an Additional Hard Disk Drive" in the empty peripheral bay. Remove the HDD bracket from ...an optional device in this chapter. Remove the cover according to install a 3.5-inch hard disk drive, you can add an optional device such as a CD/DVD-ROM drive, hard disk drive, LS-120 drive, or ZIP drive in this chapter. 2. Installing the 5.25-inch Device in the Peripheral Bay Your...
...inch dock or mounting bracket and attach it to your 3.5-inch hard disk drive to install your hard disk drive for the 5.25-inch bay. 3. Installing and Removing Drives 4-9 For more information, see "Installing an Additional Hard Disk Drive" in the empty peripheral bay. Remove the HDD bracket from ...an optional device in this chapter. Remove the cover according to install a 3.5-inch hard disk drive, you can add an optional device such as a CD/DVD-ROM drive, hard disk drive, LS-120 drive, or ZIP drive in this chapter. 2. Installing the 5.25-inch Device in the Peripheral Bay Your...

User Guide
Page 33
...ends of optional drive you want to install is an EMI shield that must set for the drive to work properly with your system recognizes the device according to location of the cable connector that connected to CS (Cable Select). EMI shield 8. NOTES Like a hard disk drive, most optional devices... have jumpers that covers the 5.25-inch drive bay you want to CS (Cable Select). Make sure the jumper of the front panel using a tool such ...
...ends of optional drive you want to install is an EMI shield that must set for the drive to work properly with your system recognizes the device according to location of the cable connector that connected to CS (Cable Select). EMI shield 8. NOTES Like a hard disk drive, most optional devices... have jumpers that covers the 5.25-inch drive bay you want to CS (Cable Select). Make sure the jumper of the front panel using a tool such ...
User Guide
Page 37
... any software not originally installed on your original preinstalled software: 1. CAUTION If you will be started. 4. Turn on your hard disk since you purchased your hard disk, you restore your system. When the Microsoft Windows Startup Menu appears, type the number 1 and press Enter. And ... 1 If you lose all data in the hard disk (C:). Restoration procedures will lose all data that added files, programs, or other data on the computer. 2. RESTORE WINDOWS XP," you select "1. Insert the Restore CD #1 into the optical drive (D:) before restoring. Using the Restore CDs Use...
... any software not originally installed on your original preinstalled software: 1. CAUTION If you will be started. 4. Turn on your hard disk since you purchased your hard disk, you restore your system. When the Microsoft Windows Startup Menu appears, type the number 1 and press Enter. And ... 1 If you lose all data in the hard disk (C:). Restoration procedures will lose all data that added files, programs, or other data on the computer. 2. RESTORE WINDOWS XP," you select "1. Insert the Restore CD #1 into the optical drive (D:) before restoring. Using the Restore CDs Use...
User Guide
Page 38
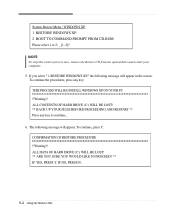
... continue the procedures, press any key to continue... 6. To continue, press Y. RESTORE WINDOWS XP," the following message will appear in the screen. ALL DATA OF HARD DRIVE (C:) WILL BE LOST! ** ARE YOU SURE YOU WOULD LIKE TO PROCEED? ** IF YES, PRESS Y. System Restore Menu / WINDOWS XP 1 RESTORE WINDOWS XP 2 BOOT ... RE-INSTALL WINDOWS XP ON YOUR PC !!Warning!! The following message will appear. IF NO, PRESS N. 5-2 Using the Restore CDs ALL CONTENTS OF HARD DRIVE (C:) WILL BE LOST! ** BACK UP YOUR FILES BEFORE PROCEEDING AND RESTART ** Press any key. If you select "1.
... continue the procedures, press any key to continue... 6. To continue, press Y. RESTORE WINDOWS XP," the following message will appear in the screen. ALL DATA OF HARD DRIVE (C:) WILL BE LOST! ** ARE YOU SURE YOU WOULD LIKE TO PROCEED? ** IF YES, PRESS Y. System Restore Menu / WINDOWS XP 1 RESTORE WINDOWS XP 2 BOOT ... RE-INSTALL WINDOWS XP ON YOUR PC !!Warning!! The following message will appear. IF NO, PRESS N. 5-2 Using the Restore CDs ALL CONTENTS OF HARD DRIVE (C:) WILL BE LOST! ** BACK UP YOUR FILES BEFORE PROCEEDING AND RESTART ** Press any key. If you select "1.

User Guide
Page 39
.... The restoration process will appear. And press Enter to continue..." If the "Insert next media and press enter to continue. 9. Enter your hard disk. 8. All data in the Device Manager window if there is the executable file for using the Restore CDs. message appears, replace the... file. Using the Restore CDs 5-3 After the restoration process is completed, remove the Restore CD from your computer is ) in the optical drive. In this case, the "Microsoft Windows Startup Menu" menu will start. And press Enter to continue..." To continue the restoration, remove the...
.... The restoration process will appear. And press Enter to continue..." If the "Insert next media and press enter to continue. 9. Enter your hard disk. 8. All data in the Device Manager window if there is the executable file for using the Restore CDs. message appears, replace the... file. Using the Restore CDs 5-3 After the restoration process is completed, remove the Restore CD from your computer is ) in the optical drive. In this case, the "Microsoft Windows Startup Menu" menu will start. And press Enter to continue..." To continue the restoration, remove the...

User Guide
Page 43
... Help. Wall outlet is listed first, followed by sudden power failure, it will not operate if you press the power button. Hard Disk Drive Cause Hard disk drive operation seems slow Hard disk drive access indicator light stays on Solution The files stored on the computer, refer to the followings: Unplug the power cord to a grounded...
... Help. Wall outlet is listed first, followed by sudden power failure, it will not operate if you press the power button. Hard Disk Drive Cause Hard disk drive operation seems slow Hard disk drive access indicator light stays on Solution The files stored on the computer, refer to the followings: Unplug the power cord to a grounded...


