User Guide
Page 4
... system 44 Preventing static electricity discharge 45 Opening the case 46 Removing the side panel 46 Removing the front bezel 47 Closing the case 48 Replacing the side panel 48 Replacing the front bezel 49 Installing memory 50 Replacing the system battery 52 6 Troubleshooting 55 Safety guidelines 56 First steps 56 Troubleshooting... DVD drives 57 Computer 59 Diskette drive 59 DVD drives 60 File management 60 Hard drive 61 Internet 62 Keyboard 63 Memory 64 ii www.eMachines.com
... system 44 Preventing static electricity discharge 45 Opening the case 46 Removing the side panel 46 Removing the front bezel 47 Closing the case 48 Replacing the side panel 48 Replacing the front bezel 49 Installing memory 50 Replacing the system battery 52 6 Troubleshooting 55 Safety guidelines 56 First steps 56 Troubleshooting... DVD drives 57 Computer 59 Diskette drive 59 DVD drives 60 File management 60 Hard drive 61 Internet 62 Keyboard 63 Memory 64 ii www.eMachines.com
User Guide
Page 53
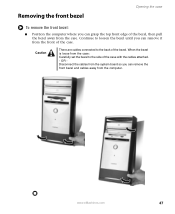
Removing the front bezel Opening the case To remove the front bezel: ■ Position the computer where you can grasp the top front edge of the bezel, then pull the bezel away from the case: Carefully set the bezel to the side of the case with the cables attached. - Caution There are cables ...connected to loosen the bezel until you can remove it from the computer. When the bezel is loose from the case. www.eMachines.com 47 Continue to the back of the case. OR Disconnect the cables from the system ...
Removing the front bezel Opening the case To remove the front bezel: ■ Position the computer where you can grasp the top front edge of the bezel, then pull the bezel away from the case: Carefully set the bezel to the side of the case with the cables attached. - Caution There are cables ...connected to loosen the bezel until you can remove it from the computer. When the bezel is loose from the case. www.eMachines.com 47 Continue to the back of the case. OR Disconnect the cables from the system ...

User Guide
Page 55
Closing the case 2 Press the bezel firmly into place. www.eMachines.com 49 Replacing the front bezel To replace the front bezel: 1 Align the latch pins with the computer latch holes.
Closing the case 2 Press the bezel firmly into place. www.eMachines.com 49 Replacing the front bezel To replace the front bezel: 1 Align the latch pins with the computer latch holes.
User Guide
Page 89
... 11 line out jack 11 microphone jack 9, 11 muting 21 audio CD See CD audio in jack 11 audio playback buttons 23 B battery replacing 52 bezel removing 47 replacing 49 broadband connection 27 connecting 12 buttons See keys and buttons C cable modem 27 connecting 12 Caps Lock indicator 23 cards inserting... 44 computer exterior 41 computer screen 42 DVD 44 keyboard 42 LCD panel 42 mouse 42 screen 42 clicking 25 closing computer case 48 front bezel 49 unresponsive program 21 connecting modem 26 PS/2 keyboard 11 PS/2 mouse 11 to Ethernet 12 to Ethernet network 27 to Internet 12, 27 to...
... 11 line out jack 11 microphone jack 9, 11 muting 21 audio CD See CD audio in jack 11 audio playback buttons 23 B battery replacing 52 bezel removing 47 replacing 49 broadband connection 27 connecting 12 buttons See keys and buttons C cable modem 27 connecting 12 Caps Lock indicator 23 cards inserting... 44 computer exterior 41 computer screen 42 DVD 44 keyboard 42 LCD panel 42 mouse 42 screen 42 clicking 25 closing computer case 48 front bezel 49 unresponsive program 21 connecting modem 26 PS/2 keyboard 11 PS/2 mouse 11 to Ethernet 12 to Ethernet network 27 to Internet 12, 27 to...
User Guide
Page 91
...faxes troubleshooting 66 files opening 25 troubleshooting 60 finding Help and Support topics 4 Firewire port 9, 12, 28 folders opening 25 front bezel removing 49 replacing 49 function keys 23 H hard drive indicator 9 troubleshooting 61 headphone jack 9, 11 help online 5 using 3 ... power 9 Scroll Lock 23 installing battery 52 devices 28 digital camera 28 digital video camera 28 front bezel 47 memory 50 peripheral devices 28 printer 28 scanner 28 side panel 46 system battery 52 Internet broadband connection... 23 L label Microsoft Certificate of Authenticity 13 model number 13 www.eMachines.com 85
...faxes troubleshooting 66 files opening 25 troubleshooting 60 finding Help and Support topics 4 Firewire port 9, 12, 28 folders opening 25 front bezel removing 49 replacing 49 function keys 23 H hard drive indicator 9 troubleshooting 61 headphone jack 9, 11 help online 5 using 3 ... power 9 Scroll Lock 23 installing battery 52 devices 28 digital camera 28 digital video camera 28 front bezel 47 memory 50 peripheral devices 28 printer 28 scanner 28 side panel 46 system battery 52 Internet broadband connection... 23 L label Microsoft Certificate of Authenticity 13 model number 13 www.eMachines.com 85
User Guide
Page 92
... 27 troubleshooting 70 network jack 12 Norton Antivirus 39 numeric keypad 23 indicator 23 O online help 3, 5 opening computer case 46 files 25 folders 25 front bezel 47 programs 25 shortcut menu 25 P Pad Lock indicator 23 parallel port 11 86 www...
... 27 troubleshooting 70 network jack 12 Norton Antivirus 39 numeric keypad 23 indicator 23 O online help 3, 5 opening computer case 46 files 25 folders 25 front bezel 47 programs 25 shortcut menu 25 P Pad Lock indicator 23 parallel port 11 86 www...

