
eMachines W4885 Support Question
eMachines W4885 Support Question
Find answers below for this question about eMachines W4885.Need a eMachines W4885 manual? We have 1 online manual for this item!
Question posted by scar1979 on April 30th, 2013
From Bezel Wiring
I recently had to replace my optical drive in my emachine w4885 desktop. When I removed the front bezel, I lost the order or connections of the three conecting wires to the mother board: The PW_SW, PW_LED, and the HDD_LED. Does anyone have a diagram or can tell me which wires go on which pins?
Current Answers
Answer #1: Posted by TexasDeviL on April 30th, 2013 10:55 AM
TexasDeviL

Member since:
December 27th, 2012 Points: 960,825

Member since:
December 27th, 2012 Points: 960,825
These wires are always a pain. Depending on the case you have, the wires might not always be positive and negative as indicated. Sometimes it's just trial and error to get them to work. You can't mess anything up by having them backwards though. The power switch will work no matter which direction you put it. HD and power light have to be put in the right way to work. If you dont know which one is which watch how it behaves when you plug them up and turn the rig on. if the hdd light stays steady on and the power light comes on when the hard disc is accessed you know you have them in each others connecters
If you agree that the answer I provided is correct please remember to "accept" and/or mark it as "helpful" so I know I'm doing a good job. Thank you, I would really appreciate it.
[automotive mechanic and phone modding enthusiast]
Related eMachines W4885 Manual Pages
User Guide - Page 3
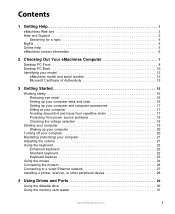
... 5 eMachines contact information 6
2 Checking Out Your eMachines Computer 7
Desktop PC Front 8 Desktop PC Back 10 Identifying your model 13
eMachines model ...Connecting the modem 26 Connecting to a wired Ethernet network 27 Installing a printer, scanner, or other peripheral device 28
4 Using Drives and Ports 29
Using the diskette drive 30 Using the memory card reader 31
www.eMachines...
User Guide - Page 4
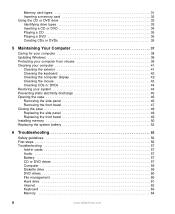
... 46 Removing the front bezel 47 Closing the case 48 Replacing the side panel 48 Replacing the front bezel 49 Installing memory 50 Replacing the system battery 52
6 Troubleshooting 55
Safety guidelines 56 First steps 56 Troubleshooting 57
Add-in cards 57 Audio 57 Battery 57 CD or DVD drives 57 Computer 59 Diskette drive 59 DVD drives 60...
User Guide - Page 14
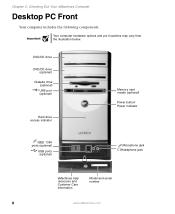
...) USB port (optional)
Hard drive access indicator
Memory card reader (optional)
Power button/ Power indicator
IEEE 1394 ports (optional)
USB ports (optional)
Microphone jack Headphone jack
Model: S/No:
eMachines help resources and Customer Care information
Model and serial number
8
www.eMachines.com Chapter 2: Checking Out Your eMachines Computer
Desktop PC Front
Your computer includes the...
User Guide - Page 15
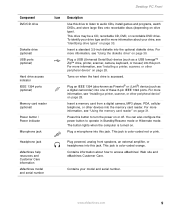
.... For more information, see "Identifying drive types" on page 33. Headphone jack
eMachines help resources and Customer Care information
eMachines model and serial number
Plug powered, analog...mode or Hibernate mode. Turns on .
Desktop PC Front
Component DVD/CD drive
Diskette drive (optional) USB ports (optional)
Hard drive access indicator IEEE 1394 ports (optional)
Memory...
User Guide - Page 16
Chapter 2: Checking Out Your eMachines Computer
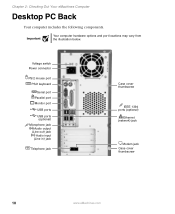
Desktop PC Back
Your computer includes the following components. Important
Your computer hardware options and port locations may vary from the illustration below. Voltage ...Audio input (Line in) jack
Telephone jack
Case cover thumbscrew
IEEE 1394 ports (optional)
Ethernet (network) jack
Modem jack Case cover thumbscrew
10
www.eMachines.com
User Guide - Page 33
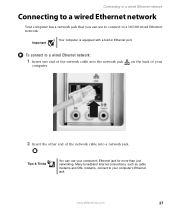
... is equipped with a built-in Ethernet port. on the back of your computer's Ethernet jack. www.eMachines.com
27
To connect to a wired Ethernet network:
1 Insert one end of the network cable into the network jack
computer. Connecting to a wired Ethernet network
Connecting to a wired Ethernet network
Your computer has a network jack that you can use to...
User Guide - Page 48
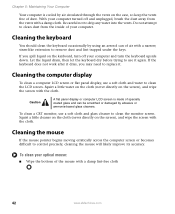
...vents free of the mouse with a damp cloth. To clean your optical mouse:
■ Wipe the bottom of dust. Chapter 5: Maintaining ...abrasive or ammonia-based glass cleaners.
If you may need to replace it. Cleaning the computer display
To clean a computer LCD ... with a damp lint-free cloth
42
www.eMachines.com
Do not attempt to remove dust and lint trapped under the keys.
With...
User Guide - Page 53
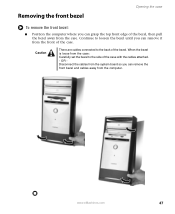
... board so you can grasp the top front edge of the case. www.eMachines.com
47 Removing the front bezel
Opening the case
To remove the front bezel:
■ Position the computer where you can remove the front bezel and cables away from the computer.
Caution
There are cables connected to the side of the bezel. Continue to loosen the bezel...
User Guide - Page 54
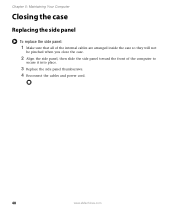
Chapter 5: Maintaining Your Computer
Closing the case
Replacing the side panel
To replace the side panel:
1 Make sure that all of the internal cables are arranged inside the case so they will not
be ... case.
2 Align the side panel, then slide the side panel toward the front of the computer to
secure it into place.
3 Replace the side panel thumbscrews. 4 Reconnect the cables and power cord.
48
www...
User Guide - Page 55

www.eMachines.com
49 Closing the case
2 Press the bezel firmly into place. Replacing the front bezel
To replace the front bezel:
1 Align the latch pins with the computer latch holes.
User Guide - Page 57
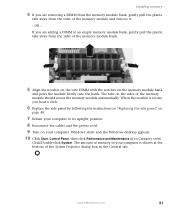
OR If you are removing a DIMM from the memory module bank, gently pull the plastic
tabs away from the sides of memory in your computer is secure, you hear a click.
6 Replace the side panel by following the instructions in the General tab. Click/Double-click System.
www.eMachines.com
51 The amount of the...
User Guide - Page 69
... Clean the keyboard and turn off your computer and unplug the keyboard. www.eMachines.com
63
A keyboard character keeps repeating or you see
the poster that came with your computer. ■ Remove all extension cables and switch boxes. ■ Clean the keyboard by using ... you have not received any mail ■ Click the receive button in correctly. Press each key to replace it again.
User Guide - Page 74
... Check the cable for brighter colors and greater luminescence. These wires are not placed too close to the monitor.
■ ... damaged pins.
■ Reinstall the device driver.
■ Connect a monitor that :
■ The monitor warms up from the...■ Adjust the brightness and contrast controls.
68
www.eMachines.com Chapter 6: Troubleshooting
Monitor
The screen resolution is not correct...
User Guide - Page 82
...on the products plugged into a grounding-type outlet. Appendix A:
Important safety information
Your eMachines system is set up the system on a stable work surface. ■ The ...equivalent type recommended by eMachines.
76
www.eMachines.com Replace the battery with a three-wire power cord to make sure that the safety instructions marked on the system board.
Dispose of batteries...
User Guide - Page 84

...situations.
78
www.eMachines.com If requested, this information must also be connected to the telephone ...wiring associated with an IC-compliant modem)
The Industry Canada label identifies certified equipment. Contact the state public utility commission or public service commission for details. The Department does not guarantee the equipment will notify you to make changes in order...
User Guide - Page 85
... supplier.
Laser safety statement
All eMachines systems equipped with CD and DVD drives comply with regard to the requirement that the electrical ground connections of the power utility, telephone lines...made by yourself. www.eMachines.com
79 Repairs to certified equipment should make electrical ground connections by the user to this manual may result in wire to an antenna discharge...
User Guide - Page 86
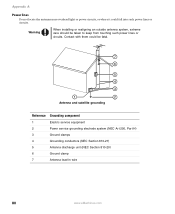
... system (NEC Art 250, Part H)
3
Ground clamps
4
Grounding conductors (NEC Section 810-21)
5
Antenna discharge unit (NEC Section 810-20)
6
Ground clamp
7
Antenna lead-in wire
80
www.eMachines.com Contact with them could fall into such power lines or circuits.
User Guide - Page 89
...buttons 23
B
battery replacing 52
bezel removing 47 replacing 49
broadband connection 27 connecting 12
buttons See keys and buttons
C
cable modem 27 connecting 12
Caps Lock ...bezel 49 unresponsive program 21
connecting modem 26 PS/2 keyboard 11 PS/2 mouse 11 to Ethernet 12 to Ethernet network 27
to Internet 12, 27 to network 12, 27
connections audio in 11
digital camera 9, 11, 28
www.eMachines...
User Guide - Page 91
Ethernet connecting 27 jack 27
Ethernet jack 12 external audio jack 11
F
faxes troubleshooting 66
files opening 25 troubleshooting 60
finding Help and Support topics 4
Firewire port 9, 12, 28
folders opening 25
front bezel removing 49 replacing 49
function keys 23
H
hard drive indicator 9 troubleshooting ... 23
L
label Microsoft Certificate of Authenticity 13 model number 13
www.eMachines.com
85
User Guide - Page 92
...replacing 50 troubleshooting 64
memory card reader locating drive 9 memory card types supported 31 using 31
microphone jack 9, 11
Microsoft Certificate of Authenticity 13 model number 13 modem
cable 27 connecting... 31
multimedia adjusting volume 21 playing DVD 35 using DVD drive 33 using Windows Media Player 35
muting sound 21
N
... front bezel 47 programs 25 shortcut menu 25
P
Pad Lock indicator 23 parallel...
Similar Questions


I Need The Wiring Connections On The Mother Board And The Case
I need the Emachine W3653a computer wiring connections on the motherbaord and case. The website show...
I need the Emachine W3653a computer wiring connections on the motherbaord and case. The website show...
(Posted by DaveDa 10 years ago)

Graphics Driver?
QWhat kind of graphics card would i need to buy for my emachines w4885
QWhat kind of graphics card would i need to buy for my emachines w4885
(Posted by bellcolen73 11 years ago)

Where Is The Button To Open The Optical Drive To Receive A Cd Or Dvd?
(Posted by davidtver 11 years ago)