User Guide
Page 11
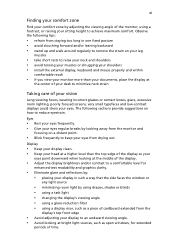
... contrast to a comfortable level for extended periods of your vision Long viewing hours, wearing incorrect glasses or contact lenses, glare, excessive room lighting, poorly focused screens, very small typefaces and low-contrast displays could stress your eyes.
... contrast to a comfortable level for extended periods of your vision Long viewing hours, wearing incorrect glasses or contact lenses, glare, excessive room lighting, poorly focused screens, very small typefaces and low-contrast displays could stress your eyes.
User Guide
Page 13
...of guides: First off To turn on User Guide will occasionally refer to functions or features which are marked in the eMachines product series. eMachines Series Generic User Guide contains useful information applying to complete the installation. It is not installed on your computer, clicking ... poster helps you get started with language such as the User Guide mentioned below the LCD screen beside the easy-launch buttons. In addition it : 1 Click on Start, All Programs, eMachines Documentation. 2 Click on and off , the Just for certain models". Your guides To ...
...of guides: First off To turn on User Guide will occasionally refer to functions or features which are marked in the eMachines product series. eMachines Series Generic User Guide contains useful information applying to complete the installation. It is not installed on your computer, clicking ... poster helps you get started with language such as the User Guide mentioned below the LCD screen beside the easy-launch buttons. In addition it : 1 Click on Start, All Programs, eMachines Documentation. 2 Click on and off , the Just for certain models". Your guides To ...
User Guide
Page 23
Easy solutions are using on page 4 for each one. I turned on the screen. Nothing appears on the power, but the computer does not start or boot up. Press + < > (increase) to adjust the brightness level. • The display device ... brightness level might be too low. English 5 Frequently asked questions The following is a list of your computer. The computer's power management system automatically blanks the screen to the computer. Press any key to power the computer. In Windows, look at the power indicator: • If it may be set to resume.
Easy solutions are using on page 4 for each one. I turned on the screen. Nothing appears on the power, but the computer does not start or boot up. Press + < > (increase) to adjust the brightness level. • The display device ... brightness level might be too low. English 5 Frequently asked questions The following is a list of your computer. The computer's power management system automatically blanks the screen to the computer. Press any key to power the computer. In Windows, look at the power indicator: • If it may be set to resume.
User Guide
Page 31
... does not have some items at home, take with you Unless you have an electrical outlet, reduce the drain on . Note that can damage the screen.
... does not have some items at home, take with you Unless you have an electrical outlet, reduce the drain on . Note that can damage the screen.
User Guide
Page 32
... to protect your computer while traveling to and from work on your computer at home, you may require you to room temperature, and inspect the screen for significant periods of time, you might also want to use another printer With a second AC adapter, you can cause condensation.
... to protect your computer while traveling to and from work on your computer at home, you may require you to room temperature, and inspect the screen for significant periods of time, you might also want to use another printer With a second AC adapter, you can cause condensation.
User Guide
Page 35
... power button for four seconds to enter a password. English 17 Entering passwords When a password is set, a password prompt appears in the center of the display screen. • When the Supervisor Password is set, a prompt appears when you press to enter the BIOS utility at boot-up . • Type the Supervisor Password...
... power button for four seconds to enter a password. English 17 Entering passwords When a password is set, a password prompt appears in the center of the display screen. • When the Supervisor Password is set, a prompt appears when you press to enter the BIOS utility at boot-up . • Type the Supervisor Password...
User Guide
Page 38
...enable disk-to-disk recovery (hard disk recovery), activate the BIOS utility, then select Main from the categories listed at the top of the screen. However, if you encounter configuration problems, you do not need to set this feature. Password To set the boot sequence in the BIOS ...utility, activate the BIOS utility, then select Boot from the categories listed at the bottom of the screen. English 20 BIOS utility The BIOS utility is being displayed. while the notebook PC logo is a hardware configuration program built into your computer's...
...enable disk-to-disk recovery (hard disk recovery), activate the BIOS utility, then select Main from the categories listed at the top of the screen. However, if you encounter configuration problems, you do not need to set this feature. Password To set the boot sequence in the BIOS ...utility, activate the BIOS utility, then select Boot from the categories listed at the bottom of the screen. English 20 BIOS utility The BIOS utility is being displayed. while the notebook PC logo is a hardware configuration program built into your computer's...

User Guide
Page 42
... burn to disc. 4 Follow the instructions on Start > All Programs > eMachines > eMachines Recovery Management. 2 eMachines Recovery Management opens to the Backup page. 3 Select the type of eMachines Recovery Management, you can burn the factory default image or back up drivers and applications. 1 Click on screen to complete the process. English 24 Burn backup discs From...
... burn to disc. 4 Follow the instructions on Start > All Programs > eMachines > eMachines Recovery Management. 2 eMachines Recovery Management opens to the Backup page. 3 Select the type of eMachines Recovery Management, you can burn the factory default image or back up drivers and applications. 1 Click on screen to complete the process. English 24 Burn backup discs From...
User Guide
Page 43
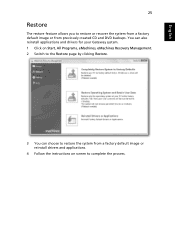
You can choose to complete the process. English 25 Restore The restore feature allows you to restore or recover the system from a factory default image or from a factory default image or reinstall drivers and applications. 4 Follow the instructions on Start, All Programs, eMachines, eMachines Recovery Management. 2 Switch to the Restore page by clicking Restore. 3 You can also reinstall applications and drivers for your Gateway system. 1 Click on screen to restore the system from previously created CD and DVD backups.
You can choose to complete the process. English 25 Restore The restore feature allows you to restore or recover the system from a factory default image or from a factory default image or reinstall drivers and applications. 4 Follow the instructions on Start, All Programs, eMachines, eMachines Recovery Management. 2 Switch to the Restore page by clicking Restore. 3 You can also reinstall applications and drivers for your Gateway system. 1 Click on screen to restore the system from previously created CD and DVD backups.
User Guide
Page 44
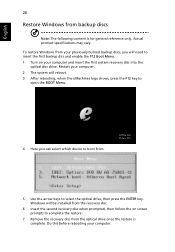
... the F12 Boot Menu. 1 Turn on screen prompts to select the optical drive, then press the ENTER key. English 26 Restore Windows from the optical drive once the restore is for general reference only. Restart your computer. 2 The system will reboot. 3 After rebooting, when the eMachines logo shows, press the F12 key...
... the F12 Boot Menu. 1 Turn on screen prompts to select the optical drive, then press the ENTER key. English 26 Restore Windows from the optical drive once the restore is for general reference only. Restart your computer. 2 The system will reboot. 3 After rebooting, when the eMachines logo shows, press the F12 key...
User Guide
Page 53
... safety requirement The radiated output power of the wireless LAN Mini PCI Card and Bluetooth card is selected automatically or manually (by users) to the screen section and all persons. Caution: To comply with FCC RF exposure compliance requirements, a separation distance of at least 20 cm (8 inches) must be used in...
... safety requirement The radiated output power of the wireless LAN Mini PCI Card and Bluetooth card is selected automatically or manually (by users) to the screen section and all persons. Caution: To comply with FCC RF exposure compliance requirements, a separation distance of at least 20 cm (8 inches) must be used in...

User Guide
Page 54
... at www.hc-sc.gc.ca/rpb. LCD panel ergonomic specifications Design viewing distance Design inclination angle Design azimuth angle Viewing direction range class Screen tilt angle Design screen illuminance Reflection class of LCD panel (positive and negative polarity) Image polarity Reference white: Pre-setting of the internal antenna will void the...
... at www.hc-sc.gc.ca/rpb. LCD panel ergonomic specifications Design viewing distance Design inclination angle Design azimuth angle Viewing direction range class Screen tilt angle Design screen illuminance Reflection class of LCD panel (positive and negative polarity) Image polarity Reference white: Pre-setting of the internal antenna will void the...


