User Guide
Page 11
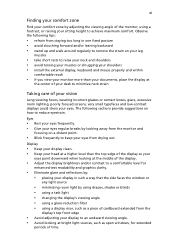
... eyestrain. xi Finding your comfort zone Find your comfort zone by adjusting the viewing angle of the monitor, using a display visor, such as open windows, for enhanced text readability and graphics clarity. • Eliminate glare and reflections by: • placing your display in one fixed posture •...and focusing on a distant point. • Blink frequently to keep your eyes from staying too long in such a way that the side faces the window or any light source • minimizing room light by using drapes, shades or blinds • using a task light • changing the display's ...
... eyestrain. xi Finding your comfort zone Find your comfort zone by adjusting the viewing angle of the monitor, using a display visor, such as open windows, for enhanced text readability and graphics clarity. • Eliminate glare and reflections by: • placing your display in one fixed posture •...and focusing on a distant point. • Blink frequently to keep your eyes from staying too long in such a way that the side faces the window or any light source • minimizing room light by using drapes, shades or blinds • using a task light • changing the display's ...

User Guide
Page 14
... into a single wall outlet should not exceed the fuse rating. Note: If you are some ways to take care of the following: • Use the Windows shutdown command Click on Start then click on again, wait at least two seconds before powering up. Taking care of your AC adapter: • Do...
... into a single wall outlet should not exceed the fuse rating. Note: If you are some ways to take care of the following: • Use the Windows shutdown command Click on Start then click on again, wait at least two seconds before powering up. Taking care of your AC adapter: • Do...

User Guide
Page 17
... of your battery pack xv Cleaning and servicing xv Touchpad 1 Touchpad basics (with two-click buttons) 1 Using the keyboard 2 Lock keys and embedded numeric keypad* 2 Windows keys 3 Special keys 4 Frequently asked questions 5 Battery pack 8 Battery pack characteristics 8 Maximizing the battery's life 8 Installing and removing the battery pack 9 Charging the battery 10...
... of your battery pack xv Cleaning and servicing xv Touchpad 1 Touchpad basics (with two-click buttons) 1 Using the keyboard 2 Lock keys and embedded numeric keypad* 2 Windows keys 3 Special keys 4 Frequently asked questions 5 Battery pack 8 Battery pack characteristics 8 Maximizing the battery's life 8 Installing and removing the battery pack 9 Charging the battery 10...

User Guide
Page 18
...) 36 Exposure of humans to -disk recovery 20 Password 20 Using software 21 Playing DVD movies 21 Power management 22 eMachines Recovery Management 23 Burn backup discs 24 Restore 25 Restore Windows from backup discs 26 Troubleshooting 29 Troubleshooting tips 29 Error messages 29 Regulations and safety notices 31 FCC statement 31...
...) 36 Exposure of humans to -disk recovery 20 Password 20 Using software 21 Playing DVD movies 21 Power management 22 eMachines Recovery Management 23 Burn backup discs 24 Restore 25 Restore Windows from backup discs 26 Troubleshooting 29 Troubleshooting tips 29 Error messages 29 Regulations and safety notices 31 FCC statement 31...
User Guide
Page 19
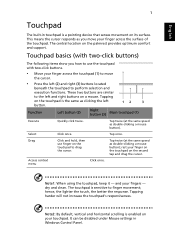
... means the cursor responds as clicking the left (2) and right (3) buttons located beneath the touchpad to finger movement; Click once. English 1 Touchpad The built-in Windows Control Panel.
... means the cursor responds as clicking the left (2) and right (3) buttons located beneath the touchpad to finger movement; Click once. English 1 Touchpad The built-in Windows Control Panel.
User Guide
Page 20
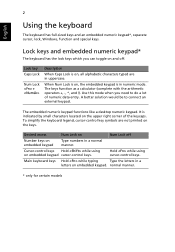
... upper right corner of numeric data entry. 2 English Using the keyboard The keyboard has full-sized keys and an embedded numeric keypad*, separate cursor, lock, Windows, function and special keys. The keys function as a calculator (complete with the arithmetic operators +, -, *, and /). To simplify the keyboard legend, cursor-control key symbols are...
... upper right corner of numeric data entry. 2 English Using the keyboard The keyboard has full-sized keys and an embedded numeric keypad*, separate cursor, lock, Windows, function and special keys. The keys function as a calculator (complete with the arithmetic operators +, -, *, and /). To simplify the keyboard legend, cursor-control key symbols are...
User Guide
Page 21
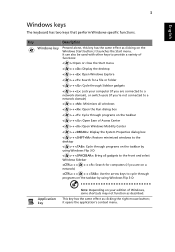
...through Sidebar gadgets < > + : Lock your edition of Access Center < > + : Open Windows Mobility Center < > + : Display the System Properties dialog box < > + : Restore minimized windows to cycle through programs on the taskbar by using Windows Flip 3-D < > + : Bring all windows < > + : Open the Run dialog box < > + : Cycle through programs on ...keys to provide a variety of functions: < >: Open or close the Start menu < > + : Display the desktop < > + : Open Windows Explore < > + : Search for computers (if you are on a + < > + : Use the arrow keys to the desktop < > + :...
...through Sidebar gadgets < > + : Lock your edition of Access Center < > + : Open Windows Mobility Center < > + : Display the System Properties dialog box < > + : Restore minimized windows to cycle through programs on the taskbar by using Windows Flip 3-D < > + : Bring all windows < > + : Open the Run dialog box < > + : Cycle through programs on ...keys to provide a variety of functions: < >: Open or close the Start menu < > + : Display the desktop < > + : Open Windows Explore < > + : Search for computers (if you are on a + < > + : Use the arrow keys to the desktop < > + :...
User Guide
Page 23
... replace it with a system disk and press + + to resume. Press and release the power button to restart the system. In Windows, look at the volume control icon on the taskbar. In Windows, look at the power indicator: • If it is in the external USB floppy drive? Check the following : • The...
... replace it with a system disk and press + + to resume. Press and release the power button to restart the system. In Windows, look at the volume control icon on the taskbar. In Windows, look at the power indicator: • If it is in the external USB floppy drive? Check the following : • The...
User Guide
Page 28
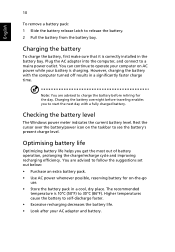
... out of battery operation, prolonging the charge/recharge cycle and improving recharging efficiency. You can continue to a mains power outlet. Checking the battery level The Windows power meter indicates the current battery level. English 10 To remove a battery pack: 1 Slide the battery release latch to 30°C (86°F). Charging the...
... out of battery operation, prolonging the charge/recharge cycle and improving recharging efficiency. You can continue to a mains power outlet. Checking the battery level The Windows power meter indicates the current battery level. English 10 To remove a battery pack: 1 Slide the battery release latch to 30°C (86°F). Charging the...
User Guide
Page 29
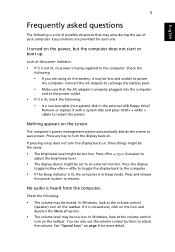
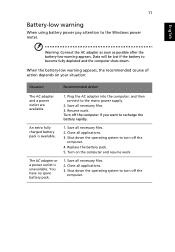
... unavailable. Close all necessary files. 3. Save all necessary files. 2. Shut down . Resume work . Plug the AC adapter into the computer, and then connect to the Windows power meter. Save all necessary files. 2. Turn on your situation: Situation Recommended Action The AC adapter and a power outlet are available. 1. You have no spare...
... unavailable. Close all necessary files. 3. Save all necessary files. 2. Shut down . Resume work . Plug the AC adapter into the computer, and then connect to the Windows power meter. Save all necessary files. 2. Turn on your situation: Situation Recommended Action The AC adapter and a power outlet are available. 1. You have no spare...

User Guide
Page 40
English 22 Power management This computer has a built-in order to the computer, and video memory. Windows handles all power-saving chores for a period of time (called an inactivity timeout), the computer stops some or all of the following devices: keyboard, mouse, ...
English 22 Power management This computer has a built-in order to the computer, and video memory. Windows handles all power-saving chores for a period of time (called an inactivity timeout), the computer stops some or all of the following devices: keyboard, mouse, ...
User Guide
Page 44
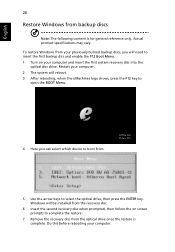
... eMachines logo shows, press the F12 key to open the BOOT Menu. 4 Here you can select which device to boot from your previously burned backup discs, you will be installed from the recovery disc. 6 Insert the second recovery disc when prompted, then follow the on your computer. Windows will...need to select the optical drive, then press the ENTER key. Actual product specifications may vary. English 26 Restore Windows from backup discs Note: The following content is complete. To restore Windows from . 5 Use the arrow keys to insert the first backup disc and enable the F12 Boot Menu. 1...
... eMachines logo shows, press the F12 key to open the BOOT Menu. 4 Here you can select which device to boot from your previously burned backup discs, you will be installed from the recovery disc. 6 Insert the second recovery disc when prompted, then follow the on your computer. Windows will...need to select the optical drive, then press the ENTER key. Actual product specifications may vary. English 26 Restore Windows from backup discs Note: The following content is complete. To restore Windows from . 5 Use the arrow keys to insert the first backup disc and enable the F12 Boot Menu. 1...

User Guide
Page 46
Note: * Actual product specifications may vary. English 28 6 Press the ESC key to enter the Exit submenu, press the ENTER key to select Yes. Do this before rebooting your computer. Press the ENTER key again to Exit Saving Changes. The system will reboot. 7 When you reboot, Windows will be installed from the recovery disc. 8 Insert the second recovery disc when prompted, then follow the onscreen prompts to complete the restore. 9 Remove the recovery disc from the optical drive once the restore is complete.
Note: * Actual product specifications may vary. English 28 6 Press the ESC key to enter the Exit submenu, press the ENTER key to select Yes. Do this before rebooting your computer. Press the ENTER key again to Exit Saving Changes. The system will reboot. 7 When you reboot, Windows will be installed from the recovery disc. 8 Insert the second recovery disc when prompted, then follow the onscreen prompts to complete the restore. 9 Remove the recovery disc from the optical drive once the restore is complete.


