
User Manual
Page 3
...the monitor 2 Connecting the monitor 2 Attaching the base 2 Connecting video inputs 3 Connecting power 4 Connecting a security cable 5 Setting up the optional stand 5 Attaching the USB stand 5 Adjusting monitor height tension 8 Adjusting monitor tilt tension 9 Connecting the USB hub 10 Setting up the optional speaker bar 11 Installing the speaker bar 11 Starting the monitor 12 Adjusting monitor settings 13 Using the eTouch menu buttons 13 Using the shortcut menu 13 Using the main menu 14 Changing Windows screen settings 16 Changing color depth and screen resolution 16 Power...
...the monitor 2 Connecting the monitor 2 Attaching the base 2 Connecting video inputs 3 Connecting power 4 Connecting a security cable 5 Setting up the optional stand 5 Attaching the USB stand 5 Adjusting monitor height tension 8 Adjusting monitor tilt tension 9 Connecting the USB hub 10 Setting up the optional speaker bar 11 Installing the speaker bar 11 Starting the monitor 12 Adjusting monitor settings 13 Using the eTouch menu buttons 13 Using the shortcut menu 13 Using the main menu 14 Changing Windows screen settings 16 Changing color depth and screen resolution 16 Power...

User Manual
Page 5
Chapter 1 Using Your eMachines Flat-Panel Monitor • Unpacking the monitor • Connecting the monitor • Setting up the optional stand • Setting up the optional speaker bar • Starting the monitor • Adjusting monitor settings • Changing Windows screen settings • Power management • Maintaining • Troubleshooting • Specifications 1
Chapter 1 Using Your eMachines Flat-Panel Monitor • Unpacking the monitor • Connecting the monitor • Setting up the optional stand • Setting up the optional speaker bar • Starting the monitor • Adjusting monitor settings • Changing Windows screen settings • Power management • Maintaining • Troubleshooting • Specifications 1
User Manual
Page 7
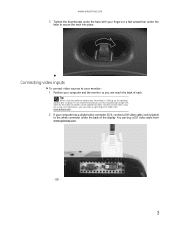
... the back of the display. Connecting video inputs To connect video sources to your monitor: 1 Position your computer and the monitor so you can buy a DVI video cable from www.gateway.com. 2 If your computer has a digital video connector (DVI), connect a DVI video cable (not included) to the white connector under the base to secure the neck into place. If you are using the optional speaker bar (described in "Setting up the optional speaker bar" on page 11...
... the back of the display. Connecting video inputs To connect video sources to your monitor: 1 Position your computer and the monitor so you can buy a DVI video cable from www.gateway.com. 2 If your computer has a digital video connector (DVI), connect a DVI video cable (not included) to the white connector under the base to secure the neck into place. If you are using the optional speaker bar (described in "Setting up the optional speaker bar" on page 11...

User Manual
Page 8
... your computer. Using Your eMachines Flat-Panel Monitor Connect the blue VGA video cable to the blue VGA video connector under the back of the monitor. 2 Plug the power cord into a correctly grounded power outlet. Connecting power To connect power: 1 Position your monitor so you can reach the back, then connect the power cord to the power connector under the back of the display. 3 Make sure that your computer is turned off, then connect the other end of the video cable to protect your monitor from voltage...
... your computer. Using Your eMachines Flat-Panel Monitor Connect the blue VGA video cable to the blue VGA video connector under the back of the monitor. 2 Plug the power cord into a correctly grounded power outlet. Connecting power To connect power: 1 Position your monitor so you can reach the back, then connect the power cord to the power connector under the back of the display. 3 Make sure that your computer is turned off, then connect the other end of the video cable to protect your monitor from voltage...
User Manual
Page 9
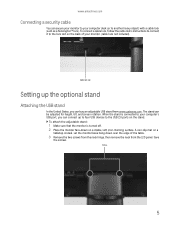
... your monitor to your computer's USB port, you can connect up the optional stand Attaching the USB stand In the United States, you can buy an adjustable USB stand from the LCD panel. When the stand is turned off. 2 Place the monitor face-down over the edge of your monitor (cable lock not included). Let the monitor base hang down on the stand. www.emachines.com Connecting a security cable You can be adjusted for height, tilt, and screen...
... your monitor to your computer's USB port, you can connect up the optional stand Attaching the USB stand In the United States, you can buy an adjustable USB stand from the LCD panel. When the stand is turned off. 2 Place the monitor face-down over the edge of your monitor (cable lock not included). Let the monitor base hang down on the stand. www.emachines.com Connecting a security cable You can be adjusted for height, tilt, and screen...

User Manual
Page 12
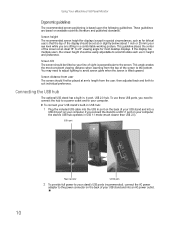
You also need to remove it from below the base to change the stand's height tension. Adjusting monitor height tension The stand is factory adjusted to raise and lower the monitor are not equal. To adjust your monitor. However, if it , then lower the neck into place and release the lever. Screwdriver access cap 8 Using Your eMachines Flat-Panel Monitor 10 Press the bracket lever to the right and hold it...
You also need to remove it from below the base to change the stand's height tension. Adjusting monitor height tension The stand is factory adjusted to raise and lower the monitor are not equal. To adjust your monitor. However, if it , then lower the neck into place and release the lever. Screwdriver access cap 8 Using Your eMachines Flat-Panel Monitor 10 Press the bracket lever to the right and hold it...
User Manual
Page 14
Using Your eMachines Flat-Panel Monitor Ergonomic guidelines The recommended screen positioning is tilted upward. Screen height The recommended screen height for displays (except in special circumstances, such as for most consistent viewing distance when scanning from the user, then adjusted back and forth to avoid screen glare when the screen is based upon the following guildelines. Screen distance from user The screen should be tilted so your line of your USB stand and into the...
Using Your eMachines Flat-Panel Monitor Ergonomic guidelines The recommended screen positioning is tilted upward. Screen height The recommended screen height for displays (except in special circumstances, such as for most consistent viewing distance when scanning from the user, then adjusted back and forth to avoid screen glare when the screen is based upon the following guildelines. Screen distance from user The screen should be tilted so your line of your USB stand and into the...
User Manual
Page 15
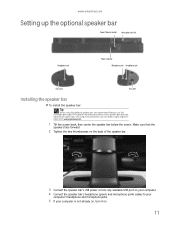
....emachines.com Setting up the optional speaker bar Power/Volume control Kensington lock slot Headphone jack Power indicator Microphone jack Headphone jack Bass port Bass port Installing the speaker bar To install the speaker bar: Tip When using a DVI connection, you can order a right-angle DVI cable from www.gateway.com. 1 Tilt the screen back, then center the speaker bar below the screen. If you use the included right-angle VGA cable for the video connection so the speaker...
....emachines.com Setting up the optional speaker bar Power/Volume control Kensington lock slot Headphone jack Power indicator Microphone jack Headphone jack Bass port Bass port Installing the speaker bar To install the speaker bar: Tip When using a DVI connection, you can order a right-angle DVI cable from www.gateway.com. 1 Tilt the screen back, then center the speaker bar below the screen. If you use the included right-angle VGA cable for the video connection so the speaker...
User Manual
Page 16
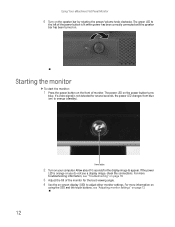
... see "Troubleshooting" on page 18. 3 Adjust the tilt of monitor. If the power LED is lit when power has been correctly connected and the speaker bar has been turned on -screen display (OSD) to appear. The green LED to orange (standby). Allow about 10 seconds for the best viewing angle. 4 Use the on . Starting the monitor To start the monitor: 1 Press the power button on the speaker bar by rotating the power/volume knob clockwise. Using Your eMachines Flat-Panel Monitor 6 Turn on...
... see "Troubleshooting" on page 18. 3 Adjust the tilt of monitor. If the power LED is lit when power has been correctly connected and the speaker bar has been turned on -screen display (OSD) to appear. The green LED to orange (standby). Allow about 10 seconds for the best viewing angle. 4 Use the on . Starting the monitor To start the monitor: 1 Press the power button on the speaker bar by rotating the power/volume knob clockwise. Using Your eMachines Flat-Panel Monitor 6 Turn on...
User Manual
Page 17
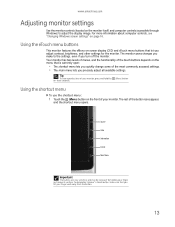
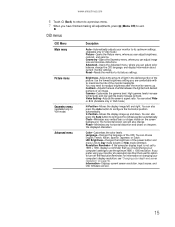
To completely "release" a touch button, make to adjust the display image. www.emachines.com Adjusting monitor settings Use the monitor controls (located on the monitor itself) and computer controls (accessible through Windows) to the settings, even if you adjust contrast, brightness, and other settings for three seconds. (Menu) button Using the shortcut menu To use the shortcut menu: 1 Touch the (Menu) button on the front of the touch buttons depends on the menu that let you turn off the monitor. Your monitor has two levels of menus...
To completely "release" a touch button, make to adjust the display image. www.emachines.com Adjusting monitor settings Use the monitor controls (located on the monitor itself) and computer controls (accessible through Windows) to the settings, even if you adjust contrast, brightness, and other settings for three seconds. (Menu) button Using the shortcut menu To use the shortcut menu: 1 Touch the (Menu) button on the front of the touch buttons depends on the menu that let you turn off the monitor. Your monitor has two levels of menus...

User Manual
Page 18
... adjust your display image to the ideal settings. (Available only in VGA mode.) • Touch (Information) to display current screen resolution and input source. • Touch (Cancel) to exit the shortcut menu. • Touch (Main Menu) to your monitor. (When only one video source is connected, you lift your finger well away from the button. 2 To use a button, lightly touch its surface. Important The eTouch menu buttons are connected to open the selected menu or setting. Using Your eMachines Flat-Panel Monitor 2 To use the main menu: 1 Touch the (Menu) button...
... adjust your display image to the ideal settings. (Available only in VGA mode.) • Touch (Information) to display current screen resolution and input source. • Touch (Cancel) to exit the shortcut menu. • Touch (Main Menu) to your monitor. (When only one video source is connected, you lift your finger well away from the button. 2 To use a button, lightly touch its surface. Important The eTouch menu buttons are connected to open the selected menu or setting. Using Your eMachines Flat-Panel Monitor 2 To use the main menu: 1 Touch the (Menu) button...
User Manual
Page 19
...-Displays current screen resolution, input source, and OSD firmware version. 15 Geometry-Opens the Geometry menu, where you can also press the Auto button to turn off the Resolution Reminder. Gamma-Customizes the gamma level. You can adjust brightness, contrast, and gamma. The horizontal screen size will also change your computer's settings to readjust brightness after the monitor warms up and down. LED Brightness-Changes the brightness of the power button and menu LEDs to exit. Video Scaling-Adjusts the screen's aspect ratio. www.emachines...
...-Displays current screen resolution, input source, and OSD firmware version. 15 Geometry-Opens the Geometry menu, where you can also press the Auto button to turn off the Resolution Reminder. Gamma-Customizes the gamma level. You can adjust brightness, contrast, and gamma. The horizontal screen size will also change your computer's settings to readjust brightness after the monitor warms up and down. LED Brightness-Changes the brightness of the power button and menu LEDs to exit. Video Scaling-Adjusts the screen's aspect ratio. www.emachines...
User Manual
Page 20
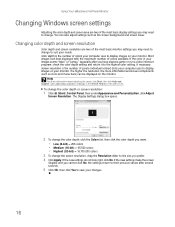
... icons and menu bars) can also adjust settings such as the screen background and screen saver. To change the color depth or screen resolution: 1 Click (Start), Control Panel, then under Appearance and Personalization, click Adjust Screen Resolution. Using Your eMachines Flat-Panel Monitor Changing Windows screen settings Adjusting the color depth and screen area are two of the most basic display settings you may need to change. If the color in the Search Help box, then press ENTER. Type adjusting monitor settings in your images seems "false...
... icons and menu bars) can also adjust settings such as the screen background and screen saver. To change the color depth or screen resolution: 1 Click (Start), Control Panel, then under Appearance and Personalization, click Adjust Screen Resolution. Using Your eMachines Flat-Panel Monitor Changing Windows screen settings Adjusting the color depth and screen area are two of the most basic display settings you may need to change. If the color in the Search Help box, then press ENTER. Type adjusting monitor settings in your images seems "false...
User Manual
Page 21
... screen. • To clean the monitor, use any keyboard key. You can be reduced to select it is in optimal working order: • Do not block the ventilation holes. • Do not expose the monitor to rain or use . Caution Do not use a soft cloth slightly moistened with water only. The Control Panel window opens. Use these conventions and the power can change the monitor's power management settings using the Windows Control Panel...
... screen. • To clean the monitor, use any keyboard key. You can be reduced to select it is in optimal working order: • Do not block the ventilation holes. • Do not expose the monitor to rain or use . Caution Do not use a soft cloth slightly moistened with water only. The Control Panel window opens. Use these conventions and the power can change the monitor's power management settings using the Windows Control Panel...
User Manual
Page 22
... sleep mode. • Restart your computer. Using Your eMachines Flat-Panel Monitor Troubleshooting Important Make sure that the monitor has warmed up for approximately 30 minutes before making any judgments about connecting the power cord, see "Connecting the monitor" on page 2. For more information. • If the power LED is orange: • Make sure that your notebook's display and this troubleshooting section may help you have an FN key combination that the video cable...
... sleep mode. • Restart your computer. Using Your eMachines Flat-Panel Monitor Troubleshooting Important Make sure that the monitor has warmed up for approximately 30 minutes before making any judgments about connecting the power cord, see "Connecting the monitor" on page 2. For more information. • If the power LED is orange: • Make sure that your notebook's display and this troubleshooting section may help you have an FN key combination that the video cable...
User Manual
Page 23
... • Press (Menu), then (Auto) to automatically adjust the display image to the Windows System Registry. We recommend making a complete system backup before making a final judgment about connecting the video cable, see "Changing color depth and screen resolution" on page 16. • If you must adjust the operating system's display settings to match the monitor's optimal (native) 1680 × 1050 setting. See the eMachines support Web site (www.emachines.com) for updated video drivers for widescreen displays as the...
... • Press (Menu), then (Auto) to automatically adjust the display image to the Windows System Registry. We recommend making a complete system backup before making a final judgment about connecting the video cable, see "Changing color depth and screen resolution" on page 16. • If you must adjust the operating system's display settings to match the monitor's optimal (native) 1680 × 1050 setting. See the eMachines support Web site (www.emachines.com) for updated video drivers for widescreen displays as the...
User Manual
Page 24
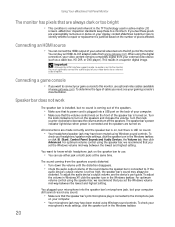
Connecting a game console • If you need, see the device's user guide. Turn the knob counter-clockwise to decrease the volume and turn on . To check your headphone/speaker mute settings, click the speaker icon in the Windows taskbar, or click (Start), Control Panel, Sounds and Audio Devices, the Volume tab, then click Advanced. This results in the Windows taskbar. Important Although the HDMI interface supports audio, no sound is coming from the speakers sounds distorted...
Connecting a game console • If you need, see the device's user guide. Turn the knob counter-clockwise to decrease the volume and turn on . To check your headphone/speaker mute settings, click the speaker icon in the Windows taskbar, or click (Start), Control Panel, Sounds and Audio Devices, the Volume tab, then click Advanced. This results in the Windows taskbar. Important Although the HDMI interface supports audio, no sound is coming from the speakers sounds distorted...

User Manual
Page 25
...) Colors 16.7 million OSD languages English, French, Italian, Spanish, Japanese, Dutch Connections and inputs ■ Analog (VGA): 15-pin mini d-sub VGA ■ Digital (DVI-D): 24-pin DVD-D (supports 480p, 720p, and 1080i). Panel size 22 inches (diagonal) Panel type 22-inch viewable TFT active matrix TN Anti-glare coating Pixel resolution 1680 × 1050 (native) (60 Hz) Pixel pitch 0.0111 × 0.0111 inches (0.282 mm × 0.282 mm) Aspect ratio 16:10 Brightness...
...) Colors 16.7 million OSD languages English, French, Italian, Spanish, Japanese, Dutch Connections and inputs ■ Analog (VGA): 15-pin mini d-sub VGA ■ Digital (DVI-D): 24-pin DVD-D (supports 480p, 720p, and 1080i). Panel size 22 inches (diagonal) Panel type 22-inch viewable TFT active matrix TN Anti-glare coating Pixel resolution 1680 × 1050 (native) (60 Hz) Pixel pitch 0.0111 × 0.0111 inches (0.282 mm × 0.282 mm) Aspect ratio 16:10 Brightness...

User Manual
Page 28
... cleaning the system. ■ Unplug the system from the wall outlet and refer servicing to qualified personnel if: ■ The power cord or plug is damaged. ■ Liquid has been spilled into a grounding-type outlet. Retain all safety and operating instructions for future use. ■ Do not use an extension cord with a TV Tuner, cable, or satellite receiver card, make sure that the switch...
... cleaning the system. ■ Unplug the system from the wall outlet and refer servicing to qualified personnel if: ■ The power cord or plug is damaged. ■ Liquid has been spilled into a grounding-type outlet. Retain all safety and operating instructions for future use. ■ Do not use an extension cord with a TV Tuner, cable, or satellite receiver card, make sure that the switch...

User Manual
Page 29
...to dispose of your product's user guide and we will not occur in a particular installation. Finally, we can responsibly recycle or reuse most of the materials in a residential installation. For additional recycling information specific to your electrical or electronic ... www.emachines.com Environmental information Recycling Mercury Warning THE LAMP IN THIS DISPLAY CONTAINS MERCURY. These accessories are : shielded video cable. Substances such as WEEE) should never be used in the municipal waste stream (residential garbage collection). However, there is connected ■...
...to dispose of your product's user guide and we will not occur in a particular installation. Finally, we can responsibly recycle or reuse most of the materials in a residential installation. For additional recycling information specific to your electrical or electronic ... www.emachines.com Environmental information Recycling Mercury Warning THE LAMP IN THIS DISPLAY CONTAINS MERCURY. These accessories are : shielded video cable. Substances such as WEEE) should never be used in the municipal waste stream (residential garbage collection). However, there is connected ■...


