
User Manual
Page 3
Contents Using Your eMachines Flat-Panel Monitor 1 Unpacking the monitor 2 Connecting the monitor 2 Attaching the base 2 Connecting video and audio inputs 3 Connecting power 3 Adjusting monitor tilt 3 Starting the monitor 4 Adjusting monitor settings 5 Monitor buttons 5 On-screen display options 6 Using the Direct Keys 8 Changing Windows screen settings...or centered correctly 14 The image remains after switching off the monitor 15 The image is unstable 15 The message "No Input Signal" appears on the screen 15 The monitor has pixels that are always dark or too bright 15 ...
Contents Using Your eMachines Flat-Panel Monitor 1 Unpacking the monitor 2 Connecting the monitor 2 Attaching the base 2 Connecting video and audio inputs 3 Connecting power 3 Adjusting monitor tilt 3 Starting the monitor 4 Adjusting monitor settings 5 Monitor buttons 5 On-screen display options 6 Using the Direct Keys 8 Changing Windows screen settings...or centered correctly 14 The image remains after switching off the monitor 15 The image is unstable 15 The message "No Input Signal" appears on the screen 15 The monitor has pixels that are always dark or too bright 15 ...

User Manual
Page 5
Using Your eMachines Flat-Panel Monitor • Unpacking the monitor • Connecting the monitor • Starting the monitor • Adjusting monitor settings • Power management • Maintaining • Troubleshooting • Specifications 1
Using Your eMachines Flat-Panel Monitor • Unpacking the monitor • Connecting the monitor • Starting the monitor • Adjusting monitor settings • Power management • Maintaining • Troubleshooting • Specifications 1

User Manual
Page 6
... Connecting the monitor To set up the monitor, first attach the base, then make your monitor. Attaching the base To attach the base: • Place the monitor base on the back of your cable connections. Using Your eMachines Flat-Panel Monitor Unpacking the monitor Your monitor box should ...contain the following items: • Monitor (with neck attached) • Base • This User Guide &#...
... Connecting the monitor To set up the monitor, first attach the base, then make your monitor. Attaching the base To attach the base: • Place the monitor base on the back of your cable connections. Using Your eMachines Flat-Panel Monitor Unpacking the monitor Your monitor box should ...contain the following items: • Monitor (with neck attached) • Base • This User Guide &#...

User Manual
Page 7
We recommend using a surge protector to protect your computer's audio out jack. www.emachines.com Connecting video and audio inputs To connect video and audio inputs to your monitor: 1 Position your computer and the monitor so you can reach the back of each. 2 Connect the VGA video cable to the ...VGA video connector under the back of the monitor for your monitor so you can reach the back, then connect the power cord to your monitor from voltage spikes. Connecting power To connect power: 1 Position your viewing comfort. 3 Power outlet ...
We recommend using a surge protector to protect your computer's audio out jack. www.emachines.com Connecting video and audio inputs To connect video and audio inputs to your monitor: 1 Position your computer and the monitor so you can reach the back of each. 2 Connect the VGA video cable to the ...VGA video connector under the back of the monitor for your monitor so you can reach the back, then connect the power cord to your monitor from voltage spikes. Connecting power To connect power: 1 Position your viewing comfort. 3 Power outlet ...

User Manual
Page 8
...settings. This will automatically adjust the display image to the ideal settings for the current screen resolution. 4 After you see "Adjusting monitor settings" on available scientific literature and published standards. This guideline places the center of the screen at arm's length from the user... special circumstances, such as for bifocal use) is based upon the following guidelines. Power button 2 Turn on your monitor. Using Your eMachines Flat-Panel Monitor Ergonomic guidelines The recommended screen positioning is that the top of the display should be placed at an ideal 15°...
...settings. This will automatically adjust the display image to the ideal settings for the current screen resolution. 4 After you see "Adjusting monitor settings" on available scientific literature and published standards. This guideline places the center of the screen at arm's length from the user... special circumstances, such as for bifocal use) is based upon the following guidelines. Power button 2 Turn on your monitor. Using Your eMachines Flat-Panel Monitor Ergonomic guidelines The recommended screen positioning is that the top of the display should be placed at an ideal 15°...
User Manual
Page 9
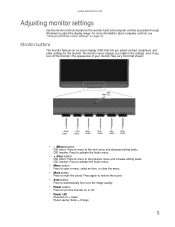
... sound. • Auto button Press to automatically fine-tune the image quality. • Power button Press to turn off . • Power LED Powered on the monitor itself) and computer controls (accessible through Windows) to mute the sound. www.emachines.com Adjusting monitor settings Use the monitor controls (located on = Green Power saving mode = Orange 5
... sound. • Auto button Press to automatically fine-tune the image quality. • Power button Press to turn off . • Power LED Powered on the monitor itself) and computer controls (accessible through Windows) to mute the sound. www.emachines.com Adjusting monitor settings Use the monitor controls (located on = Green Power saving mode = Orange 5
User Manual
Page 10
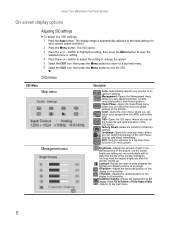
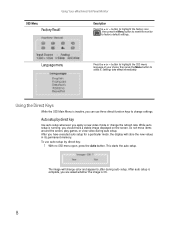
Using Your eMachines Flat-Panel Monitor On-screen display options Adjusting OSD settings To adjust the OSD settings: 1 Press the Auto button. button to highlight a setting, then press the Menu button to its optimum settings. Factory Recall-Resets the monitor to open the selected menu or setting. 4 Press ..., contrast, horizontal position, and vertical position. Color-Opens the Color menu, where you can adjust the clock and phase settings of the monitor backlights. Settings take effect immediately. The OSD opens. 3 Press the + or - OSD-Opens the OSD menu, where you can set...
Using Your eMachines Flat-Panel Monitor On-screen display options Adjusting OSD settings To adjust the OSD settings: 1 Press the Auto button. button to highlight a setting, then press the Menu button to its optimum settings. Factory Recall-Resets the monitor to open the selected menu or setting. 4 Press ..., contrast, horizontal position, and vertical position. Color-Opens the Color menu, where you can adjust the clock and phase settings of the monitor backlights. Settings take effect immediately. The OSD opens. 3 Press the + or - OSD-Opens the OSD menu, where you can set...
User Manual
Page 11
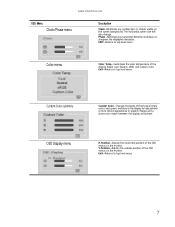
The horizontal screen size will also change. Phase-Minimizes any vertical bars or stripes visible on the monitor. Select Cool, Neutral, sRGB, and Custom Color. Exit-Returns to top level menu. EXIT-Returns to top level menu. Custom Color submenu Custom...Color menu Color Temp-Customizes the color temperature of the OSD menus on the monitor. Exit-Returns to help achieve a more natural appearance in graphic images and a closer color match between the display and printer. www.emachines.com OSD Menu Clock/Phase menu Description Clock-Minimizes any horizontal distortion and clears ...
The horizontal screen size will also change. Phase-Minimizes any vertical bars or stripes visible on the monitor. Select Cool, Neutral, sRGB, and Custom Color. Exit-Returns to top level menu. EXIT-Returns to top level menu. Custom Color submenu Custom...Color menu Color Temp-Customizes the color temperature of the OSD menus on the monitor. Exit-Returns to help achieve a more natural appearance in graphic images and a closer color match between the display and printer. www.emachines.com OSD Menu Clock/Phase menu Description Clock-Minimizes any horizontal distortion and clears ...
User Manual
Page 12
... screen, play games, or view video during auto setup. After you apply a new video mode or change settings. button to select it. Using Your eMachines Flat-Panel Monitor OSD Menu Factory Recall Description Press the + or - The image will store the new values in its permanent memory. After auto setup is complete... direct key: 1 With no OSD menu open, press the Auto button. button to highlight the Factory icon , then press the Menu button to reset the monitor to change the refresh rate. Settings take effect immediately.
... screen, play games, or view video during auto setup. After you apply a new video mode or change settings. button to select it. Using Your eMachines Flat-Panel Monitor OSD Menu Factory Recall Description Press the + or - The image will store the new values in its permanent memory. After auto setup is complete... direct key: 1 With no OSD menu open, press the Auto button. button to highlight the Factory icon , then press the Menu button to reset the monitor to change the refresh rate. Settings take effect immediately.

User Manual
Page 14
...Resolution slider to the size you prefer. 4 Click Apply. Color depth is the number of colors your computer uses to display images on your monitor. Most images look right, click No. If the color in Windows Vista®: 1 Click (Start), Control Panel, then under Appearance and ...and screen resolution in Windows XP: 1 Click Start, then click Control Panel. Using Your eMachines Flat-Panel Monitor Changing Windows screen settings Color depth and screen resolution are two of the most basic monitor settings you may need to change to suit your images seems "false" or "jumpy," ...
...Resolution slider to the size you prefer. 4 Click Apply. Color depth is the number of colors your computer uses to display images on your monitor. Most images look right, click No. If the color in Windows Vista®: 1 Click (Start), Control Panel, then under Appearance and ...and screen resolution in Windows XP: 1 Click Start, then click Control Panel. Using Your eMachines Flat-Panel Monitor Changing Windows screen settings Color depth and screen resolution are two of the most basic monitor settings you may need to change to suit your images seems "false" or "jumpy," ...
User Manual
Page 15
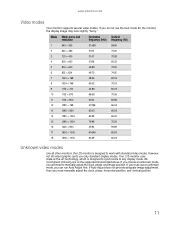
...We recommend choosing one of -the-art technology, which is designed to work with standard video modes. However, not all other monitors, the LCD monitor is designed to synchronize to manually adjust the clock, phase, and image position. If you choose an unknown mode, you do ... then you must use an unknown mode, you must manually adjust the clock, phase, horizontal position, and vertical position. 11 www.emachines.com Video modes Your monitor supports several video modes. Mode Mode name and resolution Horizontal Vertical frequency (kHz) frequency (Hz) 1 640 × 350 31.469...
...We recommend choosing one of -the-art technology, which is designed to work with standard video modes. However, not all other monitors, the LCD monitor is designed to synchronize to manually adjust the clock, phase, and image position. If you choose an unknown mode, you do ... then you must use an unknown mode, you must manually adjust the clock, phase, horizontal position, and vertical position. 11 www.emachines.com Video modes Your monitor supports several video modes. Mode Mode name and resolution Horizontal Vertical frequency (kHz) frequency (Hz) 1 640 × 350 31.469...
User Manual
Page 16
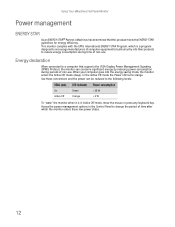
...computer equipment to build circuitry into the energy saving mode, the monitor enters the Active Off mode (sleep). Using Your eMachines Flat-Panel Monitor Power management ENERGY STAR As an ENERGY STAR® Partner, eMachines has determined that supports the VESA Display Power Management Signaling (DPMS...) Protocol, the monitor can be reduced to the following levels: ...
...computer equipment to build circuitry into the energy saving mode, the monitor enters the Active Off mode (sleep). Using Your eMachines Flat-Panel Monitor Power management ENERGY STAR As an ENERGY STAR® Partner, eMachines has determined that supports the VESA Display Power Management Signaling (DPMS...) Protocol, the monitor can be reduced to the following levels: ...

User Manual
Page 17
... optimal working order: • Do not block the ventilation holes. • Do not expose the monitor to rain or use the notebook's screen. www.emachines.com Maintaining To keep the monitor in extended desktop multi-monitor mode. No picture • Make sure that the video cable is connected correctly to qualified service personnel if...
... optimal working order: • Do not block the ventilation holes. • Do not expose the monitor to rain or use the notebook's screen. www.emachines.com Maintaining To keep the monitor in extended desktop multi-monitor mode. No picture • Make sure that the video cable is connected correctly to qualified service personnel if...

User Manual
Page 18
...using the VGA cable that came with your monitor. If the monitor is connected securely to the back of the monitor and your computer. For more information about connecting the video cable, see "Adjusting monitor settings" on page 5. 14 Using Your eMachines Flat-Panel Monitor • If the power LED is orange:... • Make sure that your computer is turned on. • Move the mouse or press any key on the keyboard to bring the monitor out of sleep mode....
...using the VGA cable that came with your monitor. If the monitor is connected securely to the back of the monitor and your computer. For more information about connecting the video cable, see "Adjusting monitor settings" on page 5. 14 Using Your eMachines Flat-Panel Monitor • If the power LED is orange:... • Make sure that your computer is turned on. • Move the mouse or press any key on the keyboard to bring the monitor out of sleep mode....

User Manual
Page 19
...computer to identify whether a repair or replacement is justified based on the monitor for one hour and a "ghost" remains, you feel these to erase the image. • We recommend the use of your display, contact eMachines Customer Care to a supported video mode, preferably 1680 x 1050 at... least one hour to a minimum. www.emachines.com The image remains after switching the monitor off. The monitor has pixels that a supported mode is unstable • Set your computer. If, for more information. The image is selected. &#...
...computer to identify whether a repair or replacement is justified based on the monitor for one hour and a "ghost" remains, you feel these to erase the image. • We recommend the use of your display, contact eMachines Customer Care to a supported video mode, preferably 1680 x 1050 at... least one hour to a minimum. www.emachines.com The image remains after switching the monitor off. The monitor has pixels that a supported mode is unstable • Set your computer. If, for more information. The image is selected. &#...

User Manual
Page 20
Many products for eMachines are subject to change without notice or obligation. Panel size 21.6 inches Panel type TFT LCD Viewable image size 21.6-inch diagonal Pixel resolution 1680 &#... ratio 16:10 Horizontal frequency 30 to 81 KHz Vertical refresh rate 56 to 76 Hz Tilt -5° to eMachines specifications and may vary from similarly marketed products. Using Your eMachines Flat-Panel Monitor Specifications Specifications are custom engineered by our suppliers to 20° Colors 16.2 million OSD languages English, French, Spanish...
Many products for eMachines are subject to change without notice or obligation. Panel size 21.6 inches Panel type TFT LCD Viewable image size 21.6-inch diagonal Pixel resolution 1680 &#... ratio 16:10 Horizontal frequency 30 to 81 KHz Vertical refresh rate 56 to 76 Hz Tilt -5° to eMachines specifications and may vary from similarly marketed products. Using Your eMachines Flat-Panel Monitor Specifications Specifications are custom engineered by our suppliers to 20° Colors 16.2 million OSD languages English, French, Spanish...

User Manual
Page 22
... the product is damaged. ■ The system performance changes. No user serviceable parts inside. Call Gateway Customer Care for advice on whether the monitor is in use. The best way to avoid spills is to avoid eating and drinking near your system. ■ Do not expose the...power cables and modem cables from the wall outlet and refer servicing to the correct voltage. ■ Openings in the monitor case are provided for safety of any kind into the monitor ventilation openings. ■ Some products are followed. ■ The system was dropped or the cabinet is properly grounded...
... the product is damaged. ■ The system performance changes. No user serviceable parts inside. Call Gateway Customer Care for advice on whether the monitor is in use. The best way to avoid spills is to avoid eating and drinking near your system. ■ Do not expose the...power cables and modem cables from the wall outlet and refer servicing to the correct voltage. ■ Openings in the monitor case are provided for safety of any kind into the monitor ventilation openings. ■ Some products are followed. ■ The system was dropped or the cabinet is properly grounded...


