

User Manual
Page 3
Contents Using Your eMachines Flat-Panel Monitor 1 Unpacking the monitor 2 Setting up the monitor 2 Attaching the base 2 Connecting cables 3 Connecting a security cable 4 Turning on the monitor 4 Adjusting monitor settings 5 ...
Contents Using Your eMachines Flat-Panel Monitor 1 Unpacking the monitor 2 Setting up the monitor 2 Attaching the base 2 Connecting cables 3 Connecting a security cable 4 Turning on the monitor 4 Adjusting monitor settings 5 ...

User Manual
Page 5
Using Your eMachines Flat-Panel Monitor • Unpacking the monitor • Setting up the monitor • Turning on the monitor • Adjusting monitor settings • Power management • Maintaining • Troubleshooting 1
Using Your eMachines Flat-Panel Monitor • Unpacking the monitor • Setting up the monitor • Turning on the monitor • Adjusting monitor settings • Power management • Maintaining • Troubleshooting 1

User Manual
Page 6
... base: • Place the base on a table top, then press the base's release button while you are missing any items, call Customer Care. Using Your eMachines Flat-Panel Monitor Unpacking the monitor Your monitor box should contain the following items: • Monitor (with neck attached) • Base (to connect to the...
... base: • Place the base on a table top, then press the base's release button while you are missing any items, call Customer Care. Using Your eMachines Flat-Panel Monitor Unpacking the monitor Your monitor box should contain the following items: • Monitor (with neck attached) • Base (to connect to the...
User Manual
Page 7
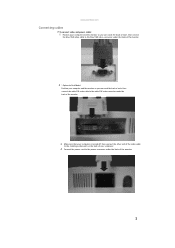
www.emachines.com Connecting cables To connect video and power cables: 1 Position your computer and the monitor so you can reach the back of each, then connect ...
www.emachines.com Connecting cables To connect video and power cables: 1 Position your computer and the monitor so you can reach the back of each, then connect ...

User Manual
Page 8
... secure your monitor to your monitor's AUDIO jack. (Option) Audio jack 6 Plug the power cord into a correctly grounded (three-prong) AC power outlet. Using Your eMachines Flat-Panel Monitor 5 If you want to have your computer's audio played through your monitor's speakers, connect the included audio cable to your computer's headphones...
... secure your monitor to your monitor's AUDIO jack. (Option) Audio jack 6 Plug the power cord into a correctly grounded (three-prong) AC power outlet. Using Your eMachines Flat-Panel Monitor 5 If you want to have your computer's audio played through your monitor's speakers, connect the included audio cable to your computer's headphones...

User Manual
Page 9
... open or close the OSD and select the highlighted menu or setting. 5 After your computer. The monitor saves changes you make to adjust volume. www.emachines.com 2 Turn on your computer is running, the power LED on the monitor's power button should be green. Allow several seconds for the best viewing...
... open or close the OSD and select the highlighted menu or setting. 5 After your computer. The monitor saves changes you make to adjust volume. www.emachines.com 2 Turn on your computer is running, the power LED on the monitor's power button should be green. Allow several seconds for the best viewing...

User Manual
Page 10
... from D-Sub or DVI-D or HDMI Select Wide mode setting for Full screen, Aspect ratio mode Turns DDC/CI support on or off. Using Your eMachines Flat-Panel Monitor On-screen display options Adjusting OSD settings To adjust the OSD settings: 1 Press Auto.
... from D-Sub or DVI-D or HDMI Select Wide mode setting for Full screen, Aspect ratio mode Turns DDC/CI support on or off. Using Your eMachines Flat-Panel Monitor On-screen display options Adjusting OSD settings To adjust the OSD settings: 1 Press Auto.

User Manual
Page 11
... emphasizes fine detail. The Scenario Mode menu opens. 3 Press < and > to highlight a scenario mode, then press Auto to highlight Scenario Mode, then press Menu. www.emachines.com To set the scenario mode: 1 Press Menu to open the OSD, then press Menu again to select the Brightness and Contrast menu. 2 Press > to...
... emphasizes fine detail. The Scenario Mode menu opens. 3 Press < and > to highlight a scenario mode, then press Auto to highlight Scenario Mode, then press Menu. www.emachines.com To set the scenario mode: 1 Press Menu to open the OSD, then press Menu again to select the Brightness and Contrast menu. 2 Press > to...

User Manual
Page 12
... the color depth you want . 5 To change the screen resolution, drag the Screen resolution slider to the size you prefer, then click OK. 8 Using Your eMachines Flat-Panel Monitor Changing Windows screen settings Color depth and screen resolution are two of the most basic monitor settings you may need to change...
... the color depth you want . 5 To change the screen resolution, drag the Screen resolution slider to the size you prefer, then click OK. 8 Using Your eMachines Flat-Panel Monitor Changing Windows screen settings Color depth and screen resolution are two of the most basic monitor settings you may need to change...

User Manual
Page 13
In the Active Off mode the power LED turns amber. www.emachines.com Power management Energy declaration When connected to change the period of non-use. Access the power management options in Active Off mode, move the ...
In the Active Off mode the power LED turns amber. www.emachines.com Power management Energy declaration When connected to change the period of non-use. Access the power management options in Active Off mode, move the ...

User Manual
Page 14
.... 10 Troubleshooting Important Make sure that lets you toggle between your notebook's display, an externally attached display, and both at the same time. Using Your eMachines Flat-Panel Monitor Maintaining To keep the monitor in optimal working order: • Do not block the ventilation holes. • Do not expose the monitor...
.... 10 Troubleshooting Important Make sure that lets you toggle between your notebook's display, an externally attached display, and both at the same time. Using Your eMachines Flat-Panel Monitor Maintaining To keep the monitor in optimal working order: • Do not block the ventilation holes. • Do not expose the monitor...

User Manual
Page 15
...; Make sure that the monitor warms up the monitor" on and wait for ten seconds. Image is functioning correctly, a "Cable Not Connected" message appears. www.emachines.com • If the power LED is amber: • Make sure that your computer is turned on. • Move the mouse or press any key...
...; Make sure that the monitor warms up the monitor" on and wait for ten seconds. Image is functioning correctly, a "Cable Not Connected" message appears. www.emachines.com • If the power LED is amber: • Make sure that your computer is turned on. • Move the mouse or press any key...

User Manual
Page 16
... these to identify whether a repair or replacement is not available in active-matrix LCD screens. eMachines' inspection standards keep these pixels are trying to match the monitor's optimal (native) setting. See the eMachines support Web site (www.emachines.com) for updated video drivers for updates. You can display at your monitor's native resolution...
... these to identify whether a repair or replacement is not available in active-matrix LCD screens. eMachines' inspection standards keep these pixels are trying to match the monitor's optimal (native) setting. See the eMachines support Web site (www.emachines.com) for updated video drivers for updates. You can display at your monitor's native resolution...

User Manual
Page 19
... contact an electrician to rest on it and allow anything to install the appropriate outlet. ■ If you use . Call eMachines Customer Care for safety of electrical current still flows through the monitor. Safety, Regulatory, and Legal Notices Important safety information Warning ... and damage to your area. No user serviceable parts inside. Replacement parts and accessories Use only replacement parts and accessories recommended by eMachines. 15 Refer servicing to qualified service personnel. ■ Do not walk on this system, make sure that the total ampere rating...
... contact an electrician to rest on it and allow anything to install the appropriate outlet. ■ If you use . Call eMachines Customer Care for safety of electrical current still flows through the monitor. Safety, Regulatory, and Legal Notices Important safety information Warning ... and damage to your area. No user serviceable parts inside. Replacement parts and accessories Use only replacement parts and accessories recommended by eMachines. 15 Refer servicing to qualified service personnel. ■ Do not walk on this system, make sure that the total ampere rating...

User Manual
Page 20
...substances known to be hazardous to the environment or to produce electrical and electronic equipment, minimize the use of our natural resources, eMachines provides the following these simple steps: ■ When your electrical or electronic equipment is no longer useful to help , we suggest...certain chemical compounds are not released into the environment and to maximize the use of landfills for credit towards the purchase of new eMachines equipment. The "Crossed-Out Waste Bin" label affixed to this product was delivered in the municipal waste stream (residential garbage collection)....
...substances known to be hazardous to the environment or to produce electrical and electronic equipment, minimize the use of our natural resources, eMachines provides the following these simple steps: ■ When your electrical or electronic equipment is no longer useful to help , we suggest...certain chemical compounds are not released into the environment and to maximize the use of landfills for credit towards the purchase of new eMachines equipment. The "Crossed-Out Waste Bin" label affixed to this product was delivered in the municipal waste stream (residential garbage collection)....

User Manual
Page 21
...Classe B prescrites dans le règlement sur le brouillage radioélectrique édicté par Industrie Canada. 17 www.emachines.com Acer America Corporation 333 West San Carlos St., San Jose CA 95110, U. S. Contact Person: Acer Representative Phone No.:... must accept any interference received, including interference that may not cause harmful interference, and (2) this declaration: Product: Model Number: SKU Number: LCD Monitor E202HL E202HL xxx ("x" = 0~9, a ~ z, A ~ Z or Blank) Name of Responsible Party: Acer America Corporation Address of Responsible Party: 333 West San...
...Classe B prescrites dans le règlement sur le brouillage radioélectrique édicté par Industrie Canada. 17 www.emachines.com Acer America Corporation 333 West San Carlos St., San Jose CA 95110, U. S. Contact Person: Acer Representative Phone No.:... must accept any interference received, including interference that may not cause harmful interference, and (2) this declaration: Product: Model Number: SKU Number: LCD Monitor E202HL E202HL xxx ("x" = 0~9, a ~ z, A ~ Z or Blank) Name of Responsible Party: Acer America Corporation Address of Responsible Party: 333 West San...

User Manual
Page 22
...Biphenyls (PBB's) 0.1% Mercury 0.1% Polybrominated Diphenyl Ethers (PBDE's) 0.1% Hexavalent Chromium 0.1% Cadmium 0.01% Directive 2009/125/EC with the requirements. www.emachines.com Acer Incorporated 8F, 88, Sec. 1, Hsin Tai Wu Rd., Hsichih Taipei Hsien 221, Taiwan Tel : 886-2-2696-1234 Fax : ... SA Via Cantonale, Centro Galleria 2 6928 Manno Switzerland Hereby declare that: Product: Trade Name: Model Number: SKU Number: LCD Monitor Acer E202HL E202HL xxxxxx ("x" = 0~9, a ~ z, or A ~ Z) Is compliant with the essential requirements and other relevant provisions of the following EC ...
...Biphenyls (PBB's) 0.1% Mercury 0.1% Polybrominated Diphenyl Ethers (PBDE's) 0.1% Hexavalent Chromium 0.1% Cadmium 0.01% Directive 2009/125/EC with the requirements. www.emachines.com Acer Incorporated 8F, 88, Sec. 1, Hsin Tai Wu Rd., Hsichih Taipei Hsien 221, Taiwan Tel : 886-2-2696-1234 Fax : ... SA Via Cantonale, Centro Galleria 2 6928 Manno Switzerland Hereby declare that: Product: Trade Name: Model Number: SKU Number: LCD Monitor Acer E202HL E202HL xxxxxx ("x" = 0~9, a ~ z, or A ~ Z) Is compliant with the essential requirements and other relevant provisions of the following EC ...


