

User Manual
Page 3
... Flat-Panel Monitor 1 Unpacking the monitor 2 Setting up the monitor 2 Attaching the base 2 Connecting cables 3 Connecting a security cable 4 Turning on the monitor 4 Adjusting monitor settings 5 Monitor buttons 5 On-screen display options 6 Changing Windows screen settings 8 Power management 9 ENERGY STAR 9 Energy declaration 9 Maintaining 10 Troubleshooting 10 No power 10 No picture 10 Display colors are wrong 11 Picture has shadows or "ghosts 11 Color is not uniform 11 Image is not sized or centered correctly 11 The monitor has pixels that are always dark or too bright...
... Flat-Panel Monitor 1 Unpacking the monitor 2 Setting up the monitor 2 Attaching the base 2 Connecting cables 3 Connecting a security cable 4 Turning on the monitor 4 Adjusting monitor settings 5 Monitor buttons 5 On-screen display options 6 Changing Windows screen settings 8 Power management 9 ENERGY STAR 9 Energy declaration 9 Maintaining 10 Troubleshooting 10 No power 10 No picture 10 Display colors are wrong 11 Picture has shadows or "ghosts 11 Color is not uniform 11 Image is not sized or centered correctly 11 The monitor has pixels that are always dark or too bright...

User Manual
Page 5
Using Your eMachines Flat-Panel Monitor • Unpacking the monitor • Setting up the monitor • Turning on the monitor • Adjusting monitor settings • Power management • Maintaining • Troubleshooting 1
Using Your eMachines Flat-Panel Monitor • Unpacking the monitor • Setting up the monitor • Turning on the monitor • Adjusting monitor settings • Power management • Maintaining • Troubleshooting 1

User Manual
Page 6
... press the base's release button while you are missing any items, call Customer Care. Setting up the monitor To set up the monitor, first attach the base, then connect cables. Using Your eMachines Flat-Panel Monitor Unpacking the monitor Your monitor box should contain the following items: • Monitor (with neck attached) • Base (to connect to the neck) • This User Guide • VGA cable • Audio cable (Option)€ • Power cord If you slide...
... press the base's release button while you are missing any items, call Customer Care. Setting up the monitor To set up the monitor, first attach the base, then connect cables. Using Your eMachines Flat-Panel Monitor Unpacking the monitor Your monitor box should contain the following items: • Monitor (with neck attached) • Base (to connect to the neck) • This User Guide • VGA cable • Audio cable (Option)€ • Power cord If you slide...

User Manual
Page 7
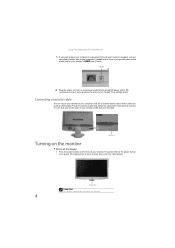
www.emachines.com Connecting cables To connect video and power cables: 1 Position your computer and the monitor so you can reach the back of each, then connect the blue VGA video cable to the blue VGA video connector under the back of the monitor. 2 * Option for Dual Model Position your computer and the monitor so you can reach the back of each, then connect the white DVI video cable to the white DVI video connector under the back of the monitor. 3 Make sure that...
www.emachines.com Connecting cables To connect video and power cables: 1 Position your computer and the monitor so you can reach the back of each, then connect the blue VGA video cable to the blue VGA video connector under the back of the monitor. 2 * Option for Dual Model Position your computer and the monitor so you can reach the back of each, then connect the white DVI video cable to the white DVI video connector under the back of the monitor. 3 Make sure that...
User Manual
Page 8
... 6 Plug the power cord into a correctly grounded (three-prong) AC power outlet. Using Your eMachines Flat-Panel Monitor 5 If you want to have your computer's audio played through your monitor's speakers, connect the included audio cable to your computer's headphones or line out jack (usually color-coded green) and to your monitor. Connecting a security cable You can secure your monitor to another heavy object) with a cable lock (such as a Kensington™ lock). To connect a cable lock, follow the cable lock's instructions...
... 6 Plug the power cord into a correctly grounded (three-prong) AC power outlet. Using Your eMachines Flat-Panel Monitor 5 If you want to have your computer's audio played through your monitor's speakers, connect the included audio cable to your computer's headphones or line out jack (usually color-coded green) and to your monitor. Connecting a security cable You can secure your monitor to another heavy object) with a cable lock (such as a Kensington™ lock). To connect a cable lock, follow the cable lock's instructions...
User Manual
Page 9
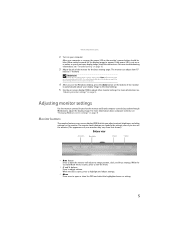
... the monitor. www.emachines.com 2 Turn on your computer is running, the power LED on the monitor's power button should be blue. The monitor can adjust from that lets you adjust contrast, brightness, and other monitor settings. While the Scenario Mode menu is open or close the OSD and select the highlighted menu or setting. 5 For more information about computer controls, see a display image, check the connections. For more information, see "Troubleshooting" on page 10. 3 Adjust the tilt of your display image...
... the monitor. www.emachines.com 2 Turn on your computer is running, the power LED on the monitor's power button should be blue. The monitor can adjust from that lets you adjust contrast, brightness, and other monitor settings. While the Scenario Mode menu is open or close the OSD and select the highlighted menu or setting. 5 For more information about computer controls, see a display image, check the connections. For more information, see "Troubleshooting" on page 10. 3 Adjust the tilt of your display image...

User Manual
Page 10
...Source Wide Mode DDC/CI Settings Select input signal from D-Sub or DVI-D or HDMI Select Wide mode setting for the OSD. Using Your eMachines Flat-Panel Monitor On-screen display options Adjusting OSD settings To adjust the OSD settings: 1 Press Auto. Exit Exits the OSD. 4 Press < and > to adjust the setting to the desired level or change the option. 5 When you have finished making all OSD settings to exit. 6 Position Adjusts horizontal and vertical screen image position. The display image is automatically adjusted to open the selected menu or setting. Reset to Defaults Resets...
...Source Wide Mode DDC/CI Settings Select input signal from D-Sub or DVI-D or HDMI Select Wide mode setting for the OSD. Using Your eMachines Flat-Panel Monitor On-screen display options Adjusting OSD settings To adjust the OSD settings: 1 Press Auto. Exit Exits the OSD. 4 Press < and > to adjust the setting to the desired level or change the option. 5 When you have finished making all OSD settings to exit. 6 Position Adjusts horizontal and vertical screen image position. The display image is automatically adjusted to open the selected menu or setting. Reset to Defaults Resets...

User Manual
Page 11
... uses default settings, and is the best balance of Text brightness and contrast to highlight Scenario Mode, then press Menu. Graphic This enhances color and emphasizes fine detail. This is the best general-purpose mode. www.emachines.com To set the scenario mode: 1 Press Menu to open the OSD, then press Menu again to select the Brightness and Contrast menu. 2 Press > to prevent eye strain while reading on-screen text. Menu Mode icon Description User...
... uses default settings, and is the best balance of Text brightness and contrast to highlight Scenario Mode, then press Menu. Graphic This enhances color and emphasizes fine detail. This is the best general-purpose mode. www.emachines.com To set the scenario mode: 1 Press Menu to open the OSD, then press Menu again to select the Brightness and Contrast menu. 2 Press > to prevent eye strain while reading on-screen text. Menu Mode icon Description User...

User Manual
Page 12
Using Your eMachines Flat-Panel Monitor Changing Windows screen settings Color depth and screen resolution are two of pixels (individual colored dots) your computer uses to display images on your monitor. The higher the resolution, the more information about adjusting the screen, click Start, then click Help and Support. Shortcut You can also right-click on the monitor. If your Windows desktop, then click Personalize. 2 To change the color depth, click the Colors list, then click the color depth you want...
Using Your eMachines Flat-Panel Monitor Changing Windows screen settings Color depth and screen resolution are two of pixels (individual colored dots) your computer uses to display images on your monitor. The higher the resolution, the more information about adjusting the screen, click Start, then click Help and Support. Shortcut You can also right-click on the monitor. If your Windows desktop, then click Personalize. 2 To change the color depth, click the Colors list, then click the color depth you want...

User Manual
Page 13
... qualified use . www.emachines.com Power management ENERGY STAR ENERGY STAR® Acer's ENERGY STAR qualified products save more we reduce greenhouse gases and the risks of inactivity respectively. ‧ Wake the monitor when it is ENERGY STAR? Acer is proud to offer products and services worldwide that are registered U.S. When your computer goes into "display sleep" and "computer sleep" mode...
... qualified use . www.emachines.com Power management ENERGY STAR ENERGY STAR® Acer's ENERGY STAR qualified products save more we reduce greenhouse gases and the risks of inactivity respectively. ‧ Wake the monitor when it is ENERGY STAR? Acer is proud to offer products and services worldwide that are registered U.S. When your computer goes into "display sleep" and "computer sleep" mode...

User Manual
Page 14
... permanently scratch the screen. • To clean the monitor, use any judgments about connecting the video cable, see "Setting up the monitor" on page 2. • Make sure that the monitor is connected correctly to enable multiple monitors. • You can take several minutes to reach maximum brightness. For more information about the picture quality. See your notebook's user guide for about connecting the power cord, see "Setting up the monitor" on . •...
... permanently scratch the screen. • To clean the monitor, use any judgments about connecting the video cable, see "Setting up the monitor" on page 2. • Make sure that the monitor is connected correctly to enable multiple monitors. • You can take several minutes to reach maximum brightness. For more information about the picture quality. See your notebook's user guide for about connecting the power cord, see "Setting up the monitor" on . •...

User Manual
Page 15
... monitor. For instructions on how to the back of the monitor and your computer. For more information about connecting the video cable, see "Adjusting monitor settings" on page 2. If the monitor is not sized or centered correctly • Press Auto to automatically adjust the display image to the ideal settings. • Change the position settings. For more information about color uniformity or brightness. www.emachines.com • If the power LED is amber: • Make...
... monitor. For instructions on how to the back of the monitor and your computer. For more information about connecting the video cable, see "Adjusting monitor settings" on page 2. If the monitor is not sized or centered correctly • Press Auto to automatically adjust the display image to the ideal settings. • Change the position settings. For more information about color uniformity or brightness. www.emachines.com • If the power LED is amber: • Make...

User Manual
Page 16
... whether a repair or replacement is normal and inherent in the TFT technology used in the Windows display control panel: • Make sure that are always dark or too bright • This condition is justified based on your computer. Connecting a game console • To determine the type of pixels affected. The monitor has pixels that your video card can display at your monitor's native resolution. • This may require you need, see "Changing Windows screen settings" on...
... whether a repair or replacement is normal and inherent in the TFT technology used in the Windows display control panel: • Make sure that are always dark or too bright • This condition is justified based on your computer. Connecting a game console • To determine the type of pixels affected. The monitor has pixels that your video card can display at your monitor's native resolution. • This may require you need, see "Changing Windows screen settings" on...

User Manual
Page 19
... water or a heat source such as a radiator. ■ Set up the system on a stable work area. Replacement parts and accessories Use only replacement parts and accessories recommended by eMachines. 15 No user serviceable parts inside. Such areas include patient care areas of information technology equipment. The plug on the system. To avoid electrical shock, always unplug all instructions marked on the products plugged into a grounding...
... water or a heat source such as a radiator. ■ Set up the system on a stable work area. Replacement parts and accessories Use only replacement parts and accessories recommended by eMachines. 15 No user serviceable parts inside. Such areas include patient care areas of information technology equipment. The plug on the system. To avoid electrical shock, always unplug all instructions marked on the products plugged into a grounding...

User Manual
Page 20
...eMachines equipment. Call eMachines to see if this product was delivered in, and by following information on how you need further assistance in recycling, reusing, or trading in your effort. This product may be glad to human health. With your help you with your product's user guide and we will be "traded in your part...environment and are highly recoverable, recyclable, and reusable. For additional recycling information specific to maximize the use of our natural resources, eMachines provides the following these simple steps: ■ When your electrical or electronic...
...eMachines equipment. Call eMachines to see if this product was delivered in, and by following information on how you need further assistance in recycling, reusing, or trading in your effort. This product may be glad to human health. With your help you with your product's user guide and we will be "traded in your part...environment and are highly recoverable, recyclable, and reusable. For additional recycling information specific to maximize the use of our natural resources, eMachines provides the following these simple steps: ■ When your electrical or electronic...

User Manual
Page 21
... of Conformity This device complies with Part 15 of Responsible Party: 333 West San Carlos St. E202H SKU Number: E182H xxx; The following local Manufacturer /Importer is subject to the following two conditions: (1) this device may not cause harmful interference, and (2) this declaration: Product: 18.5 &20" LCD Monitor Model Number: E182H; www.emachines.com Acer America Corporation 333...
... of Conformity This device complies with Part 15 of Responsible Party: 333 West San Carlos St. E202H SKU Number: E182H xxx; The following local Manufacturer /Importer is subject to the following two conditions: (1) this device may not cause harmful interference, and (2) this declaration: Product: 18.5 &20" LCD Monitor Model Number: E182H; www.emachines.com Acer America Corporation 333...

User Manual
Page 22
...Electronic Equipment Year to assure that : Product: Trade Name: Model Number: SKU Number: or Blank) 18.5 &20" LCD Monitor emachines E182H;E192HQ;E202H E182H xxx; Easy Lai /Manager Regulation, Acer Inc. EN55024:1998 + A1:2001 + A2:2003 -. www.emachines.com European Union Acer Incorporated 8F, 88, Sec. 1, Hsin...:2006, AS/NZS CISPR22:2006, Class B -. EN60950-1:2001 + A11:2004 RoHS Directive 2002/95/EC on the Restriction of the Use of certain Hazardous Substances in force to begin affixing CE marking 2009. EN61000-3-2:2006, Class D -. Trademark acknowledgments 9 Feb. 9, 2009...
...Electronic Equipment Year to assure that : Product: Trade Name: Model Number: SKU Number: or Blank) 18.5 &20" LCD Monitor emachines E182H;E192HQ;E202H E182H xxx; Easy Lai /Manager Regulation, Acer Inc. EN55024:1998 + A1:2001 + A2:2003 -. www.emachines.com European Union Acer Incorporated 8F, 88, Sec. 1, Hsin...:2006, AS/NZS CISPR22:2006, Class B -. EN60950-1:2001 + A11:2004 RoHS Directive 2002/95/EC on the Restriction of the Use of certain Hazardous Substances in force to begin affixing CE marking 2009. EN61000-3-2:2006, Class D -. Trademark acknowledgments 9 Feb. 9, 2009...

Setup Guide
Page 1
Option) Plug in the monitor To protect your monitor to computer (DVI ; User Guide F293I0F2:3IR0F313I Quick Guide VGA cable Audio cable (Option) Power cord DVI cable (Option) Getting Help Visit the tech support site at www.emachines.com : Easy Steps to the audo jack (Option) 6 Turn on the monitor MAN E182H/E192HQ/E202H PST R0 01/09 Connect your monitor to your computer Connect your monitor from power fluctuations, use a surge protector. 5 Connect the audio cable to Set Up Your Monitor 6 5 Actual product...
Option) Plug in the monitor To protect your monitor to computer (DVI ; User Guide F293I0F2:3IR0F313I Quick Guide VGA cable Audio cable (Option) Power cord DVI cable (Option) Getting Help Visit the tech support site at www.emachines.com : Easy Steps to the audo jack (Option) 6 Turn on the monitor MAN E182H/E192HQ/E202H PST R0 01/09 Connect your monitor to your computer Connect your monitor from power fluctuations, use a surge protector. 5 Connect the audio cable to Set Up Your Monitor 6 5 Actual product...


