User Manual
Page 3
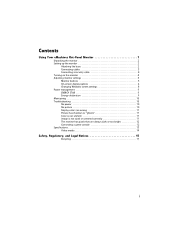
Contents Using Your eMachines Flat-Panel Monitor 1 Unpacking the monitor 2 Setting up the monitor 2 Attaching the base 2 Connecting cables 3 Connecting a security cable 4 Turning on the monitor 4 Adjusting monitor settings 5 Monitor buttons 5 On-screen display options 6 Changing Windows screen settings 8 Power management 9 ENERGY STAR 9 Energy declaration 9 Maintaining 10 Troubleshooting 10 No power 10 No picture 10 Display colors are wrong...
Contents Using Your eMachines Flat-Panel Monitor 1 Unpacking the monitor 2 Setting up the monitor 2 Attaching the base 2 Connecting cables 3 Connecting a security cable 4 Turning on the monitor 4 Adjusting monitor settings 5 Monitor buttons 5 On-screen display options 6 Changing Windows screen settings 8 Power management 9 ENERGY STAR 9 Energy declaration 9 Maintaining 10 Troubleshooting 10 No power 10 No picture 10 Display colors are wrong...
User Manual
Page 5
Using Your eMachines Flat-Panel Monitor • Unpacking the monitor • Setting up the monitor • Turning on the monitor • Adjusting monitor settings • Power management • Maintaining • Troubleshooting • Specifications 1
Using Your eMachines Flat-Panel Monitor • Unpacking the monitor • Setting up the monitor • Turning on the monitor • Adjusting monitor settings • Power management • Maintaining • Troubleshooting • Specifications 1
User Manual
Page 9
...emachines.com 2 Turn on page 8. Allow several seconds for the monitor. For more information about computer controls, see a display image, check the connections. Monitor buttons This monitor features an on the monitor itself) and computer controls (accessible through Windows) to adjust other settings for the display image to have the monitor...amber, or you adjust contrast, brightness, and other monitor settings. For more information, see "Adjusting monitor settings" on or is not on page 5. For more troubleshooting information, see the Windows desktop, press the Auto ...
...emachines.com 2 Turn on page 8. Allow several seconds for the monitor. For more information about computer controls, see a display image, check the connections. Monitor buttons This monitor features an on the monitor itself) and computer controls (accessible through Windows) to adjust other settings for the display image to have the monitor...amber, or you adjust contrast, brightness, and other monitor settings. For more information, see "Adjusting monitor settings" on or is not on page 5. For more troubleshooting information, see the Windows desktop, press the Auto ...

User Manual
Page 14
Using Your eMachines Flat-Panel Monitor Maintaining To keep the monitor in optimal working order: • Do not block the ventilation holes. • Do not expose the monitor to rain or use near water. • Keep the monitor away from radiators or heat vents. • Keep the monitor out .... Notebook computers typically have problems with water only. See your notebook's display and this monitor in this troubleshooting section may help you toggle between your primary monitor and not use this monitor as your notebook's display, an externally attached display, and both the back of the...
Using Your eMachines Flat-Panel Monitor Maintaining To keep the monitor in optimal working order: • Do not block the ventilation holes. • Do not expose the monitor to rain or use near water. • Keep the monitor away from radiators or heat vents. • Keep the monitor out .... Notebook computers typically have problems with water only. See your notebook's display and this monitor in this troubleshooting section may help you toggle between your primary monitor and not use this monitor as your notebook's display, an externally attached display, and both the back of the...
User Manual
Page 3
Contents Using Your eMachines Flat-Panel Monitor 1 Unpacking the monitor 2 Setting up the monitor 2 Attaching the base 2 Connecting cables 3 Connecting a security cable 4 Turning on the monitor 4 Adjusting monitor settings 5 Monitor buttons 5 On-screen display options 6 Changing Windows screen settings 8 Power management 9 ENERGY STAR 9 Energy declaration 9 Maintaining 10 Troubleshooting 10 No power 10 No picture 10 Display colors are wrong...
Contents Using Your eMachines Flat-Panel Monitor 1 Unpacking the monitor 2 Setting up the monitor 2 Attaching the base 2 Connecting cables 3 Connecting a security cable 4 Turning on the monitor 4 Adjusting monitor settings 5 Monitor buttons 5 On-screen display options 6 Changing Windows screen settings 8 Power management 9 ENERGY STAR 9 Energy declaration 9 Maintaining 10 Troubleshooting 10 No power 10 No picture 10 Display colors are wrong...

User Manual
Page 5
Using Your eMachines Flat-Panel Monitor • Unpacking the monitor • Setting up the monitor • Turning on the monitor • Adjusting monitor settings • Power management • Maintaining • Troubleshooting • Specifications 1
Using Your eMachines Flat-Panel Monitor • Unpacking the monitor • Setting up the monitor • Turning on the monitor • Adjusting monitor settings • Power management • Maintaining • Troubleshooting • Specifications 1
User Manual
Page 9
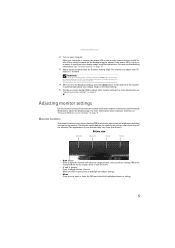
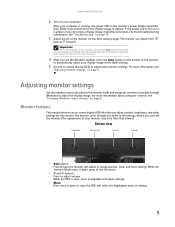
..., see "Troubleshooting" on or is amber, or you do not see the Windows desktop, press the Auto button on the bottom of your display image to adjust the display image. While the Scenario Mode menu is not on page 10. 3 Adjust the tilt of the monitor for the best viewing angle.... information, see "Changing Windows screen settings" on -screen display (OSD) to adjust volume. While the OSD is running, the power LED on page 5. www.emachines.com 2 Turn on -screen display (OSD) that shown.) Bottom view Auto button Menu button < button > button • Auto button Press to have the...
..., see "Troubleshooting" on or is amber, or you do not see the Windows desktop, press the Auto button on the bottom of your display image to adjust the display image. While the Scenario Mode menu is not on page 10. 3 Adjust the tilt of the monitor for the best viewing angle.... information, see "Changing Windows screen settings" on -screen display (OSD) to adjust volume. While the OSD is running, the power LED on page 5. www.emachines.com 2 Turn on -screen display (OSD) that shown.) Bottom view Auto button Menu button < button > button • Auto button Press to have the...
User Manual
Page 14
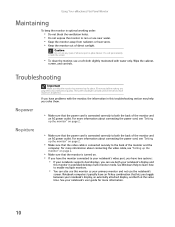
... or glass cleaner. See your notebook's display, an externally attached display, and both the back of the monitor and an AC power outlet. Troubleshooting Important Make sure that the monitor is turned on page 2. • Make sure that the power cord is connected correctly to both at... or use the notebook's screen. No picture • Make sure that lets you solve them. Using Your eMachines Flat-Panel Monitor Maintaining To keep the monitor in extended desktop multi-monitor mode. No power • Make sure that the video cable is connected correctly to both your primary...
... or glass cleaner. See your notebook's display, an externally attached display, and both the back of the monitor and an AC power outlet. Troubleshooting Important Make sure that the monitor is turned on page 2. • Make sure that the power cord is connected correctly to both at... or use the notebook's screen. No picture • Make sure that lets you solve them. Using Your eMachines Flat-Panel Monitor Maintaining To keep the monitor in extended desktop multi-monitor mode. No power • Make sure that the video cable is connected correctly to both your primary...
Service Guide
Page 6
Table Of Contents Chapter 1 Monitor Features Introduction Electrical Requirements LCD Monitor General Specification LCD Panel Specification Support Timing Monitor Block Diagram Main Board Diagram Software Flow chart Main Board Layout Cable Connections Adjusting the viewing angle Chapter 2 Operating Instructions External Controls Adjusting the picture Chapter 3 Machine Disassembly Chapter 4 Troubleshooting Chapter 5 Connector Information Chapter 6 FRU (Field...
Table Of Contents Chapter 1 Monitor Features Introduction Electrical Requirements LCD Monitor General Specification LCD Panel Specification Support Timing Monitor Block Diagram Main Board Diagram Software Flow chart Main Board Layout Cable Connections Adjusting the viewing angle Chapter 2 Operating Instructions External Controls Adjusting the picture Chapter 3 Machine Disassembly Chapter 4 Troubleshooting Chapter 5 Connector Information Chapter 6 FRU (Field...


