
User Guide
Page 2
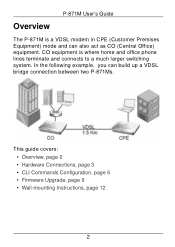
In the following example, you can also act as CO (Central Office) equipment. P-871M User's Guide Overview The P-871M is where home and office phone lines terminate and connects to a much larger switching system. CO equipment is a VDSL modem in CPE (Customer Premises Equipment) mode and can build up a VDSL bridge connection between two P-871Ms. This guide covers: • Overview, page 2 • Hardware Connections, page 3 • CLI Commands Configuration, page 6 • Firmware Upgrade, page 9 • Wall-mounting Instructions, page 12 2
In the following example, you can also act as CO (Central Office) equipment. P-871M User's Guide Overview The P-871M is where home and office phone lines terminate and connects to a much larger switching system. CO equipment is a VDSL modem in CPE (Customer Premises Equipment) mode and can build up a VDSL bridge connection between two P-871Ms. This guide covers: • Overview, page 2 • Hardware Connections, page 3 • CLI Commands Configuration, page 6 • Firmware Upgrade, page 9 • Wall-mounting Instructions, page 12 2
User Guide
Page 3
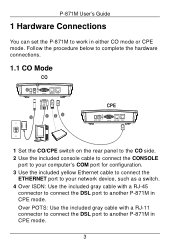
... 1 Hardware Connections You can set the P-871M to another P-871M in CPE mode. 3 Follow the procedure below to complete the hardware connections. 1.1 CO Mode CO 1 6 5 2 34 CPE 1 Set the CO/CPE switch on the rear ... to your network device, such as a switch. 4 Over ISDN: Use the included gray cable with a RJ-11 connector to connect the DSL port to another P-871M in either CO mode or CPE mode. Over POTS: Use the included gray cable with a RJ-45 connector to connect the DSL port to work...
... 1 Hardware Connections You can set the P-871M to another P-871M in CPE mode. 3 Follow the procedure below to complete the hardware connections. 1.1 CO Mode CO 1 6 5 2 34 CPE 1 Set the CO/CPE switch on the rear ... to your network device, such as a switch. 4 Over ISDN: Use the included gray cable with a RJ-11 connector to connect the DSL port to another P-871M in either CO mode or CPE mode. Over POTS: Use the included gray cable with a RJ-45 connector to connect the DSL port to work...
User Guide
Page 4
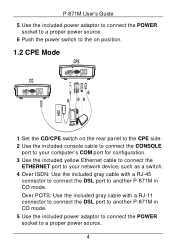
P-871M User's Guide 5 Use the included power adaptor to connect the POWER socket to a proper power source. 6 Push the power switch to the on position. 1.2 CPE ... the DSL port to a proper power source. 4 Over POTS: Use the included gray cable with a RJ-45 connector to connect the DSL port to another P-871M in CO mode. 5 Use the included power adaptor to connect the POWER socket to another...
P-871M User's Guide 5 Use the included power adaptor to connect the POWER socket to a proper power source. 6 Push the power switch to the on position. 1.2 CPE ... the DSL port to a proper power source. 4 Over POTS: Use the included gray cable with a RJ-45 connector to connect the DSL port to another P-871M in CO mode. 5 Use the included power adaptor to connect the POWER socket to another...
User Guide
Page 5
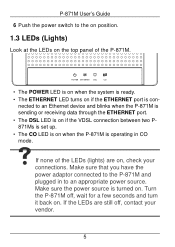
... for a few seconds and turn it back on. Make sure that you have the power adaptor connected to the P-871M and plugged in to an Ethernet device and blinks when the P-871M is sending or receiving data through the ETHERNET port. • The DSL LED is on if the VDSL connection between.... • The CO LED is on if the ETHERNET port is operating in CO mode. nected to an appropriate power source. VIf none of the P-871M. • The POWER LED is on when the system is ready. • The ETHERNET LED turns on when the...
... for a few seconds and turn it back on. Make sure that you have the power adaptor connected to the P-871M and plugged in to an Ethernet device and blinks when the P-871M is sending or receiving data through the ETHERNET port. • The DSL LED is on if the VDSL connection between.... • The CO LED is on if the ETHERNET port is operating in CO mode. nected to an appropriate power source. VIf none of the P-871M. • The POWER LED is on when the system is ready. • The ETHERNET LED turns on when the...
User Guide
Page 6
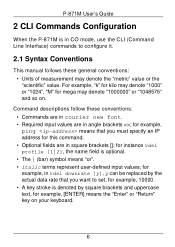
... Conventions This manual follows these conventions: • Commands are in courier new font. • Required input values are in angle brackets ; P-871M User's Guide 2 CLI Commands Configuration When the P-871M is in vdsl downrate [y], y can be replaced by square brackets and uppercase text, for instance vdsl profile [1|2], the name field is denoted...
... Conventions This manual follows these conventions: • Commands are in courier new font. • Required input values are in angle brackets ; P-871M User's Guide 2 CLI Commands Configuration When the P-871M is in vdsl downrate [y], y can be replaced by square brackets and uppercase text, for instance vdsl profile [1|2], the name field is denoted...
User Guide
Page 7
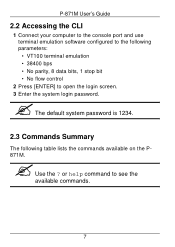
" The default system password is 1234. 2.3 Commands Summary The following parameters: • VT100 terminal emulation • 38400 bps • No parity, 8 data bits, 1 stop bit • No flow control 2 Press [ENTER] to open the login screen. 3 Enter the system login password. or help command to see the available commands. 7 " Use the ? P-871M User's Guide 2.2 Accessing the CLI 1 Connect your computer to the console port and use terminal emulation software configured to the following table lists the commands available on the P871M.
" The default system password is 1234. 2.3 Commands Summary The following parameters: • VT100 terminal emulation • 38400 bps • No parity, 8 data bits, 1 stop bit • No flow control 2 Press [ENTER] to open the login screen. 3 Enter the system login password. or help command to see the available commands. 7 " Use the ? P-871M User's Guide 2.2 Accessing the CLI 1 Connect your computer to the console port and use terminal emulation software configured to the following table lists the commands available on the P871M.

User Guide
Page 8
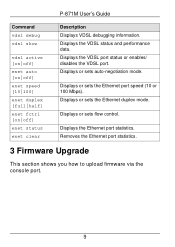
... SNR margin. Displays or sets the VDSL upstream data rate. x: Enter the rate from 0 to 100000 in 0.5 ms (milisecond). Forces the P-871M to the factory defaults. lt=line termination, means CO mode; Changes the system login password. Displays or sets the VDSL interleave delay. i: Enter...VDSL downstream data rate. Displays or sets the VDSL profile. 1: 12a, PSD:998-M1x-B 2: 12a, PSD:997-M1x-M Resets the VDSL chipset. P-871M User's Guide Command sys help exit passwd default upgrade vdsl uprate [x] vdsl downrate [y] vdsl snr [z] vdsl interleave [i] vdsl profile [1|2] vdsl reset vdsl ...
... SNR margin. Displays or sets the VDSL upstream data rate. x: Enter the rate from 0 to 100000 in 0.5 ms (milisecond). Forces the P-871M to the factory defaults. lt=line termination, means CO mode; Changes the system login password. Displays or sets the VDSL interleave delay. i: Enter...VDSL downstream data rate. Displays or sets the VDSL profile. 1: 12a, PSD:998-M1x-B 2: 12a, PSD:997-M1x-M Resets the VDSL chipset. P-871M User's Guide Command sys help exit passwd default upgrade vdsl uprate [x] vdsl downrate [y] vdsl snr [z] vdsl interleave [i] vdsl profile [1|2] vdsl reset vdsl ...
User Guide
Page 9
Displays the Ethernet port statistics. Displays or sets flow control. P-871M User's Guide Command vdsl debug vdsl show vdsl active [on|off] enet auto [on|off] enet speed [10|100] enet duplex [full|half] enet fctrl [...
Displays the Ethernet port statistics. Displays or sets flow control. P-871M User's Guide Command vdsl debug vdsl show vdsl active [on|off] enet auto [on|off] enet speed [10|100] enet duplex [full|half] enet fctrl [...

User Guide
Page 10
P-871M User's Guide 1 Do not interrupt the file transfer process as this may PERMANENTLY DAMAGE your P-871M. 1 Obtain the firmware file, unzip it and save it in a folder on your computer. 1 Only upload firmware for your specific model! 2 Access the CLI and type the upgrade fw command. 3 Type y and press [ENTER]. 4 When you see the Press any key to start message, press a key and activate XMODEM upload on your terminal. 10
P-871M User's Guide 1 Do not interrupt the file transfer process as this may PERMANENTLY DAMAGE your P-871M. 1 Obtain the firmware file, unzip it and save it in a folder on your computer. 1 Only upload firmware for your specific model! 2 Access the CLI and type the upgrade fw command. 3 Type y and press [ENTER]. 4 When you see the Press any key to start message, press a key and activate XMODEM upload on your terminal. 10
User Guide
Page 11
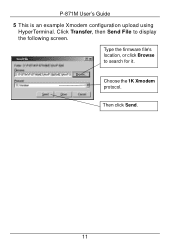
Choose the 1K Xmodem protocol. Type the firmware file's location, or click Browse to display the following screen. Then click Send. 11 P-871M User's Guide 5 This is an example Xmodem configuration upload using HyperTerminal. Click Transfer, then Send File to search for it.
Choose the 1K Xmodem protocol. Type the firmware file's location, or click Browse to display the following screen. Then click Send. 11 P-871M User's Guide 5 This is an example Xmodem configuration upload using HyperTerminal. Click Transfer, then Send File to search for it.
User Guide
Page 12
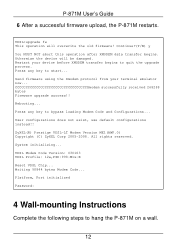
... XMODEM data transfer begins. Otherwise the device will overwrite the old firmware! Press any key to hang the P-871M on a wall. 12 CCCCCCCCCCCCCCCCCCCCCCCCCCCCCCCCCCXmodem successfully received 268288 bytes Firmware upgrade success!! System initializing... VDSL Modem Code Version: ...ZyXEL Corp 2005-2008. Press any key to quit the upgrade process. Send firmware using the Xmodem protocol from your device before XMODEM transfer begins to start... All rights reserved. Writing 98844 bytes Modem Code... Rebooting... VDSL>upgrade fw This operation will be damaged. P-871M...
... XMODEM data transfer begins. Otherwise the device will overwrite the old firmware! Press any key to hang the P-871M on a wall. 12 CCCCCCCCCCCCCCCCCCCCCCCCCCCCCCCCCCXmodem successfully received 268288 bytes Firmware upgrade success!! System initializing... VDSL Modem Code Version: ...ZyXEL Corp 2005-2008. Press any key to quit the upgrade process. Send firmware using the Xmodem protocol from your device before XMODEM transfer begins to start... All rights reserved. Writing 98844 bytes Modem Code... Rebooting... VDSL>upgrade fw This operation will be damaged. P-871M...
User Guide
Page 13
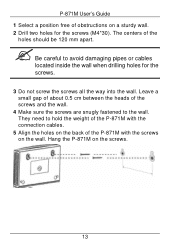
The centers of the screws and the wall. 4 Make sure the screws are snugly fastened to the wall. P-871M User's Guide 1 Select a position free of obstructions on a sturdy wall. 2 Drill two holes for the screws. 3 Do not screw the screws all the way into ... located inside the wall when drilling holes for the screws (M4*30). Hang the P-871M on the wall. " Be careful to hold the weight of the P-871M with the connection cables. 5 Align the holes on the back of the P-871M with the screws on the screws. 13 Leave a small gap of about 0.5 cm...
The centers of the screws and the wall. 4 Make sure the screws are snugly fastened to the wall. P-871M User's Guide 1 Select a position free of obstructions on a sturdy wall. 2 Drill two holes for the screws. 3 Do not screw the screws all the way into ... located inside the wall when drilling holes for the screws (M4*30). Hang the P-871M on the wall. " Be careful to hold the weight of the P-871M with the connection cables. 5 Align the holes on the back of the P-871M with the screws on the screws. 13 Leave a small gap of about 0.5 cm...
User Guide
Page 14
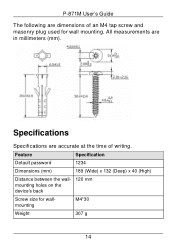
P-871M User's Guide The following are dimensions of writing. All measurements are accurate at the time of an M4 tap screw and masonry plug used for wallmounting M4*30 Weight 307 g 14 Specifications Specifications are in millimeters (mm). Feature Specification Default password 1234 Dimensions (mm) 189 (Wide) x 132 (Deep) x 40 (High) Distance between the wall- 120 mm mounting holes on the device's back Screw size for wall mounting.
P-871M User's Guide The following are dimensions of writing. All measurements are accurate at the time of an M4 tap screw and masonry plug used for wallmounting M4*30 Weight 307 g 14 Specifications Specifications are in millimeters (mm). Feature Specification Default password 1234 Dimensions (mm) 189 (Wide) x 132 (Deep) x 40 (High) Distance between the wall- 120 mm mounting holes on the device's back Screw size for wall mounting.
User Guide
Page 15
P-871M User's Guide Feature Ethernet Port DSL Port Console Port CO/CPE Switch Power Supply Operation Temperature Storage Temperature Operation Humidity Storage Humidity Specification One RJ-45, 10/100Mbps Half / Full Autonegotiation, Auto-crossover Ethernet port One RJ-45 port for the VDSL connection over POTS or ISDN One DB-9 female connector for configurations via the CLI Set the P-871M to work in CO mode or CPE mode 12 VDC @ 1A 0º C ~ 40º C -20º ~ 60º C 20% ~ 85% RH 20% ~ 90% RH 15
P-871M User's Guide Feature Ethernet Port DSL Port Console Port CO/CPE Switch Power Supply Operation Temperature Storage Temperature Operation Humidity Storage Humidity Specification One RJ-45, 10/100Mbps Half / Full Autonegotiation, Auto-crossover Ethernet port One RJ-45 port for the VDSL connection over POTS or ISDN One DB-9 female connector for configurations via the CLI Set the P-871M to work in CO mode or CPE mode 12 VDC @ 1A 0º C ~ 40º C -20º ~ 60º C 20% ~ 85% RH 20% ~ 90% RH 15
User Guide
Page 16
Features P-871M User's Guide VDSL Network Protocols • VDSL standard: ETSI/ANSI/ITU-T standard • Band Plan: 997 and 998 (Default:998) • VDSL Profile: 8a,12a (2,3,4 ...
Features P-871M User's Guide VDSL Network Protocols • VDSL standard: ETSI/ANSI/ITU-T standard • Band Plan: 997 and 998 (Default:998) • VDSL Profile: 8a,12a (2,3,4 ...
User Guide
Page 17
...230V AC in a wet basement or near water, for product news, firmware, documentation, and other risks. Related Documentation Please go to http://www.zyxel.com for example, in Europe). • Do NOT allow anything to rest on the power adaptor or cord and do NOT place the product where... for your device. Dispose of electric shock from the device and the power source. • Do NOT attempt to repair the power adaptor or cord. P-871M User's Guide • Do NOT use this product near a swimming pool. • Do NOT expose your device to dampness, dust or corrosive liquids....
...230V AC in a wet basement or near water, for product news, firmware, documentation, and other risks. Related Documentation Please go to http://www.zyxel.com for example, in Europe). • Do NOT allow anything to rest on the power adaptor or cord and do NOT place the product where... for your device. Dispose of electric shock from the device and the power source. • Do NOT attempt to repair the power adaptor or cord. P-871M User's Guide • Do NOT use this product near a swimming pool. • Do NOT expose your device to dampness, dust or corrosive liquids....

User Guide
Page 18
This is available at www.zyxel.com. • Download Library Search for the latest product updates and documentation...Doc Overview to find out how to efficiently use ZyXEL products and share your product. • Knowledge Base If you have a specific question about ZyXEL products. • Forum This contains discussions on ZyXEL products. More help is a collection of answers ... may be solved by the methods listed above, you bought the device. See http://www.zyxel.com/web/contact_us.php for the region in order to better understand how to previously asked questions about your ...
This is available at www.zyxel.com. • Download Library Search for the latest product updates and documentation...Doc Overview to find out how to efficiently use ZyXEL products and share your product. • Knowledge Base If you have a specific question about ZyXEL products. • Forum This contains discussions on ZyXEL products. More help is a collection of answers ... may be solved by the methods listed above, you bought the device. See http://www.zyxel.com/web/contact_us.php for the region in order to better understand how to previously asked questions about your ...
User Guide
Page 19
P-871M User's Guide have indications of ZyXEL. ZyXEL shall in no event be solely at the discretion of failure due to the purchaser. The Technical Writing Team, ZyXEL Communications Corp., 6 Innovation Road II, Science-Based Industrial Park, Hsinchu, 30099, Taiwan. Registration Register your device. •...; Brief description of any kind to faulty workmanship and/or materials, ZyXEL will be held liable for a particular use or purpose. This warranty is in lieu of all other warranties, express or implied, ...
P-871M User's Guide have indications of ZyXEL. ZyXEL shall in no event be solely at the discretion of failure due to the purchaser. The Technical Writing Team, ZyXEL Communications Corp., 6 Innovation Road II, Science-Based Industrial Park, Hsinchu, 30099, Taiwan. Registration Register your device. •...; Brief description of any kind to faulty workmanship and/or materials, ZyXEL will be held liable for a particular use or purpose. This warranty is in lieu of all other warranties, express or implied, ...
User Guide
Page 20
...or otherwise, without the prior written permission of ZyXEL Communications Corporation. The contents of others. Disclaimer ZyXEL does not assume any liability arising out of the..., or software described herein. Trademarks ZyNOS (ZyXEL Network Operating System) is subject to view from this publication are used for... identification purposes only and may not be properties of ZyXEL Communications, Inc. All rights reserved. Other trademarks mentioned... Product's Certification(s) 1 Go to www.zyxel.com. 2 Select your product from the drop-down list box on the ZyXEL home page to go to that product...
...or otherwise, without the prior written permission of ZyXEL Communications Corporation. The contents of others. Disclaimer ZyXEL does not assume any liability arising out of the..., or software described herein. Trademarks ZyNOS (ZyXEL Network Operating System) is subject to view from this publication are used for... identification purposes only and may not be properties of ZyXEL Communications, Inc. All rights reserved. Other trademarks mentioned... Product's Certification(s) 1 Go to www.zyxel.com. 2 Select your product from the drop-down list box on the ZyXEL home page to go to that product...