

User Guide
Page 11
...1.3.2 Corporation Network Application 30 Chapter 2 Hardware Installation and Initial Setup 32 2.1 Front Panel of the G-1000 32 2.2 Top Panel and Connections of the G-1000 33 2.2.1 One 10/100M Ethernet Port 34 2.2.2 Power Port 34 2.2.3 The RESET Button 34 2.2.4 Antennas...Requirements 35 2.5 Configuring Your G-1000 35 Chapter 3 Introducing the Web Configurator 36 3.1 Accessing the G-1000 Web Configurator 36 3.2 Resetting the G-1000 37 3.2.1 Procedure To Use The Reset Button 37 3.2.2 Method of Restoring Factory-Defaults 38 3.3 Navigating the G-1000 Web Configurator 38 Chapter 4 ...
...1.3.2 Corporation Network Application 30 Chapter 2 Hardware Installation and Initial Setup 32 2.1 Front Panel of the G-1000 32 2.2 Top Panel and Connections of the G-1000 33 2.2.1 One 10/100M Ethernet Port 34 2.2.2 Power Port 34 2.2.3 The RESET Button 34 2.2.4 Antennas...Requirements 35 2.5 Configuring Your G-1000 35 Chapter 3 Introducing the Web Configurator 36 3.1 Accessing the G-1000 Web Configurator 36 3.2 Resetting the G-1000 37 3.2.1 Procedure To Use The Reset Button 37 3.2.2 Method of Restoring Factory-Defaults 38 3.3 Navigating the G-1000 Web Configurator 38 Chapter 4 ...

User Guide
Page 13
G-1000 User's Guide 8.6 SNMP ...76 8.6.1 Supported MIBs 78 8.6.2 SNMP Traps 78 8.6.3 SNMP Interface Index 79 8.6.4 Configuring SNMP 79 Chapter 9 Log Screens...82 9.1 Configuring View Log 82 9.2 ... 10.5.1 Backup Configuration 91 10.5.2 Restore Configuration 91 10.5.3 Back to Factory Defaults 93 10.6 Restart Screen 93 Chapter 11 Introducing the SMT 94 11.1 Connect to your G-1000 Using Telnet 94 11.2 Changing the System Password 94 11.3 G-1000 SMT Menus Overview 95 11.4 Navigating the SMT Interface 96 Chapter 12 General...
G-1000 User's Guide 8.6 SNMP ...76 8.6.1 Supported MIBs 78 8.6.2 SNMP Traps 78 8.6.3 SNMP Interface Index 79 8.6.4 Configuring SNMP 79 Chapter 9 Log Screens...82 9.1 Configuring View Log 82 9.2 ... 10.5.1 Backup Configuration 91 10.5.2 Restore Configuration 91 10.5.3 Back to Factory Defaults 93 10.6 Restart Screen 93 Chapter 11 Introducing the SMT 94 11.1 Connect to your G-1000 Using Telnet 94 11.2 Changing the System Password 94 11.3 G-1000 SMT Menus Overview 95 11.4 Navigating the SMT Interface 96 Chapter 12 General...
User Guide
Page 26
... chapter introduces the main features and applications of the G-1000. 1.1 Introducing the G-1000 The G-1000 Access Point extends the range of your existing wired network without manual intervention. The G-1000 is easy to mobile users. Use this button to restore the factory default password to detect the speed of incoming transmissions and adjust appropriately without...
... chapter introduces the main features and applications of the G-1000. 1.1 Introducing the G-1000 The G-1000 Access Point extends the range of your existing wired network without manual intervention. The G-1000 is easy to mobile users. Use this button to restore the factory default password to detect the speed of incoming transmissions and adjust appropriately without...

User Guide
Page 34
...LED on the front panel turns on. 2.2.2 Power Port Connect the power adapter to the default settings. 34 Chapter 2 Hardware Installation and Initial Setup Note: When the G-1000 is a normal operation. Note: The G-1000 will be lost once you reset to the port labeled POWER 12VDC on the top panel... The RESET Button Hold this button in for about ten seconds (or until the Link LED turns red) to reboot and restore your G-1000 to factory default values. Note: All custom settings will reboot if the supplied power is autosensing, so you use the crossover cable provided or a straight-...
...LED on the front panel turns on. 2.2.2 Power Port Connect the power adapter to the default settings. 34 Chapter 2 Hardware Installation and Initial Setup Note: When the G-1000 is a normal operation. Note: The G-1000 will be lost once you reset to the port labeled POWER 12VDC on the top panel... The RESET Button Hold this button in for about ten seconds (or until the Link LED turns red) to reboot and restore your G-1000 to factory default values. Note: All custom settings will reboot if the supplied power is autosensing, so you use the crossover cable provided or a straight-...
User Guide
Page 36
...this is properly connected and prepare your computer/ computer network to connect to the G-1000 (refer to the Quick Start Guide). 2 Launch your password (highly recommended) as the password and click Login. The default IP address of its screens. Note: If you login. 36 Chapter 3 Introducing ...the Web Configurator Type a new password (and retype it to confirm) and click Apply or click Ignore. G-1000 User's Guide CHAPTER 3 Introducing the Web Configurator...
...this is properly connected and prepare your computer/ computer network to connect to the G-1000 (refer to the Quick Start Guide). 2 Launch your password (highly recommended) as the password and click Login. The default IP address of its screens. Note: If you login. 36 Chapter 3 Introducing ...the Web Configurator Type a new password (and retype it to confirm) and click Apply or click Ignore. G-1000 User's Guide CHAPTER 3 Introducing the Web Configurator...

User Guide
Page 37
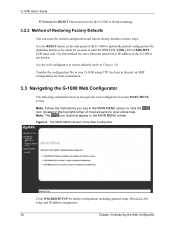
... will be reset to you. 3.2 Resetting the G-1000 If you forget your password or cannot access the web configurator, you will lose all configurations that the defaults have been restored and the G-1000 restarts. Note: The management session automatically times out when... the time period set in the Administrator Inactivity Timer field expires (default five minutes). Uploading this happens to 1234....
... will be reset to you. 3.2 Resetting the G-1000 If you forget your password or cannot access the web configurator, you will lose all configurations that the defaults have been restored and the G-1000 restarts. Note: The management session automatically times out when... the time period set in the Administrator Inactivity Timer field expires (default five minutes). Uploading this happens to 1234....
User Guide
Page 38
...: The icon does not appear in the part on the side panel of the G-1000 to upload the default configuration file (hold this method for cases when the password or IP address of the G-1000 is not known. Figure 6 The MAIN MENU Screen of most screens) to view ...address assignment. 38 Chapter 3 Introducing the Web Configurator G-1000 User's Guide 5 Release the RESET button and wait for the G-1000 to finish restarting. 3.2.2 Method of Restoring Factory-Defaults You can erase the current configuration and restore factory defaults in three ways: Use the RESET button on SMT configuration...
...: The icon does not appear in the part on the side panel of the G-1000 to upload the default configuration file (hold this method for cases when the password or IP address of the G-1000 is not known. Figure 6 The MAIN MENU Screen of most screens) to view ...address assignment. 38 Chapter 3 Introducing the Web Configurator G-1000 User's Guide 5 Release the RESET button and wait for the G-1000 to finish restarting. 3.2.2 Method of Restoring Factory-Defaults You can erase the current configuration and restore factory defaults in three ways: Use the RESET button on SMT configuration...
User Guide
Page 39
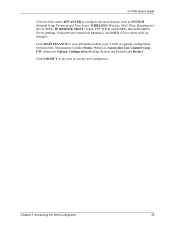
... Click the links under ADVANCED to view information about your G-1000 or upgrade configuration/ firmware files. Click MAINTENANCE to configure advanced features such as SYSTEM (General Setup, Password and Time Zone), WIRELESS (Wireless, MAC Filter, Roaming ... and Trusted User databases), and LOGS (View reports and Log Settings). Maintenance includes Status (Statistics), Association List, Channel Usage, F/W (firmware) Upload, Configuration (Backup, Restore and Default) and Restart Click LOGOUT at any time to exit the web configurator Chapter 3 Introducing the Web Configurator 39
... Click the links under ADVANCED to view information about your G-1000 or upgrade configuration/ firmware files. Click MAINTENANCE to configure advanced features such as SYSTEM (General Setup, Password and Time Zone), WIRELESS (Wireless, MAC Filter, Roaming ... and Trusted User databases), and LOGS (View reports and Log Settings). Maintenance includes Status (Statistics), Association List, Channel Usage, F/W (firmware) Upload, Configuration (Backup, Restore and Default) and Restart Click LOGOUT at any time to exit the web configurator Chapter 3 Introducing the Web Configurator 39

User Guide
Page 42
...to communicate with the least interference. Select this field on the G-1000, make sure the channel is only available when you change this option in order to encrypt data. The default key is entered automatically. G-1000 User's Guide Figure 8 Wizard 2: Wireless LAN Setup The following... table describes the labels in the G-1000. Select 64-bit WEP or 128-bit WEP to use the ...
...to communicate with the least interference. Select this field on the G-1000, make sure the channel is only available when you change this option in order to encrypt data. The default key is entered automatically. G-1000 User's Guide Figure 8 Wizard 2: Wireless LAN Setup The following... table describes the labels in the G-1000. Select 64-bit WEP or 128-bit WEP to use the ...

User Guide
Page 45
...A screen displays prompting you click Finish in to operate on your G-1000 to the web configurator again using the new IP address if you change the default IP address (192.168.1.2). You have successfully set up the G-1000. Chapter 4 Wizard Setup 45 You have successfully set up your network... When you to close the window and log in the Wizard 3 IP Address Assignment screen, a warning window display as shown. Click Yes. G-1000 User's Guide Table 8 Wizard 3: IP Address Assignment LABEL Back Finish DESCRIPTION Click Back to return to close the web browser. Click OK to ...
...A screen displays prompting you click Finish in to operate on your G-1000 to the web configurator again using the new IP address if you change the default IP address (192.168.1.2). You have successfully set up the G-1000. Chapter 4 Wizard Setup 45 You have successfully set up your network... When you to close the window and log in the Wizard 3 IP Address Assignment screen, a warning window display as shown. Click Yes. G-1000 User's Guide Table 8 Wizard 3: IP Address Assignment LABEL Back Finish DESCRIPTION Click Back to return to close the web browser. Click OK to ...

User Guide
Page 46
This name can be up to identify the G-1000 in this field blank or enter the domain name here if you have security risks. The default is not a required field. Figure 11 System General Setup The following table describes the labels in the Ethernet network. ...Administrator Inactivity Timer Type how many minutes a management session (either via the web configurator or SMT) can be left idle (not recommended). G-1000 User's Guide CHAPTER 5 System Screens 5.1 System Overview This section provides information on general system setup. 5.2 Configuring General Setup Click the SYSTEM ...
This name can be up to identify the G-1000 in this field blank or enter the domain name here if you have security risks. The default is not a required field. Figure 11 System General Setup The following table describes the labels in the Ethernet network. ...Administrator Inactivity Timer Type how many minutes a management session (either via the web configurator or SMT) can be left idle (not recommended). G-1000 User's Guide CHAPTER 5 System Screens 5.1 System Overview This section provides information on general system setup. 5.2 Configuring General Setup Click the SYSTEM ...

User Guide
Page 47
... screen allows you type. Click Apply to save your changes back to access it. Chapter 5 System Screens 47 The default setting is the default password). The screen appears as you type a password, the screen displays an asterisk (*) for each character you to reset the... G-1000. Enter the DNS server's IP address in order to the G-1000. Retype your G-1000's password (recommended), click the SYSTEM link under ADVANCED and then...
... screen allows you type. Click Apply to save your changes back to access it. Chapter 5 System Screens 47 The default setting is the default password). The screen appears as you type a password, the screen displays an asterisk (*) for each character you to reset the... G-1000. Enter the DNS server's IP address in order to the G-1000. Retype your G-1000's password (recommended), click the SYSTEM link under ADVANCED and then...

User Guide
Page 48
... 5 System Screens The main difference between them is day/month/year/time zone of your time server. The default, NTP (RFC 1305), is similar to enter the time and date manually. Check with your G-1000. New Time (hh:mm:ss) This field displays the last updated time from the time server. Select... to find a protocol that your ISP/network administrator or use trial and error to check with the time server. Each time you turn on your G-1000's time and date, click the SYSTEM link under ADVANCED and then the Time Setting tab. The screen appears as shown. Table 11 Time Setting LABEL...
... 5 System Screens The main difference between them is day/month/year/time zone of your time server. The default, NTP (RFC 1305), is similar to enter the time and date manually. Check with your G-1000. New Time (hh:mm:ss) This field displays the last updated time from the time server. Select... to find a protocol that your ISP/network administrator or use trial and error to check with the time server. Each time you turn on your G-1000's time and date, click the SYSTEM link under ADVANCED and then the Time Setting tab. The screen appears as shown. Table 11 Time Setting LABEL...

User Guide
Page 52
...network is accessible to any wireless networking device that is used for wireless stations Table 12 G-1000 Wireless Security Levels Security Level Least Secure Most Secure Security Type Unique SSID (Default) Unique SSID with Hide SSID Enabled MAC Address Filtering WEP Encryption IEEE802.1x EAP with ...bit or 128-bit WEP keys, but only one key can be enabled at any wireless security on your G-1000. It encrypts unicast and multicast communications in a network. Your G-1000 allows you do not enable any one time. EAP (Extensible Authentication Protocol) is within range. 6.3 Configuring the...
...network is accessible to any wireless networking device that is used for wireless stations Table 12 G-1000 Wireless Security Levels Security Level Least Secure Most Secure Security Type Unique SSID (Default) Unique SSID with Hide SSID Enabled MAC Address Filtering WEP Encryption IEEE802.1x EAP with ...bit or 128-bit WEP keys, but only one key can be enabled at any wireless security on your G-1000. It encrypts unicast and multicast communications in a network. Your G-1000 allows you do not enable any one time. EAP (Extensible Authentication Protocol) is within range. 6.3 Configuring the...

User Guide
Page 54
...data encryption. There are four data encryption keys to enable the Breathing LED, also known as they are Long, Short and Dynamic. The default key is entered automatically. Enable Breathing LED Select this check box to secure your data from eavesdropping by unauthorized wireless users. Choices are ... the WEP Encryption field, then enter any one time. Enable IntraBSS Traffic Intra-BSS traffic is the maximum data fragment size that the G-1000 transmits IEEE 802.11g wireless traffic only. You must be reduced. Authentication Select Auto, Open System or Shared Key from the drop-down...
...data encryption. There are four data encryption keys to enable the Breathing LED, also known as they are Long, Short and Dynamic. The default key is entered automatically. Enable Breathing LED Select this check box to secure your data from eavesdropping by unauthorized wireless users. Choices are ... the WEP Encryption field, then enter any one time. Enable IntraBSS Traffic Intra-BSS traffic is the maximum data fragment size that the G-1000 transmits IEEE 802.11g wireless traffic only. You must be reduced. Authentication Select Auto, Open System or Shared Key from the drop-down...

User Guide
Page 57
...Port # Apply Reset DESCRIPTION Select Yes from accessing the G-1000 (Deny Association). The default is assigned at the factory and consists of six pairs of the devices to configure this screen. The MAC address is 3517. To change your G-1000, click the WIRELESS link under ADVANCED and then the ...up to 32 devices (Allow Association) or exclude up to begin configuring this port is only available when you select Built-in the G-1000. The screen appears as shown. Click Apply to save your changes back to communicate roaming information between access points. Click Reset to 32...
...Port # Apply Reset DESCRIPTION Select Yes from accessing the G-1000 (Deny Association). The default is assigned at the factory and consists of six pairs of the devices to configure this screen. The MAC address is 3517. To change your G-1000, click the WIRELESS link under ADVANCED and then the ...up to 32 devices (Allow Association) or exclude up to begin configuring this port is only available when you select Built-in the G-1000. The screen appears as shown. Click Apply to save your changes back to communicate roaming information between access points. Click Reset to 32...

User Guide
Page 60
... RADIUS server looks as follows. A WPA(2) application example with RADIUS Application Example You need the IP address, port number (default is the RADIUS server. "A" is 1812) and shared secret of a RADIUS server. G-1000 User's Guide Figure 18 WPA(2) - "DS" is the distribution system (wired link to the LAN). 1 The AP passes the...
... RADIUS server looks as follows. A WPA(2) application example with RADIUS Application Example You need the IP address, port number (default is the RADIUS server. "A" is 1812) and shared secret of a RADIUS server. G-1000 User's Guide Figure 18 WPA(2) - "DS" is the distribution system (wired link to the LAN). 1 The AP passes the...

User Guide
Page 62
...Required. This is allowed. If your changes back to the wired network. No Authentication Required allows all wireless stations access to the G-1000. Select Authentication Required to display the next screen. 62 Chapter 6 Wireless LAN Click Apply to save your operating system does not ...without entering usernames and passwords. Click Reset to the wired network is the default setting. Not all wireless stations have to enter usernames and passwords before access to begin configuring this screen. G-1000 User's Guide Figure 20 Wireless LAN: 802.1x/WPA The following for IEEE...
...Required. This is allowed. If your changes back to the wired network. No Authentication Required allows all wireless stations access to the G-1000. Select Authentication Required to display the next screen. 62 Chapter 6 Wireless LAN Click Apply to save your operating system does not ...without entering usernames and passwords. Click Reset to the wired network is the default setting. Not all wireless stations have to enter usernames and passwords before access to begin configuring this screen. G-1000 User's Guide Figure 20 Wireless LAN: 802.1x/WPA The following for IEEE...

User Guide
Page 63
... needs to enter the username and password again before access to the wired network is 1800 seconds (30 minutes). The default time interval is the default setting. Figure 21 Wireless LAN: 802.1x/WPA for 802.1x Protocol LABEL DESCRIPTION Wireless Port Control To control wireless ...RADIUS server has priority. This field is activated only when you select Authentication Required. The default time interval is allowed. Table 17 Wireless LAN: 802.1x/WPA for 802.1x Protocol G-1000 User's Guide The following fields are only available when you select Authentication Required in the...
... needs to enter the username and password again before access to the wired network is 1800 seconds (30 minutes). The default time interval is the default setting. Figure 21 Wireless LAN: 802.1x/WPA for 802.1x Protocol LABEL DESCRIPTION Wireless Port Control To control wireless ...RADIUS server has priority. This field is activated only when you select Authentication Required. The default time interval is allowed. Table 17 Wireless LAN: 802.1x/WPA for 802.1x Protocol G-1000 User's Guide The following fields are only available when you select Authentication Required in the...

User Guide
Page 65
Figure 22 Wireless LAN: 802.1x/WPA for WPA Protocol G-1000 User's Guide The following table describes the labels not previously discussed Table 18 Wireless LAN: 802.1x/WPA for WPA Protocol LABEL DESCRIPTIONS Key Management ... Click Apply to save your changes back to display the next screen. Reset Click Reset to begin configuring this field. Chapter 6 Wireless LAN 65 The G-1000 default is disabled. Setting of automatically changing the WEP key for information on a periodic basis. Protocol WPA Group Key Update Timer The WPA Group Key Update...
Figure 22 Wireless LAN: 802.1x/WPA for WPA Protocol G-1000 User's Guide The following table describes the labels not previously discussed Table 18 Wireless LAN: 802.1x/WPA for WPA Protocol LABEL DESCRIPTIONS Key Management ... Click Apply to save your changes back to display the next screen. Reset Click Reset to begin configuring this field. Chapter 6 Wireless LAN 65 The G-1000 default is disabled. Setting of automatically changing the WEP key for information on a periodic basis. Protocol WPA Group Key Update Timer The WPA Group Key Update...
