

User Guide
Page 11
... 1.3.2 Corporation Network Application 30 Chapter 2 Hardware Installation and Initial Setup 32 2.1 Front Panel of the G-1000 32 2.2 Top Panel and Connections of the G-1000 33 2.2.1 One 10/100M Ethernet Port 34 2.2.2 Power Port 34 2.2.3 The RESET Button 34 2.2.4 Antennas... the G-1000 Web Configurator 38 Chapter 4 Wizard Setup ...40 4.1 Wizard Setup Overview 40 4.1.1 Channel ...40 4.1.2 ESS ID ...40 4.1.3 WEP Encryption 40 4.2 Wizard Setup: General Setup 41 4.3 Wizard Setup: Wireless LAN 41 4.4 Wizard Setup: IP Address 43 4.4.1 IP Address Assignment 43 4.4.2 IP Address and Subnet...
... 1.3.2 Corporation Network Application 30 Chapter 2 Hardware Installation and Initial Setup 32 2.1 Front Panel of the G-1000 32 2.2 Top Panel and Connections of the G-1000 33 2.2.1 One 10/100M Ethernet Port 34 2.2.2 Power Port 34 2.2.3 The RESET Button 34 2.2.4 Antennas... the G-1000 Web Configurator 38 Chapter 4 Wizard Setup ...40 4.1 Wizard Setup Overview 40 4.1.1 Channel ...40 4.1.2 ESS ID ...40 4.1.3 WEP Encryption 40 4.2 Wizard Setup: General Setup 41 4.3 Wizard Setup: Wireless LAN 41 4.4 Wizard Setup: IP Address 43 4.4.1 IP Address Assignment 43 4.4.2 IP Address and Subnet...
User Guide
Page 12
... 6.2 Wireless Security Overview 50 6.2.1 Encryption 50 6.2.2 Authentication 50 6.2.3 Restricted Access 51 6.2.4 Hide G-1000 Identity 51 6.2.5 Configuring Wireless LAN on the G-1000 51 6.3 Configuring the Wireless Screen 52 6.3.1 WEP Encryption 52 6.4 Configuring Roaming 55 6.4.1 Requirements for... 6.7.5 Authentication Required: WPA2-PSK 67 6.8 Configuring RADIUS 68 Chapter 7 IP Screen...70 7.1 TCP/IP Parameters 70 7.1.1 IP Address and Subnet Mask 70 7.1.2 WAN IP Address Assignment 70 7.2 Configuring IP ...71 Chapter 8 Remote Management Screens 72 8.1 Remote Management Overview 72...
... 6.2 Wireless Security Overview 50 6.2.1 Encryption 50 6.2.2 Authentication 50 6.2.3 Restricted Access 51 6.2.4 Hide G-1000 Identity 51 6.2.5 Configuring Wireless LAN on the G-1000 51 6.3 Configuring the Wireless Screen 52 6.3.1 WEP Encryption 52 6.4 Configuring Roaming 55 6.4.1 Requirements for... 6.7.5 Authentication Required: WPA2-PSK 67 6.8 Configuring RADIUS 68 Chapter 7 IP Screen...70 7.1 TCP/IP Parameters 70 7.1.1 IP Address and Subnet Mask 70 7.1.2 WAN IP Address Assignment 70 7.2 Configuring IP ...71 Chapter 8 Remote Management Screens 72 8.1 Remote Management Overview 72...

User Guide
Page 15
G-1000 User's Guide Troubleshooting 136 Appendix B Specifications...138 Appendix C Brute-Force Password Guessing Protection 140 Appendix D Setting up Your Computer's IP Address 142 Appendix E IP Address Assignment Conflicts 154 Appendix F Wireless LANs ...158 Appendix G IP Subnetting ...170 Appendix H Command Interpreter 178 Appendix I Log Descriptions 180 Appendix J Antenna Selection and Positioning Recommendation 184 Appendix K Power Adaptor Specifications 186 15
G-1000 User's Guide Troubleshooting 136 Appendix B Specifications...138 Appendix C Brute-Force Password Guessing Protection 140 Appendix D Setting up Your Computer's IP Address 142 Appendix E IP Address Assignment Conflicts 154 Appendix F Wireless LANs ...158 Appendix G IP Subnetting ...170 Appendix H Command Interpreter 178 Appendix I Log Descriptions 180 Appendix J Antenna Selection and Positioning Recommendation 184 Appendix K Power Adaptor Specifications 186 15

User Guide
Page 16
... 30 Figure 2 Corporation Network Application 30 Figure 3 G-1000 Front Panel 32 Figure 4 G-1000 Top Panel 34 Figure 5 Change Password Screen 37 Figure 6 The MAIN MENU Screen of the Web Configurator 38 Figure 7 Wizard 1: General Setup 41 Figure 8 Wizard 2: Wireless LAN Setup 42 Figure 9 Wizard 3: IP Address Assignment 44 Figure 10 Wizard 4: Setup Complete 45...
... 30 Figure 2 Corporation Network Application 30 Figure 3 G-1000 Front Panel 32 Figure 4 G-1000 Top Panel 34 Figure 5 Change Password Screen 37 Figure 6 The MAIN MENU Screen of the Web Configurator 38 Figure 7 Wizard 1: General Setup 41 Figure 8 Wizard 2: Wireless LAN Setup 42 Figure 9 Wizard 3: IP Address Assignment 44 Figure 10 Wizard 4: Setup Complete 45...
User Guide
Page 18
G-1000 User's Guide Figure 80 Menu 24 System Maintenance 131 Figure 81 Valid CI Commands 131 Figure 82 Menu 24.10 System Maintenance: Time and Date Setting 132 Figure 83 Telnet Configuration on a TCP/IP Network 133 Figure 84 Menu 24.11 Remote Management Control 134 Figure ...Figure 96 Macintosh OS X: Apple Menu 151 Figure 97 Macintosh OS X: Network 152 Figure 98 IP Address Conflicts: Case A 154 Figure 99 IP Address Conflicts: Case B 155 Figure 100 IP Address Conflicts: Case C 155 Figure 101 IP Address Conflicts: Case D 156 Figure 102 Peer-to-Peer Communication in an Ad-hoc Network 158...
G-1000 User's Guide Figure 80 Menu 24 System Maintenance 131 Figure 81 Valid CI Commands 131 Figure 82 Menu 24.10 System Maintenance: Time and Date Setting 132 Figure 83 Telnet Configuration on a TCP/IP Network 133 Figure 84 Menu 24.11 Remote Management Control 134 Figure ...Figure 96 Macintosh OS X: Apple Menu 151 Figure 97 Macintosh OS X: Network 152 Figure 98 IP Address Conflicts: Case A 154 Figure 99 IP Address Conflicts: Case B 155 Figure 100 IP Address Conflicts: Case C 155 Figure 101 IP Address Conflicts: Case D 156 Figure 102 Peer-to-Peer Communication in an Ad-hoc Network 158...
User Guide
Page 20
...11g ...28 Table 3 Front Panel LED Description 33 Table 4 G-1000 Wireless LAN Coverage 35 Table 5 Wizard 1: General Setup 41 Table 6 Wizard 2: Wireless LAN Setup 42 Table 7 Private IP Address Ranges 43 Table 8 Wizard 3: IP Address Assignment 44 Table 9 System General Setup 46 Table 10 Password ...47... Table 11 Time Setting ...48 Table 12 G-1000 Wireless Security Levels 52 Table 13 Wireless ...53 Table 14 Roaming...
...11g ...28 Table 3 Front Panel LED Description 33 Table 4 G-1000 Wireless LAN Coverage 35 Table 5 Wizard 1: General Setup 41 Table 6 Wizard 2: Wireless LAN Setup 42 Table 7 Private IP Address Ranges 43 Table 8 Wizard 3: IP Address Assignment 44 Table 9 System General Setup 46 Table 10 Password ...47... Table 11 Time Setting ...48 Table 12 G-1000 Wireless Security Levels 52 Table 13 Wireless ...53 Table 14 Roaming...
User Guide
Page 21
... Table 71 Allowed IP Address Range By Class 171 Table 72 "Natural" Masks 171 Table 73 Alternative Subnet Mask Notation 172 Table 74 Two Subnets Example 172 Table 75 Subnet 1 ...173 Table 76 Subnet 2 ...173 Table 77 Subnet 1 ...174 Table 78 Subnet 2 ...174 Table 79 Subnet 3 ...174 21 G-1000 User's Guide Table 37...
... Table 71 Allowed IP Address Range By Class 171 Table 72 "Natural" Masks 171 Table 73 Alternative Subnet Mask Notation 172 Table 74 Two Subnets Example 172 Table 75 Subnet 1 ...173 Table 76 Subnet 2 ...173 Table 77 Subnet 1 ...174 Table 78 Subnet 2 ...174 Table 79 Subnet 3 ...174 21 G-1000 User's Guide Table 37...
User Guide
Page 26
... Features 1.2.1.1 10/100M Auto-negotiating Ethernet/Fast Ethernet Interface This auto-negotiating feature allows the G-1000 to 1234; IP address to 192.168.1.2, subnet mask to 255.255.255.0. 26 Chapter 1 Getting to install and configure. It allows data transfer of either 10 Mbps or ...
... Features 1.2.1.1 10/100M Auto-negotiating Ethernet/Fast Ethernet Interface This auto-negotiating feature allows the G-1000 to 1234; IP address to 192.168.1.2, subnet mask to 255.255.255.0. 26 Chapter 1 Getting to install and configure. It allows data transfer of either 10 Mbps or ...
User Guide
Page 36
...2 Launch your password (highly recommended) as the password and click Login. G-1000 User's Guide CHAPTER 3 Introducing the Web Configurator This chapter describes how to confirm) and click Apply or click Ignore. The default IP address of its screens. Note: If you login. 36 Chapter 3 Introducing the... Web Configurator if this is properly connected and prepare your computer/ computer network to connect to the G-1000 (refer to change the password, the following...
...2 Launch your password (highly recommended) as the password and click Login. G-1000 User's Guide CHAPTER 3 Introducing the Web Configurator This chapter describes how to confirm) and click Apply or click Ignore. The default IP address of its screens. Note: If you login. 36 Chapter 3 Introducing the... Web Configurator if this is properly connected and prepare your computer/ computer network to connect to the G-1000 (refer to change the password, the following...
User Guide
Page 38
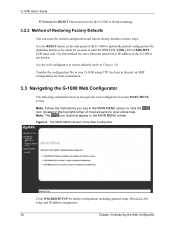
... upload the default configuration file (hold this method for cases when the password or IP address of the G-1000 is not known. G-1000 User's Guide 5 Release the RESET button and wait for the G-1000 to finish restarting. 3.2.2 Method of Restoring Factory-Defaults You can erase the current configuration and restore factory defaults in three ways...
... upload the default configuration file (hold this method for cases when the password or IP address of the G-1000 is not known. G-1000 User's Guide 5 Release the RESET button and wait for the G-1000 to finish restarting. 3.2.2 Method of Restoring Factory-Defaults You can erase the current configuration and restore factory defaults in three ways...
User Guide
Page 43
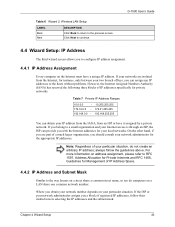
... you obtain your network number depends on your local networks. G-1000 User's Guide 4.4 Wizard Setup: IP Address The third wizard screen allows you belong to a small organization and your network administrator for your particular situation. If you to configure IP address assignment. 4.4.1 IP Address Assignment Every computer on address assignment, please refer to the way houses on a LAN...
... you obtain your network number depends on your local networks. G-1000 User's Guide 4.4 Wizard Setup: IP Address The third wizard screen allows you belong to a small organization and your network administrator for your particular situation. If you to configure IP address assignment. 4.4.1 IP Address Assignment Every computer on address assignment, please refer to the way houses on a LAN...
User Guide
Page 44
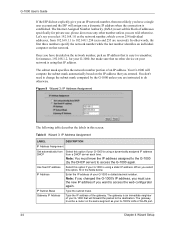
... option if your network is using a static IP address. Figure 9 Wizard 3: IP Address Assignment The following table describes the labels in the fields below. Use fixed IP address Select this option if your G-1000 in dotted decimal notation. Note: If you changed the G-1000's IP address, you must use ; IP Subnet Mask Gateway IP Address Type the subnet mask. The subnet mask specifies...
... option if your network is using a static IP address. Figure 9 Wizard 3: IP Address Assignment The following table describes the labels in the fields below. Use fixed IP address Select this option if your G-1000 in dotted decimal notation. Note: If you changed the G-1000's IP address, you must use ; IP Subnet Mask Gateway IP Address Type the subnet mask. The subnet mask specifies...

User Guide
Page 45
... close the window and log in the Wizard 3 IP Address Assignment screen, a warning window display as shown. A screen displays prompting you change the default IP address (192.168.1.2). You have successfully set up the G-1000. Click OK to operate on your network and access the Internet. ...Click Yes. Otherwise, click No and the congratulations screen shows next. Chapter 4 Wizard Setup 45 G-1000 User's Guide Table 8 Wizard 3: IP Address Assignment LABEL Back Finish DESCRIPTION Click Back to return to close the web browser. Figure 10 Wizard 4: Setup Complete Well...
... close the window and log in the Wizard 3 IP Address Assignment screen, a warning window display as shown. A screen displays prompting you change the default IP address (192.168.1.2). You have successfully set up the G-1000. Click OK to operate on your network and access the Internet. ...Click Yes. Otherwise, click No and the congratulations screen shows next. Chapter 4 Wizard Setup 45 G-1000 User's Guide Table 8 Wizard 3: IP Address Assignment LABEL Back Finish DESCRIPTION Click Back to return to close the web browser. Figure 10 Wizard 4: Setup Complete Well...

User Guide
Page 47
.... If you set to 0.0.0.0, User-Defined changes to None after you have the IP address of a machine in your DHCP server dynamically assigns DNS server information (and the G-1000's Ethernet IP address). The default setting is the default password). This screen allows you type. Table ... to access it. Retype your password (or the G-1000 IP address), you chose User-Defined, but leave the IP address set a second choice to User-Defined, and enter the same IP address, the second User-Defined changes to save your G-1000's password (recommended), click the SYSTEM link under ADVANCED...
.... If you set to 0.0.0.0, User-Defined changes to None after you have the IP address of a machine in your DHCP server dynamically assigns DNS server information (and the G-1000's Ethernet IP address). The default setting is the default password). This screen allows you type. Table ... to access it. Retype your password (or the G-1000 IP address), you chose User-Defined, but leave the IP address set a second choice to User-Defined, and enter the same IP address, the second User-Defined changes to save your G-1000's password (recommended), click the SYSTEM link under ADVANCED...

User Guide
Page 48
...then the Time Setting tab. Not all time servers support all protocols, so you may have to configure the G1000's time based on the G-1000. Figure 13 Time Setting The following table describes the labels in this screen. The default, NTP (RFC 1305), is similar to enter the ...format displays a 4-byte integer giving the total number of this page, the G-1000 synchronizes the time with your local time zone. Select None to Time (RFC 868). Check with the time server. Time Server Address Enter the IP address or the URL of your time server. Current Time (hh:mm:ss) This ...
...then the Time Setting tab. Not all time servers support all protocols, so you may have to configure the G1000's time based on the G-1000. Figure 13 Time Setting The following table describes the labels in this screen. The default, NTP (RFC 1305), is similar to enter the ...format displays a 4-byte integer giving the total number of this page, the G-1000 synchronizes the time with your local time zone. Select None to Time (RFC 868). Check with the time server. Time Server Address Enter the IP address or the URL of your time server. Current Time (hh:mm:ss) This ...

User Guide
Page 56
G-1000 User's Guide Figure 15 Roaming Example The steps below describe the roaming process. 1 As wireless station Y moves from the coverage area of access point AP 1 ... points must use the same port number to relay roaming information. 5 The access points must be connected to the Ethernet and be able to get IP addresses from a DHCP server if using dynamic IP address assignment. 56 Chapter 6 Wireless LAN
G-1000 User's Guide Figure 15 Roaming Example The steps below describe the roaming process. 1 As wireless station Y moves from the coverage area of access point AP 1 ... points must use the same port number to relay roaming information. 5 The access points must be connected to the Ethernet and be able to get IP addresses from a DHCP server if using dynamic IP address assignment. 56 Chapter 6 Wireless LAN

User Guide
Page 60
... is the RADIUS server. PSK Authentication 6.6.2 WPA(2) with an external RADIUS server looks as follows. A WPA(2) application example with RADIUS Application Example You need the IP address, port number (default is 1812) and shared secret of a RADIUS server. "A" is wirelessly transmitted between the AP and the wireless clients 60 Chapter 6 Wireless LAN...
... is the RADIUS server. PSK Authentication 6.6.2 WPA(2) with an external RADIUS server looks as follows. A WPA(2) application example with RADIUS Application Example You need the IP address, port number (default is 1812) and shared secret of a RADIUS server. "A" is wirelessly transmitted between the AP and the wireless clients 60 Chapter 6 Wireless LAN...
User Guide
Page 69
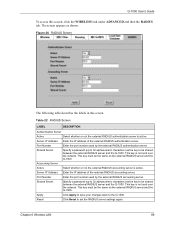
... characters) as shown. Reset Click Reset to the G-1000. G-1000 User's Guide To access this screen. Chapter 6 Wireless LAN 69 Server IP Address Enter the IP address of the external RADIUS accounting server. Server IP Address Enter the IP address of the external RADIUS authentication server. Apply Click Apply ... by the external RADIUS accounting server. This key must be the same on the external RADIUS server and the G-1000. Table 22 RADIUS Screen LABEL DESCRIPTION Authentication Server Active Select whether or not the external RADIUS authentication server is active...
... characters) as shown. Reset Click Reset to the G-1000. G-1000 User's Guide To access this screen. Chapter 6 Wireless LAN 69 Server IP Address Enter the IP address of the external RADIUS accounting server. Server IP Address Enter the IP address of the external RADIUS authentication server. Apply Click Apply ... by the external RADIUS accounting server. This key must be the same on the external RADIUS server and the G-1000. Table 22 RADIUS Screen LABEL DESCRIPTION Authentication Server Active Select whether or not the external RADIUS authentication server is active...

User Guide
Page 70
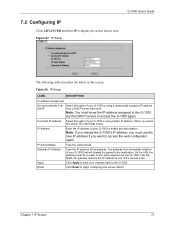
....255.0 (24 bits) These parameters should consult your local networks. The Ethernet parameters of installations. 7.1.2 WAN IP Address Assignment Every computer on the G-1000 7.1 TCP/IP Parameters 7.1.1 IP Address and Subnet Mask See the IP Address and Subnet Mask section in the factory with the Internet addresses for your network administrator for this information. always follow the guidelines above...
....255.0 (24 bits) These parameters should consult your local networks. The Ethernet parameters of installations. 7.1.2 WAN IP Address Assignment Every computer on the G-1000 7.1 TCP/IP Parameters 7.1.1 IP Address and Subnet Mask See the IP Address and Subnet Mask section in the factory with the Internet addresses for your network administrator for this information. always follow the guidelines above...
User Guide
Page 71
... to access the G-1000 again. Use fixed IP address Select this option if your G-1000 is using a static IP address. Note: You must be the IP address of one of the gateway. Click Apply to save your G-1000 that will forward the packet to the G-1000. The gateway is an immediate neighbor of your G-1000; IP Address Enter the IP address of your changes back...
... to access the G-1000 again. Use fixed IP address Select this option if your G-1000 is using a static IP address. Note: You must be the IP address of one of the gateway. Click Apply to save your G-1000 that will forward the packet to the G-1000. The gateway is an immediate neighbor of your G-1000; IP Address Enter the IP address of your changes back...


