
User Guide
Page 10
... Statement 3 Safety Warnings ...5 ZyXEL Limited Warranty 6 Customer Support...7 Preface ...24 Chapter 1 Getting to Know Your G-1000 26 1.1 Introducing the G-1000 26 1.2 G-1000 Features 26 1.2.1 Physical Features 26 1.2.1.1 10/100M Auto-negotiating Ethernet/Fast Ethernet Interface ...........26 1.2.1.2 10/100M Auto-crossover Ethernet/Fast Ethernet Interface 26 1.2.1.3 Reset Button 26 1.2.1.4 G-1000 LED 27 1.2.2 Firmware Features... 29 1.2.2.13 Logging and Tracing 29 1.2.2.14 Embedded FTP and TFTP Servers 29 1.2.2.15 Wireless Association List 29 1.3 Applications for the G-1000 29 10
... Statement 3 Safety Warnings ...5 ZyXEL Limited Warranty 6 Customer Support...7 Preface ...24 Chapter 1 Getting to Know Your G-1000 26 1.1 Introducing the G-1000 26 1.2 G-1000 Features 26 1.2.1 Physical Features 26 1.2.1.1 10/100M Auto-negotiating Ethernet/Fast Ethernet Interface ...........26 1.2.1.2 10/100M Auto-crossover Ethernet/Fast Ethernet Interface 26 1.2.1.3 Reset Button 26 1.2.1.4 G-1000 LED 27 1.2.2 Firmware Features... 29 1.2.2.13 Logging and Tracing 29 1.2.2.14 Embedded FTP and TFTP Servers 29 1.2.2.15 Wireless Association List 29 1.3 Applications for the G-1000 29 10

User Guide
Page 11
... 35 2.3 Hardware Mounting Options 35 2.4 Additional Installation Requirements 35 2.5 Configuring Your G-1000 35 Chapter 3 Introducing the Web Configurator 36 3.1 Accessing the G-1000 Web Configurator 36 3.2 Resetting the G-1000 37 3.2.1 Procedure To Use The Reset Button 37 3.2.2 Method of Restoring Factory-Defaults 38 3.3 Navigating the G-1000 Web Configurator 38 Chapter 4 Wizard Setup ...40 4.1 Wizard Setup Overview 40...
... 35 2.3 Hardware Mounting Options 35 2.4 Additional Installation Requirements 35 2.5 Configuring Your G-1000 35 Chapter 3 Introducing the Web Configurator 36 3.1 Accessing the G-1000 Web Configurator 36 3.2 Resetting the G-1000 37 3.2.1 Procedure To Use The Reset Button 37 3.2.2 Method of Restoring Factory-Defaults 38 3.3 Navigating the G-1000 Web Configurator 38 Chapter 4 Wizard Setup ...40 4.1 Wizard Setup Overview 40...

User Guide
Page 17
...77 System Maintenance: Starting Xmodem Download Screen 129 Figure 78 Backup Configuration Example 129 Figure 79 Successful Backup Confirmation Screen 129 17 G-1000 User's Guide Figure 37 System Status: Show Statistics 87 Figure 38 Association List 88 Figure 39 Firmware Upload 89 Figure 40 Firmware...Configuration ...91 Figure 44 Configuration Upload Successful 92 Figure 45 Network Temporarily Disconnected 92 Figure 46 Configuration Upload Error 93 Figure 47 Reset Warning Message 93 Figure 48 Restart Screen ...93 Figure 49 Login Screen ...94 Figure 50 Menu 23.1 System Security: Change Password...
...77 System Maintenance: Starting Xmodem Download Screen 129 Figure 78 Backup Configuration Example 129 Figure 79 Successful Backup Confirmation Screen 129 17 G-1000 User's Guide Figure 37 System Status: Show Statistics 87 Figure 38 Association List 88 Figure 39 Firmware Upload 89 Figure 40 Firmware...Configuration ...91 Figure 44 Configuration Upload Successful 92 Figure 45 Network Temporarily Disconnected 92 Figure 46 Configuration Upload Error 93 Figure 47 Reset Warning Message 93 Figure 48 Restart Screen ...93 Figure 49 Login Screen ...94 Figure 50 Menu 23.1 System Security: Change Password...
User Guide
Page 26
...10 Mbps or 100 Mbps in either half-duplex or full-duplex mode depending on your G-1000 is backward-compatible with a straight-through or crossover Ethernet cable. 1.2.1.3 Reset Button The G-1000 reset button is easy to install and configure. IP address to 192.168.1.2, subnet mask to ...255.255.255.0. 26 Chapter 1 Getting to 1234; The G-1000 incorporates the IEEE802.11g standard for high-speed wireless transmission. The G-1000 is built into the ...
...10 Mbps or 100 Mbps in either half-duplex or full-duplex mode depending on your G-1000 is backward-compatible with a straight-through or crossover Ethernet cable. 1.2.1.3 Reset Button The G-1000 reset button is easy to install and configure. IP address to 192.168.1.2, subnet mask to ...255.255.255.0. 26 Chapter 1 Getting to 1234; The G-1000 incorporates the IEEE802.11g standard for high-speed wireless transmission. The G-1000 is built into the ...

User Guide
Page 34
... appendix for more information. 2.2.3 The RESET Button Hold this button in for about ten seconds (or until the Link LED turns red) to reboot and restore your G1000 which then automatically turns on the top panel of your G-1000 to the default settings. 34 Chapter ...2 Hardware Installation and Initial Setup G-1000 User's Guide Figure 4 G-1000 Top Panel 2.2.1 One 10/100M Ethernet Port Ethernet 10Base-T/100Base-T networks use the supplied power...
... appendix for more information. 2.2.3 The RESET Button Hold this button in for about ten seconds (or until the Link LED turns red) to reboot and restore your G1000 which then automatically turns on the top panel of your G-1000 to the default settings. 34 Chapter ...2 Hardware Installation and Initial Setup G-1000 User's Guide Figure 4 G-1000 Top Panel 2.2.1 One 10/100M Ethernet Port Ethernet 10Base-T/100Base-T networks use the supplied power...

User Guide
Page 37
...LED is now restarting. This indicates that you will be reset to you. 3.2 Resetting the G-1000 If you forget your password or cannot access the web configurator, you had previously. Simply log back into the G-1000 if this configuration file replaces the current configuration file with ...-default configuration file or use the RESET button on . 4 Continue to step 2. 2 Turn the G-1000 off. 3 While pressing the RESET button, turn the G-1000 on the side panel of the G-1000. Otherwise, go to hold the RESET button. Figure 5 Change Password Screen G-1000 User's Guide You should now see...
...LED is now restarting. This indicates that you will be reset to you. 3.2 Resetting the G-1000 If you forget your password or cannot access the web configurator, you had previously. Simply log back into the G-1000 if this configuration file replaces the current configuration file with ...-default configuration file or use the RESET button on . 4 Continue to step 2. 2 Turn the G-1000 off. 3 While pressing the RESET button, turn the G-1000 on the side panel of the G-1000. Otherwise, go to hold the RESET button. Figure 5 Change Password Screen G-1000 User's Guide You should now see...
User Guide
Page 38
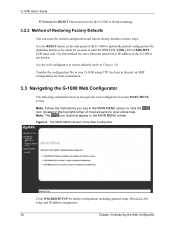
...SETUP for about 10 seconds or until the SYS LED, LINK LED or BDG/RPT LED turns red). G-1000 User's Guide 5 Release the RESET button and wait for the G-1000 to finish restarting. 3.2.2 Method of Restoring Factory-Defaults You can erase the current configuration and restore factory ...defaults in three ways: Use the RESET button on SMT configuration for more information. 3.3 Navigating the G-1000 Web Configurator The following summarizes how to your G-1000 using FTP. Use the web configurator to restore defaults (refer to upload the ...
...SETUP for about 10 seconds or until the SYS LED, LINK LED or BDG/RPT LED turns red). G-1000 User's Guide 5 Release the RESET button and wait for the G-1000 to finish restarting. 3.2.2 Method of Restoring Factory-Defaults You can erase the current configuration and restore factory ...defaults in three ways: Use the RESET button on SMT configuration for more information. 3.3 Navigating the G-1000 Web Configurator The following summarizes how to your G-1000 using FTP. Use the web configurator to restore defaults (refer to upload the ...

User Guide
Page 47
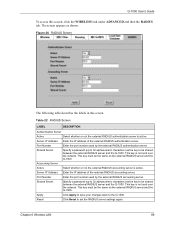
...click the SYSTEM link under ADVANCED and then the Password tab. Retype your DHCP server dynamically assigns DNS server information (and the G-1000's Ethernet IP address). Click Reset to the right displays the (read-only) DNS server IP address that as shown. Chapter 5 System Screens 47 The field to...allows you must know the IP address of a DNS server. If you do not want to None after you click Apply. See the Resetting the G-1000 section for details Figure 12 Password. If you set to 0.0.0.0, User-Defined changes to access it. If you chose User-Defined, but ...
...click the SYSTEM link under ADVANCED and then the Password tab. Retype your DHCP server dynamically assigns DNS server information (and the G-1000's Ethernet IP address). Click Reset to the right displays the (read-only) DNS server IP address that as shown. Chapter 5 System Screens 47 The field to...allows you must know the IP address of a DNS server. If you do not want to None after you click Apply. See the Resetting the G-1000 section for details Figure 12 Password. If you set to 0.0.0.0, User-Defined changes to access it. If you chose User-Defined, but ...

User Guide
Page 49
... the date with the time server. G-1000 User's Guide Table 11 Time Setting LABEL Current Date (yyyy/ mm/dd) New Date (yyyy/mm/ dd) Time Zone Daylight Savings Start Date (mm-dd) End Date (mm-dd) Apply Reset DESCRIPTION This field displays the date of your location. When you select None ... starts on if you reload this screen. Choose the time zone of your daylight-savings time ends on if you use daylight savings time. Click Reset to give more daytime light in this option if you selected Daylight Savings. Daylight saving is a period from the time server. Click Apply to ...
... the date with the time server. G-1000 User's Guide Table 11 Time Setting LABEL Current Date (yyyy/ mm/dd) New Date (yyyy/mm/ dd) Time Zone Daylight Savings Start Date (mm-dd) End Date (mm-dd) Apply Reset DESCRIPTION This field displays the date of your location. When you select None ... starts on if you reload this screen. Choose the time zone of your daylight-savings time ends on if you use daylight savings time. Click Reset to give more daytime light in this option if you selected Daylight Savings. Daylight saving is a period from the time server. Click Apply to ...

User Guide
Page 54
...stations to communicate with the access points without any 5 characters (ASCII string) or 13 hexadecimal characters ("0-9", "A-F"). The transmission rate of your G-1000 might be preceded by 0x for each key. Type the maximum frame burst between 800 and 2432. Apply Click Apply to enable Intra-BSS traffic.... Reset Click Reset to begin configuring this check box to save your data from the drop-down list box. WEP Encryption WEP (Wired Equivalent Privacy) ...
...stations to communicate with the access points without any 5 characters (ASCII string) or 13 hexadecimal characters ("0-9", "A-F"). The transmission rate of your G-1000 might be preceded by 0x for each key. Type the maximum frame burst between 800 and 2432. Apply Click Apply to enable Intra-BSS traffic.... Reset Click Reset to begin configuring this check box to save your data from the drop-down list box. WEP Encryption WEP (Wired Equivalent Privacy) ...

User Guide
Page 57
... each interface. No matter whether you have the same ESSID to allow roaming. Table 14 Roaming LABEL Active Port # Apply Reset DESCRIPTION Select Yes from accessing the G-1000 (Deny Association). Make sure this port is assigned at the factory and consists of six pairs of the devices to configure ... devices from the drop-down list box is 3517. Click Reset to begin configuring this screen. The WLAN Adapter drop down list box to enable roaming on the G-1000 if you select Built-in the G-1000. To change your G-1000, click the WIRELESS link under ADVANCED and then the MAC ...
... each interface. No matter whether you have the same ESSID to allow roaming. Table 14 Roaming LABEL Active Port # Apply Reset DESCRIPTION Select Yes from accessing the G-1000 (Deny Association). Make sure this port is assigned at the factory and consists of six pairs of the devices to configure ... devices from the drop-down list box is 3517. Click Reset to begin configuring this screen. The WLAN Adapter drop down list box to enable roaming on the G-1000 if you select Built-in the G-1000. To change your G-1000, click the WIRELESS link under ADVANCED and then the MAC ...

User Guide
Page 58
...these address fields. Enter the MAC addresses (in XX:XX:XX:XX:XX:XX format) of MAC addresses in the MAC address filter table. G-1000 User's Guide Figure 17 MAC Address Filter The following table describes the labels in this screen afresh. 58 Chapter 6 Wireless LAN Define the filter ... access the router. Table 15 MAC Address Filter LABEL Active Filter Action MAC Address Apply Reset DESCRIPTION Select Yes from the drop down list box to the G-1000. Click Apply to save your changes back to enable MAC address filtering. Select Deny Association to block access to the router, MAC ...
...these address fields. Enter the MAC addresses (in XX:XX:XX:XX:XX:XX format) of MAC addresses in the MAC address filter table. G-1000 User's Guide Figure 17 MAC Address Filter The following table describes the labels in this screen afresh. 58 Chapter 6 Wireless LAN Define the filter ... access the router. Table 15 MAC Address Filter LABEL Active Filter Action MAC Address Apply Reset DESCRIPTION Select Yes from the drop down list box to the G-1000. Click Apply to save your changes back to enable MAC address filtering. Select Deny Association to block access to the router, MAC ...

User Guide
Page 62
...documentation. Not all wireless stations access to the wired network without entering usernames and passwords. If your changes back to the G-1000. Select Authentication Required in the Wireless Port Control field and 802.1x in this screen afresh. 6.7.1 Authentication Required: 802.1x ... RADIUS server for details). For other related fields. Table 16 Wireless LAN: 802.1x/WPA LABEL Wireless Port Control Apply Reset DESCRIPTION To control wireless stations access to configure Key Management Protocol and other operating systems, see the Microsoft web site for remote...
...documentation. Not all wireless stations access to the wired network without entering usernames and passwords. If your changes back to the G-1000. Select Authentication Required in the Wireless Port Control field and 802.1x in this screen afresh. 6.7.1 Authentication Required: 802.1x ... RADIUS server for details). For other related fields. Table 16 Wireless LAN: 802.1x/WPA LABEL Wireless Port Control Apply Reset DESCRIPTION To control wireless stations access to configure Key Management Protocol and other operating systems, see the Microsoft web site for remote...

User Guide
Page 65
...Authentication Required in the Wireless Port Control field and WPA-PSK in the Key Management Protocol field to display the next screen. The G-1000 default is disabled. Please see Table 17 for information on a periodic basis. Protocol WPA Group Key Update Timer The WPA Group ... in WPA-PSK mode. Authentication Databases This field is 1800 seconds (30 minutes). Reset Click Reset to the G-1000. Chapter 6 Wireless LAN 65 Figure 22 Wireless LAN: 802.1x/WPA for WPA Protocol G-1000 User's Guide The following table describes the labels not previously discussed Table 18 Wireless ...
...Authentication Required in the Wireless Port Control field and WPA-PSK in the Key Management Protocol field to display the next screen. The G-1000 default is disabled. Please see Table 17 for information on a periodic basis. Protocol WPA Group Key Update Timer The WPA Group ... in WPA-PSK mode. Authentication Databases This field is 1800 seconds (30 minutes). Reset Click Reset to the G-1000. Chapter 6 Wireless LAN 65 Figure 22 Wireless LAN: 802.1x/WPA for WPA Protocol G-1000 User's Guide The following table describes the labels not previously discussed Table 18 Wireless ...

User Guide
Page 66
... begin configuring this field. Apply Click Apply to save your changes back to 63 case-sensitive ASCII characters (including spaces and symbols). G-1000 User's Guide Figure 23 Wireless LAN: 802.1x/WPA for WPA-PSK Protocol The following table describes the labels not previously discussed Table...are the same. Type a pre-shared key from 8 to the G-1000. The G-1000 default is that WPA-PSK uses a simple common password, instead of automatically changing the WEP key for an AP and all clients. Reset Click Reset to display the next screen. 66 Chapter 6 Wireless LAN Setting of ...
... begin configuring this field. Apply Click Apply to save your changes back to 63 case-sensitive ASCII characters (including spaces and symbols). G-1000 User's Guide Figure 23 Wireless LAN: 802.1x/WPA for WPA-PSK Protocol The following table describes the labels not previously discussed Table...are the same. Type a pre-shared key from 8 to the G-1000. The G-1000 default is that WPA-PSK uses a simple common password, instead of automatically changing the WEP key for an AP and all clients. Reset Click Reset to display the next screen. 66 Chapter 6 Wireless LAN Setting of ...

User Guide
Page 67
...) or RADIUS server (if using WPA2 key management) sends a new group key out to begin configuring this screen afresh. Reset Click Reset to all stations in this field. The G-1000 default is disabled. Please see Table 17 for information on a periodic basis. Chapter 6 Wireless LAN 67 This might reduce ...all clients. The re-keying process is the rate at the same time. Figure 24 Wireless LAN: 802.1x/WPA for WPA2 Protocol G-1000 User's Guide The following table describes the labels not previously discussed Table 20 Wireless LAN: 802.1x/WPA2 for WPA Protocol LABEL DESCRIPTIONS ...
...) or RADIUS server (if using WPA2 key management) sends a new group key out to begin configuring this screen afresh. Reset Click Reset to all stations in this field. The G-1000 default is disabled. Please see Table 17 for information on a periodic basis. Chapter 6 Wireless LAN 67 This might reduce ...all clients. The re-keying process is the rate at the same time. Figure 24 Wireless LAN: 802.1x/WPA for WPA2 Protocol G-1000 User's Guide The following table describes the labels not previously discussed Table 20 Wireless LAN: 802.1x/WPA2 for WPA Protocol LABEL DESCRIPTIONS ...

User Guide
Page 68
... password, instead of user-specific credentials. Use RADIUS if you to specify the authentication and accounting servers and to begin configuring this field. Reset Click Reset to enable and disable them. 68 Chapter 6 Wireless LAN The re-keying process is 1800 seconds (30 minutes). Pre-Shared Key The ...encryption mechanisms used for an AP and all clients. G-1000 User's Guide Figure 25 Wireless LAN: 802.1x/WPA for WPA2-PSK Protocol The ...
... password, instead of user-specific credentials. Use RADIUS if you to specify the authentication and accounting servers and to begin configuring this field. Reset Click Reset to enable and disable them. 68 Chapter 6 Wireless LAN The re-keying process is 1800 seconds (30 minutes). Pre-Shared Key The ...encryption mechanisms used for an AP and all clients. G-1000 User's Guide Figure 25 Wireless LAN: 802.1x/WPA for WPA2-PSK Protocol The ...
User Guide
Page 69
...is not sent over the network. Chapter 6 Wireless LAN 69 This key must be shared between the external RADIUS server and the G-1000. Shared Secret Specify a password (up to 32 alphanumeric characters) as the key to 32 alphanumeric characters) as shown. Port Number...active. This key must be shared between the external RADIUS server and the G-1000. Server IP Address Enter the IP address of the external RADIUS accounting server. Reset Click Reset to the G-1000. G-1000 User's Guide To access this screen. Figure 26 RADIUS Screen The following table ...
...is not sent over the network. Chapter 6 Wireless LAN 69 This key must be shared between the external RADIUS server and the G-1000. Shared Secret Specify a password (up to 32 alphanumeric characters) as the key to 32 alphanumeric characters) as shown. Port Number...active. This key must be shared between the external RADIUS server and the G-1000. Server IP Address Enter the IP address of the external RADIUS accounting server. Reset Click Reset to the G-1000. G-1000 User's Guide To access this screen. Figure 26 RADIUS Screen The following table ...
User Guide
Page 71
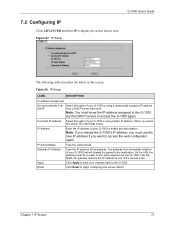
...1000 in the fields below. Use fixed IP address Select this option if your G-1000 is using a static IP address. When you want to access the G-1000...the gateway must know the IP address assigned to the G-1000 (by the DHCP server) to access the web configurator again...G-1000; Chapter 7 IP Screen 71 Note: If you change the G-1000's IP address, you must be the IP address of one of your G-1000 ...gateway is an immediate neighbor of the remote node. G-1000 User's Guide 7.2 Configuring IP Click ADVANCED and then ...1000 that will forward the packet to display the screen shown next...
...1000 in the fields below. Use fixed IP address Select this option if your G-1000 is using a static IP address. When you want to access the G-1000...the gateway must know the IP address assigned to the G-1000 (by the DHCP server) to access the web configurator again...G-1000; Chapter 7 IP Screen 71 Note: If you change the G-1000's IP address, you must be the IP address of one of your G-1000 ...gateway is an immediate neighbor of the remote node. G-1000 User's Guide 7.2 Configuring IP Click ADVANCED and then ...1000 that will forward the packet to display the screen shown next...

User Guide
Page 74
G-1000 User's Guide Table 25 Remote Management: WWW LABEL Apply Reset DESCRIPTION Click Apply to save your customized settings and exit this screen afresh. 8.3 Configuring Telnet You can configure your G-1000 for remote Telnet access as shown. 74 Chapter 8 Remote Management Screens Figure 29 Telnet Configuration on a remote network to begin configuring this screen. The administrator uses Telnet from a computer on a TCP/IP Network 8.4 Configuring TELNET Click REMOTE MGMT and the TELNET tab to display the screen as shown next. Click Reset to access the G-1000.
G-1000 User's Guide Table 25 Remote Management: WWW LABEL Apply Reset DESCRIPTION Click Apply to save your customized settings and exit this screen afresh. 8.3 Configuring Telnet You can configure your G-1000 for remote Telnet access as shown. 74 Chapter 8 Remote Management Screens Figure 29 Telnet Configuration on a remote network to begin configuring this screen. The administrator uses Telnet from a computer on a TCP/IP Network 8.4 Configuring TELNET Click REMOTE MGMT and the TELNET tab to display the screen as shown next. Click Reset to access the G-1000.


