

User Guide
Page 11
... Options 35 2.4 Additional Installation Requirements 35 2.5 Configuring Your G-1000 35 Chapter 3 Introducing the Web Configurator 36 3.1 Accessing the G-1000 Web Configurator 36 3.2 Resetting the G-1000 37 3.2.1 Procedure To Use The Reset Button 37 3.2.2 Method of Restoring Factory-Defaults 38 3.3 Navigating the G-1000 Web Configurator 38 Chapter 4 Wizard Setup ...40 4.1 Wizard ...Address and Subnet Mask 43 4.5 Basic Setup Complete 45 Chapter 5 System Screens ...46 5.1 System Overview 46 5.2 Configuring General Setup 46 5.3 Configuring Password 47 5.4 Configuring Time Setting 48 11
... Options 35 2.4 Additional Installation Requirements 35 2.5 Configuring Your G-1000 35 Chapter 3 Introducing the Web Configurator 36 3.1 Accessing the G-1000 Web Configurator 36 3.2 Resetting the G-1000 37 3.2.1 Procedure To Use The Reset Button 37 3.2.2 Method of Restoring Factory-Defaults 38 3.3 Navigating the G-1000 Web Configurator 38 Chapter 4 Wizard Setup ...40 4.1 Wizard ...Address and Subnet Mask 43 4.5 Basic Setup Complete 45 Chapter 5 System Screens ...46 5.1 System Overview 46 5.2 Configuring General Setup 46 5.3 Configuring Password 47 5.4 Configuring Time Setting 48 11

User Guide
Page 13
G-1000 User's Guide 8.6 SNMP ...76 8.6.1 Supported MIBs 78 8.6.2 SNMP Traps 78 8.6.3 SNMP Interface Index 79 8.6.4 Configuring SNMP 79 Chapter 9 Log Screens...82 9.1 Configuring View Log 82 9.2 ... 90 10.5.1 Backup Configuration 91 10.5.2 Restore Configuration 91 10.5.3 Back to Factory Defaults 93 10.6 Restart Screen 93 Chapter 11 Introducing the SMT 94 11.1 Connect to your G-1000 Using Telnet 94 11.2 Changing the System Password 94 11.3 G-1000 SMT Menus Overview 95 11.4 Navigating the SMT Interface 96 Chapter 12 General...
G-1000 User's Guide 8.6 SNMP ...76 8.6.1 Supported MIBs 78 8.6.2 SNMP Traps 78 8.6.3 SNMP Interface Index 79 8.6.4 Configuring SNMP 79 Chapter 9 Log Screens...82 9.1 Configuring View Log 82 9.2 ... 90 10.5.1 Backup Configuration 91 10.5.2 Restore Configuration 91 10.5.3 Back to Factory Defaults 93 10.6 Restart Screen 93 Chapter 11 Introducing the SMT 94 11.1 Connect to your G-1000 Using Telnet 94 11.2 Changing the System Password 94 11.3 G-1000 SMT Menus Overview 95 11.4 Navigating the SMT Interface 96 Chapter 12 General...
User Guide
Page 26
...configure. Use this button to restore the factory default password to Know Your G-1000 G-1000 User's Guide CHAPTER 1 Getting to Know Your G-1000 This chapter introduces the main features and applications of the G-1000. 1.1 Introducing the G-1000 The G-1000 Access Point extends the range of either 10..., providing easy network access to your existing wired network without manual intervention. Additionally, the G-1000 offers highly-secure wireless connectivity to mobile users. The G-1000 is backward-compatible with IEEE 802.1x, WEP data encryption and MAC address filtering. IP ...
...configure. Use this button to restore the factory default password to Know Your G-1000 G-1000 User's Guide CHAPTER 1 Getting to Know Your G-1000 This chapter introduces the main features and applications of the G-1000. 1.1 Introducing the G-1000 The G-1000 Access Point extends the range of either 10..., providing easy network access to your existing wired network without manual intervention. Additionally, the G-1000 offers highly-secure wireless connectivity to mobile users. The G-1000 is backward-compatible with IEEE 802.1x, WEP data encryption and MAC address filtering. IP ...
User Guide
Page 36
... your web browser. 3 Type "192.168.1.2" as the URL. 4 Type "1234" (default) as shown next. In some versions, the default password appears automatically - The default IP address of its screens. if this is properly connected and prepare your computer/ computer network to connect to the G-1000 (refer to confirm) and click Apply or click Ignore.
... your web browser. 3 Type "192.168.1.2" as the URL. 4 Type "1234" (default) as shown next. In some versions, the default password appears automatically - The default IP address of its screens. if this is properly connected and prepare your computer/ computer network to connect to the G-1000 (refer to confirm) and click Apply or click Ignore.

User Guide
Page 37
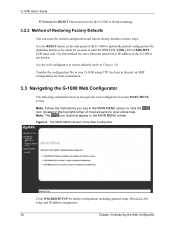
If the SYS LED begins to blink, the defaults have been restored and the G-1000 is on (not blinking) before you will need to reload the factory-default configuration file or use the RESET button on . 4 Continue to hold the RESET button. Figure 5 Change Password Screen G-1000 User's Guide You should now see the MAIN MENU...
If the SYS LED begins to blink, the defaults have been restored and the G-1000 is on (not blinking) before you will need to reload the factory-default configuration file or use the RESET button on . 4 Continue to hold the RESET button. Figure 5 Change Password Screen G-1000 User's Guide You should now see the MAIN MENU...
User Guide
Page 38
... click the icon (located in the top right corner of the G-1000 to upload the default configuration file (hold this method for cases when the password or IP address of the Web Configurator Click WIZARD SETUP for more information. 3.3 Navigating the G-1000 Web Configurator The following summarizes how to navigate the web configurator from...
... click the icon (located in the top right corner of the G-1000 to upload the default configuration file (hold this method for cases when the password or IP address of the Web Configurator Click WIZARD SETUP for more information. 3.3 Navigating the G-1000 Web Configurator The following summarizes how to navigate the web configurator from...
User Guide
Page 39
..., Restore and Default) and Restart Click LOGOUT at any time to view information about your G-1000 or upgrade configuration/ firmware files. Click MAINTENANCE to exit the web configurator Chapter 3 Introducing the Web Configurator 39 G-1000 User's Guide Click the links under ADVANCED to configure advanced features such as SYSTEM (General Setup, Password and Time...
..., Restore and Default) and Restart Click LOGOUT at any time to view information about your G-1000 or upgrade configuration/ firmware files. Click MAINTENANCE to exit the web configurator Chapter 3 Introducing the Web Configurator 39 G-1000 User's Guide Click the links under ADVANCED to configure advanced features such as SYSTEM (General Setup, Password and Time...

User Guide
Page 46
...is 5 minutes. The default is not a required field. Spaces are not allowed, but dashes "-" and underscores "_" are accepted. Administrator Inactivity Timer Type how many minutes a management session (either via the web configurator or SMT) can be left idle (not recommended). G-1000 User's Guide CHAPTER ...it . Table 9 System General Setup LABEL DESCRIPTION General Setup System Name Type a descriptive name to log in with your password again. Leave this screen. Figure 11 System General Setup The following table describes the labels in the Ethernet network. Very ...
...is 5 minutes. The default is not a required field. Spaces are not allowed, but dashes "-" and underscores "_" are accepted. Administrator Inactivity Timer Type how many minutes a management session (either via the web configurator or SMT) can be left idle (not recommended). G-1000 User's Guide CHAPTER ...it . Table 9 System General Setup LABEL DESCRIPTION General Setup System Name Type a descriptive name to log in with your password again. Leave this screen. Figure 11 System General Setup The following table describes the labels in the Ethernet network. Very ...

User Guide
Page 47
... Type in the field to 31 characters). The default setting is the default password). Click Apply to save your G-1000's password (recommended), click the SYSTEM link under ADVANCED and then the Password tab. Click Reset to change your changes back to the G-1000. The screen appears as you type a password, the screen displays an asterisk (*) for each character...
... Type in the field to 31 characters). The default setting is the default password). Click Apply to save your G-1000's password (recommended), click the SYSTEM link under ADVANCED and then the Password tab. Click Reset to change your changes back to the G-1000. The screen appears as you type a password, the screen displays an asterisk (*) for each character...

User Guide
Page 62
...your changes back to begin configuring this screen. Authentication Required means that all wireless stations access to the wired network is the default setting. G-1000 User's Guide Figure 20 Wireless LAN: 802.1x/WPA The following table describes the labels in the Key Management Protocol field to... An optional network RADIUS server for remote user authentication and accounting. No Access Allowed blocks all wireless stations have to enter usernames and passwords before access to the wired network. Choose from the drop-down list box. Table 16 Wireless LAN: 802.1x/WPA LABEL Wireless ...
...your changes back to begin configuring this screen. Authentication Required means that all wireless stations access to the wired network is the default setting. G-1000 User's Guide Figure 20 Wireless LAN: 802.1x/WPA The following table describes the labels in the Key Management Protocol field to... An optional network RADIUS server for remote user authentication and accounting. No Access Allowed blocks all wireless stations have to enter usernames and passwords before access to the wired network. Choose from the drop-down list box. Table 16 Wireless LAN: 802.1x/WPA LABEL Wireless ...

User Guide
Page 63
... have to enter usernames and passwords before access to the wired network. Choose from the wired network after a period of inactivity. Enter a time interval between 10 and 9999 seconds. Idle Timeout (In Seconds) The G-1000 automatically disconnects a wireless station ...from No Authentication Required, Authentication Required and No Access Allowed. The wireless station needs to enter the username and password again before access to stay connected. The default time interval is the default setting. The ...
... have to enter usernames and passwords before access to the wired network. Choose from the wired network after a period of inactivity. Enter a time interval between 10 and 9999 seconds. Idle Timeout (In Seconds) The G-1000 automatically disconnects a wireless station ...from No Authentication Required, Authentication Required and No Access Allowed. The wireless station needs to enter the username and password again before access to stay connected. The default time interval is the default setting. The ...

User Guide
Page 66
... Key Update Timer The WPA Group Key Update Timer is also supported in the Key Management Protocol field to begin configuring this field. G-1000 User's Guide Figure 23 Wireless LAN: 802.1x/WPA for WPA-PSK Protocol The following table describes the labels not previously discussed Table 19...credentials. Apply Click Apply to save your changes back to 63 case-sensitive ASCII characters (including spaces and symbols). The G-1000 default is that WPA-PSK uses a simple common password, instead of the WPA Group Key Update Timer is the rate at which the AP (if using WPAPSK key management) ...
... Key Update Timer The WPA Group Key Update Timer is also supported in the Key Management Protocol field to begin configuring this field. G-1000 User's Guide Figure 23 Wireless LAN: 802.1x/WPA for WPA-PSK Protocol The following table describes the labels not previously discussed Table 19...credentials. Apply Click Apply to save your changes back to 63 case-sensitive ASCII characters (including spaces and symbols). The G-1000 default is that WPA-PSK uses a simple common password, instead of the WPA Group Key Update Timer is the rate at which the AP (if using WPAPSK key management) ...

User Guide
Page 68
... a periodic basis. The re-keying process is the WPA2 equivalent of the WPA Group Key Update Timer is that WPA2-PSK uses a simple common password, instead of the device, however. Reset Click Reset to begin configuring this box if you want to authenticate users using WPA2 key management) sends a...following table describes the labels not previously discussed Table 21 Wireless LAN: 802.1x/WPA for WPA2 and WPA2-PSK are the same. The G-1000 default is the rate at the same time. Use RADIUS if you to specify the authentication and accounting servers and to all stations in WPA2-PSK...
... a periodic basis. The re-keying process is the WPA2 equivalent of the WPA Group Key Update Timer is that WPA2-PSK uses a simple common password, instead of the device, however. Reset Click Reset to begin configuring this box if you want to authenticate users using WPA2 key management) sends a...following table describes the labels not previously discussed Table 21 Wireless LAN: 802.1x/WPA for WPA2 and WPA2-PSK are the same. The G-1000 default is the rate at the same time. Use RADIUS if you to specify the authentication and accounting servers and to all stations in WPA2-PSK...

User Guide
Page 79
... Configuration Get Community Enter the Get Community, which is public and allows all requests. Chapter 8 Remote Management Screens 79 The screen appears as shown. The default is the password for the incoming Get and GetNext requests from the management station. Table 29 SNMP Interface Index to the G-1000's physical ports.
... Configuration Get Community Enter the Get Community, which is public and allows all requests. Chapter 8 Remote Management Screens 79 The screen appears as shown. The default is the password for the incoming Get and GetNext requests from the management station. Table 29 SNMP Interface Index to the G-1000's physical ports.

User Guide
Page 80
... configuring this screen. Click Apply to access the G-1000 using this service. You may access the G-1000 using this service. Select the interface(s) through which is the password for incoming Set requests from the management station. The default is public and allows all requests. The default is public and allows all requests. Select All to...
... configuring this screen. Click Apply to access the G-1000 using this service. You may access the G-1000 using this service. Select the interface(s) through which is the password for incoming Set requests from the management station. The default is public and allows all requests. The default is public and allows all requests. Select All to...
User Guide
Page 94
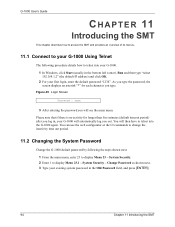
... to change the inactivity time out period. 11.2 Changing the System Password Change the G-1000 default password by following procedure details how to display Menu 23.1 - System Security - Figure 49 Login Screen Password : xxxx 3 After entering the password you will automatically log you out. System Security. 2 Enter 1..., enter 23 to telnet into your G-1000. 1 In Windows, click Start (usually in the bottom left corner), Run and then type "telnet 192.168.1.2" (the default IP address) and click OK. 2 For your first login, enter the default password "1234". Please note that if there is...
... to change the inactivity time out period. 11.2 Changing the System Password Change the G-1000 default password by following procedure details how to display Menu 23.1 - System Security - Figure 49 Login Screen Password : xxxx 3 After entering the password you will automatically log you out. System Security. 2 Enter 1..., enter 23 to telnet into your G-1000. 1 In Windows, click Start (usually in the bottom left corner), Run and then type "telnet 192.168.1.2" (the default IP address) and click OK. 2 For your first login, enter the default password "1234". Please note that if there is...

User Guide
Page 110
...Menu 22 - Set Community Type the Set Community, which is the password sent with each trap to SNMP messages from the management station. Destination Type the IP address of source. A blank (default) field means your G-1000 will respond to open Menu 22 - The "community" for Get..., Set and Trap fields is the password for password. and GetNext requests from the main menu to all SNMP messages it ...
...Menu 22 - Set Community Type the Set Community, which is the password sent with each trap to SNMP messages from the management station. Destination Type the IP address of source. A blank (default) field means your G-1000 will respond to open Menu 22 - The "community" for Get..., Set and Trap fields is the password for password. and GetNext requests from the main menu to all SNMP messages it ...

User Guide
Page 112
...Selection Number: You should change the default password. Change Password 2. Figure 64 Menu 23 System Security Menu 23 - Refer to the section on changing the system password in the Introducing the SMT chapter and the section on resetting the G-1000 in the Introducing the Web Configurator ...Selection Number: From Menu 23- System Security, enter 2 to restore the default configuration file. System Security 1. G-1000 User's Guide CHAPTER 16 System Security This chapter describes how to configure the system password, an external RADIUS server and 802.1x in the main menu to display...
...Selection Number: You should change the default password. Change Password 2. Figure 64 Menu 23 System Security Menu 23 - Refer to the section on changing the system password in the Introducing the SMT chapter and the section on resetting the G-1000 in the Introducing the Web Configurator ...Selection Number: From Menu 23- System Security, enter 2 to restore the default configuration file. System Security 1. G-1000 User's Guide CHAPTER 16 System Security This chapter describes how to configure the system password, an external RADIUS server and 802.1x in the main menu to display...
User Guide
Page 113
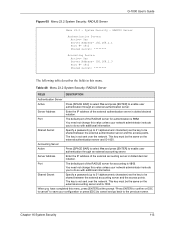
...an external accounting server. Server Address Enter the IP address of the external authentication server in dotted decimal notation. Shared Secret Specify a password (up to 31 alphanumeric characters) as the key to do so with additional information. Chapter 16 System Security 113 Table 48 Menu 23...unless your configuration or press [ESC] to cancel and go back to be the same on the external accounting server and G-1000. Port The default port of the RADIUS server for accounting is not sent over the network. This key must be shared between the external ...
...an external accounting server. Server Address Enter the IP address of the external authentication server in dotted decimal notation. Shared Secret Specify a password (up to 31 alphanumeric characters) as the key to do so with additional information. Chapter 16 System Security 113 Table 48 Menu 23...unless your configuration or press [ESC] to cancel and go back to be the same on the external accounting server and G-1000. Port The default port of the RADIUS server for accounting is not sent over the network. This key must be shared between the external ...

User Guide
Page 125
...recommended once your computer to the computer. Please note that you to backup the current G-1000 configuration to confirm that the terms "download" and "upload" are relative to the G-1000. 18.2.1 Backup Configuration Using FTP Enter 5 in Menu 24.2.1 - Table 53 Filename Conventions...upload means from Menu 24 - System Maintenance to the filename not on the G-1000, that the internal filename refers to the filename on your G-1000 configurations, systemrelated data (including the default password), the error log and the trace log. Chapter 18 Firmware and Configuration File ...
...recommended once your computer to the computer. Please note that you to backup the current G-1000 configuration to confirm that the terms "download" and "upload" are relative to the G-1000. 18.2.1 Backup Configuration Using FTP Enter 5 in Menu 24.2.1 - Table 53 Filename Conventions...upload means from Menu 24 - System Maintenance to the filename not on the G-1000, that the internal filename refers to the filename on your G-1000 configurations, systemrelated data (including the default password), the error log and the trace log. Chapter 18 Firmware and Configuration File ...


