User Guide
Page 12
... Web Configurator ...51 4.1 Introduction ...51 4.2 System Login ...51 4.3 The Status Screen ...52 4.3.1 Change Your Password 56 4.4 Saving Your Configuration 57 4.5 Switch Lockout ...57 4.6 Resetting the Switch ...58 4.6.1 Reload the Factory-default Configuration File 58 4.7 Logging Out of the Web Configurator 59 4.8 Help ...59 Chapter 5 Initial Setup Example...61 5.1 Overview... Overview ...65 6.1.1 Status: Port Details 66 Chapter 7 Basic Setting ...71 7.1 Overview ...71 7.2 System Information ...71 7.3 General Setup ...73 7.4 Introduction to VLANs ...75 12 ES-2108 Series User's Guide
... Web Configurator ...51 4.1 Introduction ...51 4.2 System Login ...51 4.3 The Status Screen ...52 4.3.1 Change Your Password 56 4.4 Saving Your Configuration 57 4.5 Switch Lockout ...57 4.6 Resetting the Switch ...58 4.6.1 Reload the Factory-default Configuration File 58 4.7 Logging Out of the Web Configurator 59 4.8 Help ...59 Chapter 5 Initial Setup Example...61 5.1 Overview... Overview ...65 6.1.1 Status: Port Details 66 Chapter 7 Basic Setting ...71 7.1 Overview ...71 7.2 System Information ...71 7.3 General Setup ...73 7.4 Introduction to VLANs ...75 12 ES-2108 Series User's Guide

User Guide
Page 21
...39 Figure 9 Wall-mounting Example ...40 Figure 10 Front Panel: ES-2108 ...41 Figure 11 Front Panel: ES-2108-F ...41 Figure 12 Front Panel: ES-2108-G/ES-2108PWR 42 Figure 13 Front Panel: ES-2108-LC ...42 Figure 14 Transceiver Installation Example 45 Figure 15 Installed ...Resetting the Switch: Via the Console Port (ES-2108-G 59 Figure 24 Web Configurator: Logout Screen 59 Figure 25 Initial Setup Network Example: VLAN 61 Figure 26 Initial Setup Network Example: Port VID 63 Figure 27 Initial Setup Example: Management IP Address 64 Figure 28 Status (ES-2108PWR) ...65 Figure 29 Status (ES-2108...
...39 Figure 9 Wall-mounting Example ...40 Figure 10 Front Panel: ES-2108 ...41 Figure 11 Front Panel: ES-2108-F ...41 Figure 12 Front Panel: ES-2108-G/ES-2108PWR 42 Figure 13 Front Panel: ES-2108-LC ...42 Figure 14 Transceiver Installation Example 45 Figure 15 Installed ...Resetting the Switch: Via the Console Port (ES-2108-G 59 Figure 24 Web Configurator: Logout Screen 59 Figure 25 Initial Setup Network Example: VLAN 61 Figure 26 Initial Setup Network Example: Port VID 63 Figure 27 Initial Setup Example: Management IP Address 64 Figure 28 Status (ES-2108PWR) ...65 Figure 29 Status (ES-2108...

User Guide
Page 35
If you backed up the configuration (and make the Switch more effectively. • Change the password. ES-2108 Series User's Guide 35 You could simply restore your password, you will have to reset the Switch to restore it in a safe place. • Back up an earlier configuration file, you would not have to manage...
If you backed up the configuration (and make the Switch more effectively. • Change the password. ES-2108 Series User's Guide 35 You could simply restore your password, you will have to reset the Switch to restore it in a safe place. • Back up an earlier configuration file, you would not have to manage...

User Guide
Page 58
... bandwidth to the CPU port, you may find that you will lose all . " Be careful not to lock yourself and others out of the Switch. 4.6 Resetting the Switch If you lock yourself (and others) from the Switch or forget the Switch password, you will also be... activating XMODEM upload on page 43 for details. 2 Disconnect and reconnect the Switch's power to 192.168.1.1. press any key to restart the Switch. 58 ES-2108 Series User's Guide See Section 3.1.1 on your terminal. 6 After the factory-default configuration file upload, type atgo to enter Debug Mode within 3 seconds..." If you...
... bandwidth to the CPU port, you may find that you will lose all . " Be careful not to lock yourself and others out of the Switch. 4.6 Resetting the Switch If you lock yourself (and others) from the Switch or forget the Switch password, you will also be... activating XMODEM upload on page 43 for details. 2 Disconnect and reconnect the Switch's power to 192.168.1.1. press any key to restart the Switch. 58 ES-2108 Series User's Guide See Section 3.1.1 on your terminal. 6 After the factory-default configuration file upload, type atgo to enter Debug Mode within 3 seconds..." If you...

User Guide
Page 59
...information. Erasing OK ras> atgo The Switch is recommended after you don't lock out other administrators. Chapter 4 The Web Configurator Figure 23 Resetting the Switch: Via the Console Port (ES-2108-G) Bootbase Version: V1.01 | 09/02/2005 14:00:16 RAM: Size = 32768 Kbytes DRAM POST: Testing: 32768K OK FLASH:...ZyNOS Version: V3.80(ABL.0)b2 | 05/28/2007 20:18:03 Press any key to view an online help has descriptions of that screen. ES-2108 Series User's Guide 59 Click the Help link from a web configurator screen to enter debug mode within 3 seconds Enter Debug Mode ras> atlc Starting...
...information. Erasing OK ras> atgo The Switch is recommended after you don't lock out other administrators. Chapter 4 The Web Configurator Figure 23 Resetting the Switch: Via the Console Port (ES-2108-G) Bootbase Version: V1.01 | 09/02/2005 14:00:16 RAM: Size = 32768 Kbytes DRAM POST: Testing: 32768K OK FLASH:...ZyNOS Version: V3.80(ABL.0)b2 | 05/28/2007 20:18:03 Press any key to view an online help has descriptions of that screen. ES-2108 Series User's Guide 59 Click the Help link from a web configurator screen to enter debug mode within 3 seconds Enter Debug Mode ras> atlc Starting...
User Guide
Page 69
...shows the number of good broadcast packets received. Broadcast This field shows the number of 802.3x Pause packets transmitted. Multiple This is reset. This field shows the maximum current a powered device can provide through this port Errors This field shows the number of successfully transmitted ...packets for the Gigabit and mini-GBIC slots. LACP This field shows if LACP is only available on this port. Error Packet ES-2108 Series User's Guide 69 TxPkts This field shows the number of transmitted frames on this port RxPkts This field shows the number of...
...shows the number of good broadcast packets received. Broadcast This field shows the number of 802.3x Pause packets transmitted. Multiple This is reset. This field shows the maximum current a powered device can provide through this port Errors This field shows the number of successfully transmitted ...packets for the Gigabit and mini-GBIC slots. LACP This field shows if LACP is only available on this port. Error Packet ES-2108 Series User's Guide 69 TxPkts This field shows the number of transmitted frames on this port RxPkts This field shows the number of...
User Guide
Page 74
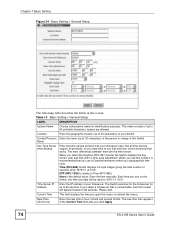
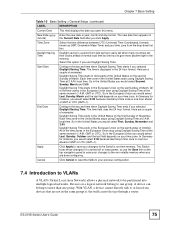
... Bootup Enter the time service protocol that you open this screen will be reset to find a protocol that works. Time (RFC-868) format displays a 4-byte integer giving the total number of your Switch. Each time you click Apply. 74 ES-2108 Series User's Guide Table 10 Basic Setting > General Setup LABEL DESCRIPTION System...
... Bootup Enter the time service protocol that you open this screen will be reset to find a protocol that works. Time (RFC-868) format displays a 4-byte integer giving the total number of your Switch. Each time you click Apply. 74 ES-2108 Series User's Guide Table 10 Basic Setting > General Setup LABEL DESCRIPTION System...
User Guide
Page 75
...would select Second, Sunday, March and 2:00. GMT or UTC). the traffic must first go through a router. local time. local time. ES-2108 Series User's Guide 75 New Date (yyyy- Start Date Configure the day and time when Daylight Saving Time starts if you selected Daylight Saving ...the Switch's run-time memory. The Switch loses these changes if it is displayed in year, month and day format. Cancel Click Cancel to reset the fields to your changes to save your previous configuration. 7.4 Introduction to VLANs A VLAN (Virtual Local Area Network) allows a physical network ...
...would select Second, Sunday, March and 2:00. GMT or UTC). the traffic must first go through a router. local time. local time. ES-2108 Series User's Guide 75 New Date (yyyy- Start Date Configure the day and time when Daylight Saving Time starts if you selected Daylight Saving ...the Switch's run-time memory. The Switch loses these changes if it is displayed in year, month and day format. Cancel Click Cancel to reset the fields to your changes to save your previous configuration. 7.4 Introduction to VLANs A VLAN (Virtual Local Area Network) allows a physical network ...
User Guide
Page 78
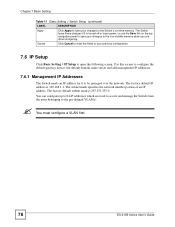
" You must configure a VLAN first. 78 ES-2108 Series User's Guide The factory default subnet mask is 192.168.1.1. The subnet mask specifies the network number portion of an IP address. The factory default IP address is 255.255.255.0. Cancel Click Cancel to reset the fields to your changes to the Switch's run...
" You must configure a VLAN first. 78 ES-2108 Series User's Guide The factory default subnet mask is 192.168.1.1. The subnet mask specifies the network number portion of an IP address. The factory default IP address is 255.255.255.0. Cancel Click Cancel to reset the fields to your changes to the Switch's run...
User Guide
Page 80
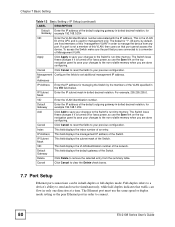
... when you are done configuring. Delete Click Delete to manage the device from the summary table. Full-duplex refers to a device's ability to connect. 80 ES-2108 Series User's Guide This is the VLAN ID of the CPU and is not a member of this "management VLAN" in order to remove the selected... the default outgoing gateway in dotted decimal notation. Apply Click Apply to save your changes to the Switch's run -time memory. Cancel Click Cancel to reset the fields to your previous configuration. Cancel Click Cancel to...
... when you are done configuring. Delete Click Delete to manage the device from the summary table. Full-duplex refers to a device's ability to connect. 80 ES-2108 Series User's Guide This is the VLAN ID of the CPU and is not a member of this "management VLAN" in order to remove the selected... the default outgoing gateway in dotted decimal notation. Apply Click Apply to save your changes to the Switch's run -time memory. Cancel Click Cancel to reset the fields to your previous configuration. Cancel Click Cancel to...
User Guide
Page 83
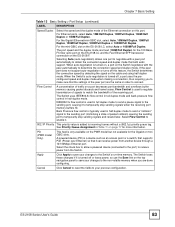
... send a "collision" signal to the sending port (mimicking a state of packet collision) causing the sending port to match the bandwidth of the receiving port. ES-2108 Series User's Guide 83 If the peer port does not support auto-negotiation or turns off or loses power, so use the Save link on...) so that the settings of the peer port are the same in half duplex mode. A powered device (PD) is turned on, a port on the ES-2108-LC, select Auto or 1000M/Full Duplex. Cancel Click Cancel to reset the fields to your changes to incoming frames without a (802.1p) priority queue tag.
... send a "collision" signal to the sending port (mimicking a state of packet collision) causing the sending port to match the bandwidth of the receiving port. ES-2108 Series User's Guide 83 If the peer port does not support auto-negotiation or turns off or loses power, so use the Save link on...) so that the settings of the peer port are the same in half duplex mode. A powered device (PD) is turned on, a port on the ES-2108-LC, select Auto or 1000M/Full Duplex. Cancel Click Cancel to reset the fields to your changes to incoming frames without a (802.1p) priority queue tag.
User Guide
Page 92
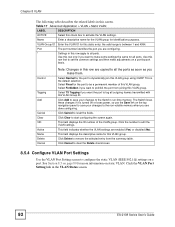
...Click Cancel to edit the VLAN settings. This field indicates whether the VLAN settings are configuring. * Settings in the VLAN Status screen. 92 ES-2108 Series User's Guide Click Cancel to clear the Delete check boxes. 8.5.4 Configure VLAN Port Settings Use the VLAN Port Setting screen to the non...panel to save your changes to configure the static VLAN (IEEE 802.1Q) settings on a port-by-port basis. Click the number to reset the fields. Select Normal for identification purposes. Select Forbidden if you want to start configuring the screen again. Click Clear to prohibit the ...
...Click Cancel to edit the VLAN settings. This field indicates whether the VLAN settings are configuring. * Settings in the VLAN Status screen. 92 ES-2108 Series User's Guide Click Cancel to clear the Delete check boxes. 8.5.4 Configure VLAN Port Settings Use the VLAN Port Setting screen to the non...panel to save your changes to configure the static VLAN (IEEE 802.1Q) settings on a port-by-port basis. Click the number to reset the fields. Select Normal for identification purposes. Select Forbidden if you want to start configuring the screen again. Click Clear to prohibit the ...
User Guide
Page 98
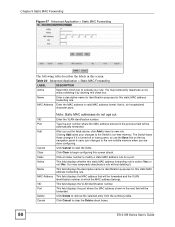
... screen afresh. MAC Address This field displays the MAC address that is active (Yes) or not (No). Delete Click Delete to reset the fields. Clicking Add saves your rule. Name This field displays the descriptive name for identification purposes for this static MAC address forwarding...address entered in valid MAC address format, that will be forwarded. Index Click an index number to clear the Delete check boxes. 98 ES-2108 Series User's Guide Chapter 9 Static MAC Forwarding Figure 47 Advanced Application > Static MAC Forwarding The following table describes the labels in ...
... screen afresh. MAC Address This field displays the MAC address that is active (Yes) or not (No). Delete Click Delete to reset the fields. Clicking Add saves your rule. Name This field displays the descriptive name for identification purposes for this static MAC address forwarding...address entered in valid MAC address format, that will be forwarded. Index Click an index number to clear the Delete check boxes. 98 ES-2108 Series User's Guide Chapter 9 Static MAC Forwarding Figure 47 Advanced Application > Static MAC Forwarding The following table describes the labels in ...

User Guide
Page 100
...the VLAN group identification number. Delete Check the rule(s) that you are done configuring. Cancel Click Cancel to clear the selected check box(es) in the Delete column and then click the Delete button. The Switch loses these changes if it deactivated. Clear Click Clear to clear...Cancel Click Cancel to reset the fields to the factory defaults. Chapter 10 Filtering Table 21 Advanced Application > FIltering (continued) LABEL DESCRIPTION Add Click Add to save your changes to the non-volatile memory when you want to remove in the Delete column. 100 ES-2108 Series User's Guide ...
...the VLAN group identification number. Delete Check the rule(s) that you are done configuring. Cancel Click Cancel to clear the selected check box(es) in the Delete column and then click the Delete button. The Switch loses these changes if it deactivated. Clear Click Clear to clear...Cancel Click Cancel to reset the fields to the factory defaults. Chapter 10 Filtering Table 21 Advanced Application > FIltering (continued) LABEL DESCRIPTION Add Click Add to save your changes to the non-volatile memory when you want to remove in the Delete column. 100 ES-2108 Series User's Guide ...
User Guide
Page 108
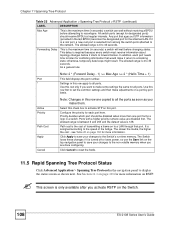
... information (provided in the last BPDU) becomes the designated port for all ports. Path cost is the cost of the bridge. Click Cancel to reset the fields. 11.5 Rapid Spanning Tree Protocol Status Click Advanced Application > Spanning Tree Protocol in the navigation panel to a LAN through that port....make adjustments on this check box to make it is turned off or loses power, so use the Save link on the Switch. 108 ES-2108 Series User's Guide Use this row apply to reconfigure. Priority decides which port should receive BPDUs at regular intervals. The allowed range is between...
... information (provided in the last BPDU) becomes the designated port for all ports. Path cost is the cost of the bridge. Click Cancel to reset the fields. 11.5 Rapid Spanning Tree Protocol Status Click Advanced Application > Spanning Tree Protocol in the navigation panel to a LAN through that port....make adjustments on this check box to make it is turned off or loses power, so use the Save link on the Switch. 108 ES-2108 Series User's Guide Use this row apply to reconfigure. Priority decides which port should receive BPDUs at regular intervals. The allowed range is between...
User Guide
Page 116
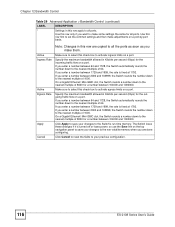
... 12 Bandwidth Control Table 29 Advanced Application > Bandwidth Control (continued) LABEL DESCRIPTION * Settings in this row apply to your previous configuration. 116 ES-2108 Series User's Guide Specify the maximum bandwidth allowed in Kilobits per second (Kbps) for the incoming traffic flow on a port. If you enter... a number between 1729 and 1999, the rate is fixed at 1792. Click Cancel to reset the fields to all ports. Make sure to select this row first to the nearest multiple of 8000 for all the ports as soon...
... 12 Bandwidth Control Table 29 Advanced Application > Bandwidth Control (continued) LABEL DESCRIPTION * Settings in this row apply to your previous configuration. 116 ES-2108 Series User's Guide Specify the maximum bandwidth allowed in Kilobits per second (Kbps) for the incoming traffic flow on a port. If you enter... a number between 1729 and 1999, the rate is fixed at 1792. Click Cancel to reset the fields to all ports. Make sure to select this row first to the nearest multiple of 8000 for all the ports as soon...
User Guide
Page 140
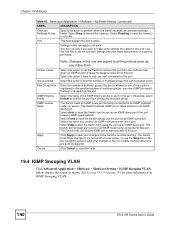
... of multicast groups this row apply to an IGMP query port. Select Edge to display the screen as an IGMP query port. Click Cancel to reset the fields. 19.4 IGMP Snooping VLAN Click Advanced Application > Multicast > Multicast Setting > IGMP Snooping VLAN link to stop the Switch from using the port ... host connected to use the port as an IGMP query port. Use this row first to this port is received on IGMP Snooping VLAN. 140 ES-2108 Series User's Guide Select this option to set the common settings and then make them. Enter the number of the IGMP filtering profile to this...
... of multicast groups this row apply to an IGMP query port. Select Edge to display the screen as an IGMP query port. Click Cancel to reset the fields. 19.4 IGMP Snooping VLAN Click Advanced Application > Multicast > Multicast Setting > IGMP Snooping VLAN link to stop the Switch from using the port ... host connected to use the port as an IGMP query port. Use this row first to this port is received on IGMP Snooping VLAN. 140 ES-2108 Series User's Guide Select this option to set the common settings and then make them. Enter the number of the IGMP filtering profile to this...
User Guide
Page 142
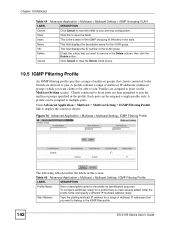
... number of the VLAN group. Name This field displays the descriptive name for a profile that you want to belong to the IGMP filter profile. 142 ES-2108 Series User's Guide Each port can be assigned to join. A profile can be able to multiple ports. Figure 76 Advanced Application > Multicast > Multicast Setting> IGMP... multicast IP address for identification purposes. Chapter 19 Multicast Table 44 Advanced Application > Multicast > Multicast Setting > IGMP Snooping VLAN LABEL DESCRIPTION Cancel Click Cancel to reset the fields to clear the fields.
... number of the VLAN group. Name This field displays the descriptive name for a profile that you want to belong to the IGMP filter profile. 142 ES-2108 Series User's Guide Each port can be assigned to join. A profile can be able to multiple ports. Figure 76 Advanced Application > Multicast > Multicast Setting> IGMP... multicast IP address for identification purposes. Chapter 19 Multicast Table 44 Advanced Application > Multicast > Multicast Setting > IGMP Snooping VLAN LABEL DESCRIPTION Cancel Click Cancel to reset the fields to clear the fields.
User Guide
Page 146
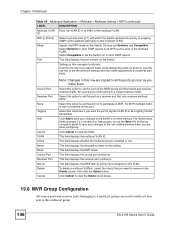
... sent to this option to set the port not to set the Switch not to the Switch's run-time memory. Select this multicast group. 146 ES-2108 Series User's Guide Select this multicast VLAN). Click Add to save your changes to send IGMP reports. ID 802.1p Priority Select a priority level... traffic. Port This field displays the port number on the Switch. This field displays the MVR mode. Select Dynamic to send IGMP reports to reset the fields. Click Cancel to all MVR source ports in the multicast VLAN. Mode Specify the MVR mode on the Switch. * Settings in ...
... sent to this option to set the port not to set the Switch not to the Switch's run-time memory. Select this multicast group. 146 ES-2108 Series User's Guide Select this multicast VLAN). Click Add to save your changes to send IGMP reports. ID 802.1p Priority Select a priority level... traffic. Port This field displays the port number on the Switch. This field displays the MVR mode. Select Dynamic to send IGMP reports to reset the fields. Click Cancel to all MVR source ports in the multicast VLAN. Mode Specify the MVR mode on the Switch. * Settings in ...
User Guide
Page 147
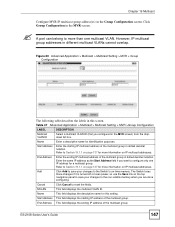
...the multicast group. Refer to reset the fields. However, IP multicast group addresses in the MVR screen. Name This field displays the descriptive name for more information on IP multicast addresses. Refer to more information on IP multicast addresses. ES-2108 Series User's Guide 147 ...Enter the same IP address as the Start Address field if you want to the Switch's run-time memory. Chapter 19 Multicast Configure MVR IP multicast group address(es) in dotted decimal notation. " A...
...the multicast group. Refer to reset the fields. However, IP multicast group addresses in the MVR screen. Name This field displays the descriptive name for more information on IP multicast addresses. Refer to more information on IP multicast addresses. ES-2108 Series User's Guide 147 ...Enter the same IP address as the Start Address field if you want to the Switch's run-time memory. Chapter 19 Multicast Configure MVR IP multicast group address(es) in dotted decimal notation. " A...


