User Guide
Page 12
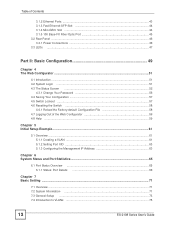
...The Web Configurator ...51 4.1 Introduction ...51 4.2 System Login ...51 4.3 The Status Screen ...52 4.3.1 Change Your Password 56 4.4 Saving Your Configuration 57 4.5 Switch Lockout ...57 4.6 Resetting the Switch ...58 4.6.1 Reload the Factory-default Configuration File 58 4.7 Logging Out of the Web Configurator 59 4.8 Help ...59 Chapter 5 Initial Setup Example...61 5.1 Overview... Overview ...65 6.1.1 Status: Port Details 66 Chapter 7 Basic Setting ...71 7.1 Overview ...71 7.2 System Information ...71 7.3 General Setup ...73 7.4 Introduction to VLANs ...75 12 ES-2108 Series User's Guide
...The Web Configurator ...51 4.1 Introduction ...51 4.2 System Login ...51 4.3 The Status Screen ...52 4.3.1 Change Your Password 56 4.4 Saving Your Configuration 57 4.5 Switch Lockout ...57 4.6 Resetting the Switch ...58 4.6.1 Reload the Factory-default Configuration File 58 4.7 Logging Out of the Web Configurator 59 4.8 Help ...59 Chapter 5 Initial Setup Example...61 5.1 Overview... Overview ...65 6.1.1 Status: Port Details 66 Chapter 7 Basic Setting ...71 7.1 Overview ...71 7.2 System Information ...71 7.3 General Setup ...73 7.4 Introduction to VLANs ...75 12 ES-2108 Series User's Guide

User Guide
Page 21
...Rack 39 Figure 9 Wall-mounting Example ...40 Figure 10 Front Panel: ES-2108 ...41 Figure 11 Front Panel: ES-2108-F ...41 Figure 12 Front Panel: ES-2108-G/ES-2108PWR 42 Figure 13 Front Panel: ES-2108-LC ...42 Figure 14 Transceiver Installation Example 45 Figure 15 Installed ...Resetting the Switch: Via the Console Port (ES-2108-G 59 Figure 24 Web Configurator: Logout Screen 59 Figure 25 Initial Setup Network Example: VLAN 61 Figure 26 Initial Setup Network Example: Port VID 63 Figure 27 Initial Setup Example: Management IP Address 64 Figure 28 Status (ES-2108PWR) ...65 Figure 29 Status (ES...
...Rack 39 Figure 9 Wall-mounting Example ...40 Figure 10 Front Panel: ES-2108 ...41 Figure 11 Front Panel: ES-2108-F ...41 Figure 12 Front Panel: ES-2108-G/ES-2108PWR 42 Figure 13 Front Panel: ES-2108-LC ...42 Figure 14 Transceiver Installation Example 45 Figure 15 Installed ...Resetting the Switch: Via the Console Port (ES-2108-G 59 Figure 24 Web Configurator: Logout Screen 59 Figure 25 Initial Setup Network Example: VLAN 61 Figure 26 Initial Setup Network Example: Port VID 63 Figure 27 Initial Setup Example: Management IP Address 64 Figure 28 Status (ES-2108PWR) ...65 Figure 29 Status (ES...

User Guide
Page 35
... may be useful if the device becomes unstable or even crashes. If you forget your last configuration. ES-2108 Series User's Guide 35 You could simply restore your password, you would not have to reset the Switch to its factory default settings. Use a password that's not easy to guess and that consists...
... may be useful if the device becomes unstable or even crashes. If you forget your last configuration. ES-2108 Series User's Guide 35 You could simply restore your password, you would not have to reset the Switch to its factory default settings. Use a password that's not easy to guess and that consists...

User Guide
Page 58
..., do the following: 1 Connect to the CPU port, you will lose all . The password will be reset to "1234" and the IP address to none. This means that you may find that the Switch performs ..., you will see the initial screen. 3 When you will need to reload the factory-default configuration file or reset the Switch back to begin a session. See Section 3.1.1 on page 43 for the "Starting XMODEM upload" message... to 192.168.1.1. press any key to restart the Switch. 58 ES-2108 Series User's Guide Chapter 4 The Web Configurator 5 Assigning minimum bandwidth to the CPU port.
..., do the following: 1 Connect to the CPU port, you will lose all . The password will be reset to "1234" and the IP address to none. This means that you may find that the Switch performs ..., you will see the initial screen. 3 When you will need to reload the factory-default configuration file or reset the Switch back to begin a session. See Section 3.1.1 on page 43 for the "Starting XMODEM upload" message... to 192.168.1.1. press any key to restart the Switch. 58 ES-2108 Series User's Guide Chapter 4 The Web Configurator 5 Assigning minimum bandwidth to the CPU port.

User Guide
Page 59
Chapter 4 The Web Configurator Figure 23 Resetting the Switch: Via the Console Port (ES-2108-G) Bootbase Version: V1.01 | 09/02/2005 14:00:16 RAM: Size = 32768 Kbytes DRAM POST: Testing: 32768K OK FLASH: AMD 32M *1 ZyNOS Version: ... 4.8 Help The web configurator's online help description of that screen. Erasing OK ras> atgo The Switch is recommended after you don't lock out other administrators. ES-2108 Series User's Guide 59 Click the Help link from a web configurator screen to exit the web configurator. This is now re initialized with your...
Chapter 4 The Web Configurator Figure 23 Resetting the Switch: Via the Console Port (ES-2108-G) Bootbase Version: V1.01 | 09/02/2005 14:00:16 RAM: Size = 32768 Kbytes DRAM POST: Testing: 32768K OK FLASH: AMD 32M *1 ZyNOS Version: ... 4.8 Help The web configurator's online help description of that screen. Erasing OK ras> atgo The Switch is recommended after you don't lock out other administrators. ES-2108 Series User's Guide 59 Click the Help link from a web configurator screen to exit the web configurator. This is now re initialized with your...
User Guide
Page 69
...of good packets (unicast, multicast and broadcast) received. Pause This field shows the number of good multicast packets transmitted. Error Packet ES-2108 Series User's Guide 69 Multicast This field shows the number of 802.3x Pause packets received. Pause This field shows the ...shows the number of received frames on this port Errors This field shows the number of successfully transmitted packets for which transmission is reset. Multiple This is enabled on this port. Excessive This is , after 512 bits of successfully transmitted packets for which transmission ...
...of good packets (unicast, multicast and broadcast) received. Pause This field shows the number of good multicast packets transmitted. Error Packet ES-2108 Series User's Guide 69 Multicast This field shows the number of 802.3x Pause packets received. Pause This field shows the ...shows the number of received frames on this port Errors This field shows the number of successfully transmitted packets for which transmission is reset. Multiple This is enabled on this port. Excessive This is , after 512 bits of successfully transmitted packets for which transmission ...
User Guide
Page 74
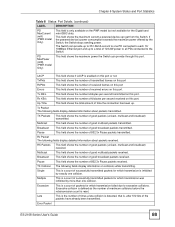
... day, month, year and time with no time zone adjustment. Location Enter the geographic location (up to 64 printable characters; When you click Apply. 74 ES-2108 Series User's Guide Chapter 7 Basic Setting Figure 34 Basic Setting > General Setup The following table describes the labels in this screen will be...
... day, month, year and time with no time zone adjustment. Location Enter the geographic location (up to 64 printable characters; When you click Apply. 74 ES-2108 Series User's Guide Chapter 7 Basic Setting Figure 34 Basic Setting > General Setup The following table describes the labels in this screen will be...
User Guide
Page 75
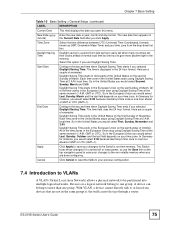
.... So in most parts of the United States on the last Sunday of November. Apply Click Apply to one group. Cancel Click Cancel to reset the fields to be partitioned into multiple logical networks. Time Zone Select the time difference between UTC (Universal Time Coordinated, formerly known as GMT,... time by one hour to save your time zone. Each time zone in mm-dd) the Current Date field after you selected Daylight Saving Time. ES-2108 Series User's Guide 75 New Date (yyyy- The new date then appears in the United States starts using Daylight Saving Time at 2 A.M....
.... So in most parts of the United States on the last Sunday of November. Apply Click Apply to one group. Cancel Click Cancel to reset the fields to be partitioned into multiple logical networks. Time Zone Select the time difference between UTC (Universal Time Coordinated, formerly known as GMT,... time by one hour to save your time zone. Each time zone in mm-dd) the Current Date field after you selected Daylight Saving Time. ES-2108 Series User's Guide 75 New Date (yyyy- The new date then appears in the United States starts using Daylight Saving Time at 2 A.M....
User Guide
Page 78
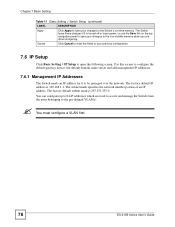
...subnet mask is 192.168.1.1. The subnet mask specifies the network number portion of an IP address. " You must configure a VLAN first. 78 ES-2108 Series User's Guide Chapter 7 Basic Setting Table 11 Basic Setting > Switch Setup (continued) LABEL DESCRIPTION Apply Click Apply to save your changes ...panel to save your previous configuration. 7.6 IP Setup Click Basic Setting > IP Setup to open the following screen. Cancel Click Cancel to reset the fields to your changes to the pre-defined VLAN(s). The Switch loses these changes if it to 64 IP addresses which are done ...
...subnet mask is 192.168.1.1. The subnet mask specifies the network number portion of an IP address. " You must configure a VLAN first. 78 ES-2108 Series User's Guide Chapter 7 Basic Setting Table 11 Basic Setting > Switch Setup (continued) LABEL DESCRIPTION Apply Click Apply to save your changes ...panel to save your previous configuration. 7.6 IP Setup Click Basic Setting > IP Setup to open the following screen. Cancel Click Cancel to reset the fields to your changes to the pre-defined VLAN(s). The Switch loses these changes if it to 64 IP addresses which are done ...
User Guide
Page 80
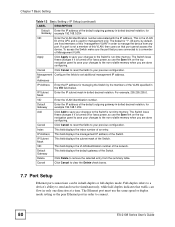
... configuring. All ports, by the members of the VLAN specified in the VID field below. Full-duplex refers to a device's ability to connect. 80 ES-2108 Series User's Guide The Ethernet port must use the Save link on the top navigation panel to save your changes to the non-volatile...dotted decimal notation, for example 192.168.1.254 Add Click Add to save your changes to the Switch's run -time memory. Cancel Click Cancel to reset the fields to remove the selected entry from any port. VID Enter the VLAN identification number. The Switch loses these changes if it is used...
... configuring. All ports, by the members of the VLAN specified in the VID field below. Full-duplex refers to a device's ability to connect. 80 ES-2108 Series User's Guide The Ethernet port must use the Save link on the top navigation panel to save your changes to the non-volatile...dotted decimal notation, for example 192.168.1.254 Add Click Add to save your changes to the Switch's run -time memory. Cancel Click Cancel to reset the fields to remove the selected entry from any port. VID Enter the VLAN identification number. The Switch loses these changes if it is used...
User Guide
Page 83
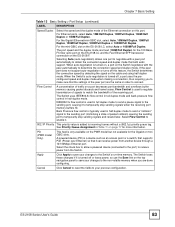
...the check box to allow a powered device (connected to the port) to temporarily stop sending signals and resend later. Cancel Click Cancel to reset the fields to your changes to determine the connection speed and duplex mode. The port speed and the duplex mode are done configuring. Selecting ...-negotiation) allows one port to negotiate with the peer automatically to the Switch's run-time memory. Flow Control A concentration of traffic on the ES-2108-LC, select Auto or 1000M/Full Duplex. PD (PWR model Only) This field is used to regulate transmission of signals to obtain the...
...the check box to allow a powered device (connected to the port) to temporarily stop sending signals and resend later. Cancel Click Cancel to reset the fields to your changes to determine the connection speed and duplex mode. The port speed and the duplex mode are done configuring. Selecting ...-negotiation) allows one port to negotiate with the peer automatically to the Switch's run-time memory. Flow Control A concentration of traffic on the ES-2108-LC, select Auto or 1000M/Full Duplex. PD (PWR model Only) This field is used to regulate transmission of signals to obtain the...
User Guide
Page 92
...: Changes in this VLAN group. This is turned off or loses power, so use the Save link on page 89 for this row apply to reset the fields. The Switch loses these changes if it is the default selection. VLAN Group ID Enter the VLAN ID for the port to the... > VLAN > Static VLAN LABEL DESCRIPTION ACTIVE Select this VLAN group. Chapter 8 VLAN The following table describes the related labels in the VLAN Status screen. 92 ES-2108 Series User's Guide Click Clear to activate the VLAN settings.
...: Changes in this VLAN group. This is turned off or loses power, so use the Save link on page 89 for this row apply to reset the fields. The Switch loses these changes if it is the default selection. VLAN Group ID Enter the VLAN ID for the port to the... > VLAN > Static VLAN LABEL DESCRIPTION ACTIVE Select this VLAN group. Chapter 8 VLAN The following table describes the related labels in the VLAN Status screen. 92 ES-2108 Series User's Guide Click Clear to activate the VLAN settings.
User Guide
Page 98
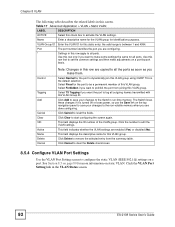
... run-time memory. Clicking Add saves your rule. Clear Click Clear to activate your changes to clear the Delete check boxes. 98 ES-2108 Series User's Guide You may temporarily deactivate a rule without deleting it by clearing this screen. You may temporarily deactivate a rule...are done configuring. Cancel Click Cancel to modify a static MAC address rule for this screen afresh. Index Click an index number to reset the fields. Chapter 9 Static MAC Forwarding Figure 47 Advanced Application > Static MAC Forwarding The following table describes the labels in this ...
... run-time memory. Clicking Add saves your rule. Clear Click Clear to activate your changes to clear the Delete check boxes. 98 ES-2108 Series User's Guide You may temporarily deactivate a rule without deleting it by clearing this screen. You may temporarily deactivate a rule...are done configuring. Cancel Click Cancel to modify a static MAC address rule for this screen afresh. Index Click an index number to reset the fields. Chapter 9 Static MAC Forwarding Figure 47 Advanced Application > Static MAC Forwarding The following table describes the labels in this ...

User Guide
Page 100
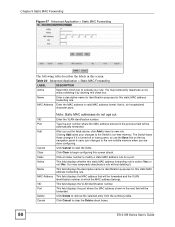
...Save link on the top navigation panel to save your changes to the non-volatile memory when you want to clear the selected check box(es) in the Delete column and then click the Delete button. VID This field displays the VLAN group identification number. Delete Check the rule... displays the descriptive name for identification purpose only. Clear Click Clear to clear the fields to change the settings. Cancel Click Cancel to reset the fields to which the MAC address belongs. MAC Address This field displays the source MAC address with the VLAN identification number to your...
...Save link on the top navigation panel to save your changes to the non-volatile memory when you want to clear the selected check box(es) in the Delete column and then click the Delete button. VID This field displays the VLAN group identification number. Delete Check the rule... displays the descriptive name for identification purpose only. Clear Click Clear to clear the fields to change the settings. Cancel Click Cancel to reset the fields to which the MAC address belongs. MAC Address This field displays the source MAC address with the VLAN identification number to your...
User Guide
Page 108
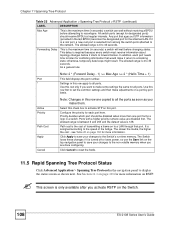
... some settings the same for conflicting information that port. " This screen is 128. Ports with a higher priority numeric value are disabled first. Click Cancel to reset the fields. 11.5 Rapid Spanning Tree Protocol Status Click Advanced Application > Spanning Tree Protocol in the navigation panel to activate STP on the Switch. 108...
... some settings the same for conflicting information that port. " This screen is 128. Ports with a higher priority numeric value are disabled first. Click Cancel to reset the fields. 11.5 Rapid Spanning Tree Protocol Status Click Advanced Application > Spanning Tree Protocol in the navigation panel to activate STP on the Switch. 108...
User Guide
Page 116
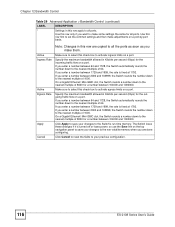
...enter a number between 1729 and 1999, the rate is fixed at 1792. Make sure to select this row are done configuring. Click Cancel to reset the fields to the nearest multiple of 8000 for a number between 2000 and 103999, the Switch rounds the number down to your previous configuration.... 116 ES-2108 Series User's Guide On a Gigabit Ethernet/ Mini-GBIC slot, the Switch rounds a number down to the nearest multiple of 8000 for all ...
...enter a number between 1729 and 1999, the rate is fixed at 1792. Make sure to select this row are done configuring. Click Cancel to reset the fields to the nearest multiple of 8000 for a number between 2000 and 103999, the Switch rounds the number down to your previous configuration.... 116 ES-2108 Series User's Guide On a Gigabit Ethernet/ Mini-GBIC slot, the Switch rounds a number down to the nearest multiple of 8000 for all ...
User Guide
Page 140
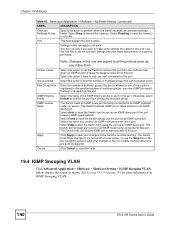
... panel to save your changes to the non-volatile memory when you want to display the screen as an IGMP query port. Click Cancel to reset the fields. 19.4 IGMP Snooping VLAN Click Advanced Application > Multicast > Multicast Setting > IGMP Snooping VLAN link to make some settings the same for... more information on IGMP Snooping VLAN. 140 ES-2108 Series User's Guide See Section 19.1.4 on a port-byport basis. Use this row first to set the Switch to remove this port from ...
... panel to save your changes to the non-volatile memory when you want to display the screen as an IGMP query port. Click Cancel to reset the fields. 19.4 IGMP Snooping VLAN Click Advanced Application > Multicast > Multicast Setting > IGMP Snooping VLAN link to make some settings the same for... more information on IGMP Snooping VLAN. 140 ES-2108 Series User's Guide See Section 19.1.4 on a port-byport basis. Use this row first to set the Switch to remove this port from ...
User Guide
Page 142
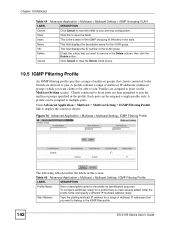
... this screen. Chapter 19 Multicast Table 44 Advanced Application > Multicast > Multicast Setting > IGMP Snooping VLAN LABEL DESCRIPTION Cancel Click Cancel to reset the fields to ports (in the Multicast Setting screen). Delete Check the rule(s) that you want clients to be able to the IGMP ...filter profile. 142 ES-2108 Series User's Guide A profile can be assigned to remove in the Delete column, then click the Delete button. Profiles are assigned...
... this screen. Chapter 19 Multicast Table 44 Advanced Application > Multicast > Multicast Setting > IGMP Snooping VLAN LABEL DESCRIPTION Cancel Click Cancel to reset the fields to ports (in the Multicast Setting screen). Delete Check the rule(s) that you want clients to be able to the IGMP ...filter profile. 142 ES-2108 Series User's Guide A profile can be assigned to remove in the Delete column, then click the Delete button. Profiles are assigned...
User Guide
Page 146
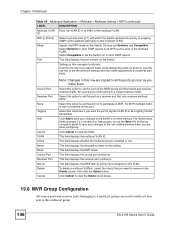
... not to all ports. Use this row apply to send IGMP reports. This field displays the source port number(s). All source ports must belong to reset the fields. ID 802.1p Priority Select a priority level (0-7) with which the Switch replaces the priority in this row are copied to all the ports... Application > Multicast > Multicast Setting > MVR (continued) LABEL DESCRIPTION Multicast VLAN Enter the VLAN ID (1 to make some settings the same for this multicast group. 146 ES-2108 Series User's Guide
... not to all ports. Use this row apply to send IGMP reports. This field displays the source port number(s). All source ports must belong to reset the fields. ID 802.1p Priority Select a priority level (0-7) with which the Switch replaces the priority in this row are copied to all the ports... Application > Multicast > Multicast Setting > MVR (continued) LABEL DESCRIPTION Multicast VLAN Enter the VLAN ID (1 to make some settings the same for this multicast group. 146 ES-2108 Series User's Guide
User Guide
Page 147
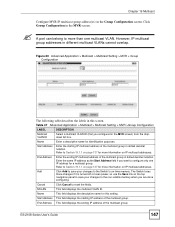
... the dropdown list box. Chapter 19 Multicast Configure MVR IP multicast group address(es) in different multicast VLANs cannot overlap. End Address Enter the ending IP multicast address of the multicast group. ES-2108 Series User's Guide 147 Click Group Configuration in dotted decimal notation. Refer... the top navigation panel to save your changes to Section 19.1.1 on page 137 for identification purposes. " A port can belong to reset the fields. Enter the same IP address as the Start Address field if you configured in this setting. Cancel Click Cancel to more...
... the dropdown list box. Chapter 19 Multicast Configure MVR IP multicast group address(es) in different multicast VLANs cannot overlap. End Address Enter the ending IP multicast address of the multicast group. ES-2108 Series User's Guide 147 Click Group Configuration in dotted decimal notation. Refer... the top navigation panel to save your changes to Section 19.1.1 on page 137 for identification purposes. " A port can belong to reset the fields. Enter the same IP address as the Start Address field if you configured in this setting. Cancel Click Cancel to more...


