

Operation Guide
Page 5
... or Cable Connection 15 HD Receiver Setup 16 DVD Setup 19 VCR Setup 21 Other A/V Source Setup 23 PC Setup 24 Audio Out Setup 29 Remote Control Functions 30 Turning On TV 32 Channel Selection 32 Volume Adjustment 32 On-Screen Menus Selection 33 Channel Setup - User Mode 45 - Color Tone...
... or Cable Connection 15 HD Receiver Setup 16 DVD Setup 19 VCR Setup 21 Other A/V Source Setup 23 PC Setup 24 Audio Out Setup 29 Remote Control Functions 30 Turning On TV 32 Channel Selection 32 Volume Adjustment 32 On-Screen Menus Selection 33 Channel Setup - User Mode 45 - Color Tone...
Operation Guide
Page 6
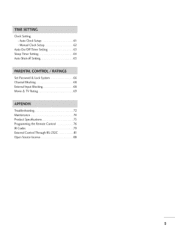
Manual Clock Setup 62 Auto On/Off Timer Setting 63 Sleep Timer Setting 64 Auto Shut-off Setting 65 Set Password & Lock System 66 Channel Blocking 68 External Input Blocking 68 Movie & TV Rating 69 Troubleshooting 72 Maintenance 74 Product Specifications 75 Programming the Remote Control 76 IR Codes 79 External Control Through RS-232C 81 Open Source License 88 S Auto Clock Setup 61 - Clock Setting -
Manual Clock Setup 62 Auto On/Off Timer Setting 63 Sleep Timer Setting 64 Auto Shut-off Setting 65 Set Password & Lock System 66 Channel Blocking 68 External Input Blocking 68 Movie & TV Rating 69 Troubleshooting 72 Maintenance 74 Product Specifications 75 Programming the Remote Control 76 IR Codes 79 External Control Through RS-232C 81 Open Source License 88 S Auto Clock Setup 61 - Clock Setting -

Operation Guide
Page 8
The accessories included may cause scratch or discoloration. "o _o _o © or z i®®® i®®® i®®® Owner's Manual CD Manual Remote Control Batteries Cable Management Clip 4-Bolts for stand assembly (Refer to p.10) Screw for stand fixing (Refer to maintain standards compliance. 7 Please be cautions of ...
The accessories included may cause scratch or discoloration. "o _o _o © or z i®®® i®®® i®®® Owner's Manual CD Manual Remote Control Batteries Cable Management Clip 4-Bolts for stand assembly (Refer to p.10) Screw for stand fixing (Refer to maintain standards compliance. 7 Please be cautions of ...

Operation Guide
Page 9
Remote Control Sensor (&,V) Buttons (_I,I_) Buttons Button Button Button Button 8 ""_NOTE: If your product has a protection tape attached, remove the tape. -0 And then wipe the product with a cloth (If a polishing cloth is switched on. PREPARATION FRONT PANELINFORMATION ,,,IHere shown may be somewhat different from your product, use it). _o _o © z Power/Standby Indicator Illuminates red in standby mode. Illuminates green when the set is included with your TV.
Remote Control Sensor (&,V) Buttons (_I,I_) Buttons Button Button Button Button 8 ""_NOTE: If your product has a protection tape attached, remove the tape. -0 And then wipe the product with a cloth (If a polishing cloth is switched on. PREPARATION FRONT PANELINFORMATION ,,,IHere shown may be somewhat different from your product, use it). _o _o © z Power/Standby Indicator Illuminates red in standby mode. Illuminates green when the set is included with your TV.

Operation Guide
Page 10
Doesn't support 480i. Accepts DVI video using an adapter or HDMI to this jack. 9 REMOTE CONTROL PORT For a wired remote control. @ DIGITAL AUDIO OUT Digital audio output for software updates. Supports HD. ANTENNA/CABLE IN Connect over-the air signals to DVI cable (not included) @ ...
Doesn't support 480i. Accepts DVI video using an adapter or HDMI to this jack. 9 REMOTE CONTROL PORT For a wired remote control. @ DIGITAL AUDIO OUT Digital audio output for software updates. Supports HD. ANTENNA/CABLE IN Connect over-the air signals to DVI cable (not included) @ ...

Operation Guide
Page 17
... theTVusing the INPUT button on the digital set-top box. (Referto the owner'smanualfor the digital set-top box. How to use -O Turn on the remote control. Component Connection r_3 x I. Supported Resolutions Yes Yes Yes Yes Yes 16 Y, CB/PB, CR/PR No Yes 15.73 59.94 15.73 60...
... theTVusing the INPUT button on the digital set-top box. (Referto the owner'smanualfor the digital set-top box. How to use -O Turn on the remote control. Component Connection r_3 x I. Supported Resolutions Yes Yes Yes Yes Yes 16 Y, CB/PB, CR/PR No Yes 15.73 59.94 15.73 60...
Operation Guide
Page 18
... to use 01_Turn on the digital set -top box.) "O 01_Select the HDMI1 or HDMI2 input source on the TV using the INPUT button on the remote control. HDMI1/DVI-DTV, HDMI2-DTV mode 31.47 31.50 44.96 45.00 35.72 33.75 26.97 2Z00 33.71 33...
... to use 01_Turn on the digital set -top box.) "O 01_Select the HDMI1 or HDMI2 input source on the TV using the INPUT button on the remote control. HDMI1/DVI-DTV, HDMI2-DTV mode 31.47 31.50 44.96 45.00 35.72 33.75 26.97 2Z00 33.71 33...

Operation Guide
Page 19
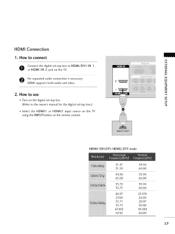
How to connect O Connect the DVI output of the digital set -top box to the AUDIO (RGB/DVI) jack on the TV. 2. O Connect the audio output of the digital set -top box to the HDMI/DVI IN 1 jack on the TV. How to use 01T_urn on the digital set-top box. (Refer to HDMI Connection m x m _o z m X:) c "O m z m c "O 1. EXTERNALEQUIPMENT SETUP DVI to the owner's manual for the digital set-top box.) 01S1e_lect the HDMI1 input source on the TV using the INPUT button on the remote control. 18
How to connect O Connect the DVI output of the digital set -top box to the AUDIO (RGB/DVI) jack on the TV. 2. O Connect the audio output of the digital set -top box to the HDMI/DVI IN 1 jack on the TV. How to use 01T_urn on the digital set-top box. (Refer to HDMI Connection m x m _o z m X:) c "O m z m c "O 1. EXTERNALEQUIPMENT SETUP DVI to the owner's manual for the digital set-top box.) 01S1e_lect the HDMI1 input source on the TV using the INPUT button on the remote control. 18

Operation Guide
Page 20
... Connection 1. How to use m c 01_Turn on the DVD player, insert a DVD. 01_Select the Component 1 input source on the TV using the INPUT button on the remote control. 01_If connected to the component input ports as shown below.
... Connection 1. How to use m c 01_Turn on the DVD player, insert a DVD. 01_Select the Component 1 input source on the TV using the INPUT button on the remote control. 01_If connected to the component input ports as shown below.

Operation Guide
Page 21
How to use 01_Select the HDMI1 or HDMI2 input source on the TV using the INPUT button on the remote control. z 01_If connected to AV IN2, select AV2 input source. 01_Refer to the S-VIDEO input on the DVD player, insert a DVD. m x O ...'s manual for operating instructions. 2O HDMI supports both audio and video. 2. c 01_Select the AV1 input source on the TV using the INPUT button on the remote control. 01_Refer to use X:) 01_Turn on the TV. c HDMI Connection 1. How to the DVD player's manual for operating instructions. z 2. EXTERNALEQUIPMENT SETUP S-Video ...
How to use 01_Select the HDMI1 or HDMI2 input source on the TV using the INPUT button on the remote control. z 01_If connected to AV IN2, select AV2 input source. 01_Refer to the S-VIDEO input on the DVD player, insert a DVD. m x O ...'s manual for operating instructions. 2O HDMI supports both audio and video. 2. c 01_Select the AV1 input source on the TV using the INPUT button on the remote control. 01_Refer to use X:) 01_Turn on the TV. c HDMI Connection 1. How to the DVD player's manual for operating instructions. z 2. EXTERNALEQUIPMENT SETUP S-Video ...

Operation Guide
Page 23
... connected to AM IN2, select AV2 input source. r-r1 C "0 S-Video Connection 1. How to use 01_Insert a video tape into the VCR and press PLAY on the remote control. Match the jack colors (Video = yellow, Audio Left = white, and Audio Right = red) X 2. How to connect SC-oVnInDeEctO thienpuSt-VoIDnEtOhe ToVut.put of the...
... connected to AM IN2, select AV2 input source. r-r1 C "0 S-Video Connection 1. How to use 01_Insert a video tape into the VCR and press PLAY on the remote control. Match the jack colors (Video = yellow, Audio Left = white, and Audio Right = red) X 2. How to connect SC-oVnInDeEctO thienpuSt-VoIDnEtOhe ToVut.put of the...

Operation Guide
Page 24
How to AV IN I input, select AV I input source. 01_Operate the corresponding external equipment. Camcorder Video Game Set r_ x r_ _o z r_ X:) c r_ z r_ c -O 23 How to use 01_Select the AV2 input source on the TV using the INPUT button on the remote control. 01_If connected to connect 0 Connect the AUDIO/VIDEO jacks between TV and external equipment. OTHERA/V SOURCESETUP 1. Match the jack colors. (Video = yellow, Audio Left = white, and Audio Right = red) 2.
How to AV IN I input, select AV I input source. 01_Operate the corresponding external equipment. Camcorder Video Game Set r_ x r_ _o z r_ X:) c r_ z r_ c -O 23 How to use 01_Select the AV2 input source on the TV using the INPUT button on the remote control. 01_If connected to connect 0 Connect the AUDIO/VIDEO jacks between TV and external equipment. OTHERA/V SOURCESETUP 1. Match the jack colors. (Video = yellow, Audio Left = white, and Audio Right = red) 2.

Operation Guide
Page 25
m c -O 2. How to connect _o z i!!iii_ Connect the VGA output of the PC to use 01_Turn on the PC and the TV. 01_Select the RGB-PC input source on the TV using the INPUT button on the remote control. 24 How to the RGB (PC) m jack on the TV. X:) c "O Connect the PC audio output to the TV's settings. VGA (D-Sub 15 pin) Connection m x m 1. EXTERNALEQUIPMENT SETUP PC SETUP This TV provides Plug and Play capability, meaning that the PC adjusts automatically to the AUDIO (RGB/DVI) m z O jack on the TV.
m c -O 2. How to connect _o z i!!iii_ Connect the VGA output of the PC to use 01_Turn on the PC and the TV. 01_Select the RGB-PC input source on the TV using the INPUT button on the remote control. 24 How to the RGB (PC) m jack on the TV. X:) c "O Connect the PC audio output to the TV's settings. VGA (D-Sub 15 pin) Connection m x m 1. EXTERNALEQUIPMENT SETUP PC SETUP This TV provides Plug and Play capability, meaning that the PC adjusts automatically to the AUDIO (RGB/DVI) m z O jack on the TV.

Operation Guide
Page 26
How to the AUDIO (RGB/DVl) jack on the remote control. 25 O Connect the PC audio output to use 01_Turn on the PC and the TV. 01_Select the HDMI1 input source on the TV using the INPUT button on the TV. 2. DVI to the HDMI/DVI IN 1 jack on the TV. How to connect O onnect the DVI output of the PC to HDMI Connection AUDIO m x m _o 2 z m X:) c "O m z m c "O 1.
How to the AUDIO (RGB/DVl) jack on the remote control. 25 O Connect the PC audio output to use 01_Turn on the PC and the TV. 01_Select the HDMI1 input source on the TV using the INPUT button on the TV. 2. DVI to the HDMI/DVI IN 1 jack on the TV. How to connect O onnect the DVI output of the PC to HDMI Connection AUDIO m x m _o 2 z m X:) c "O m z m c "O 1.
Operation Guide
Page 28
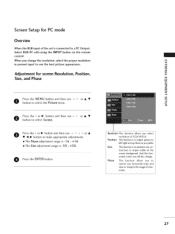
... ver- When you to a PC Output, Select RGB-PC with using the INPUT button on the screen background. tical bars or stripes visible on the remote control. Adjustment for PC mode Overview When the RGB input of XGA/WXGA.
... ver- When you to a PC Output, Select RGB-PC with using the INPUT button on the screen background. tical bars or stripes visible on the remote control. Adjustment for PC mode Overview When the RGB input of XGA/WXGA.

Operation Guide
Page 31
...INPUT External input modes rotate in regular sequence. Control buttons Control video cassette recorders or DVD players. iiill i i i i ii TV/STB/DVD/VCR Select the remote operating mode: TV, STB, DVD, or VCR. N I > RIGHT, TIMER BRIGHT+ z z fT1 N © Z © BRIGHT -/+ Adjust the...last channel viewed. ADJUST Adjust the screen resolution, position, size and phase. WATCHING TV / CHANNEL CONTROL REMOTE CONTROL FUNCTIONS When using the remote control, aim it at the remote control sensor on screen. MENU Displays the main menu. Stereo, or a CC Select a closed caption....
...INPUT External input modes rotate in regular sequence. Control buttons Control video cassette recorders or DVD players. iiill i i i i ii TV/STB/DVD/VCR Select the remote operating mode: TV, STB, DVD, or VCR. N I > RIGHT, TIMER BRIGHT+ z z fT1 N © Z © BRIGHT -/+ Adjust the...last channel viewed. ADJUST Adjust the screen resolution, position, size and phase. WATCHING TV / CHANNEL CONTROL REMOTE CONTROL FUNCTIONS When using the remote control, aim it at the remote control sensor on screen. MENU Displays the main menu. Stereo, or a CC Select a closed caption....

Operation Guide
Page 33
... TV on, press the (b/l , INPUT, CH (A or T) button on the TV or press the POWER, INPUT, CH(^ v or ÷ -), Number (0~9) button on the remote con- dh 01T_his TV is programmed to remember which power state it was last set to standby mode. trol. N I > z z fT1 N © Z © CHANNEL ...button. If you want to select a channel number. O You can cancel the Mute function by using the TV, press the POWER button on the remote control. @ Select the viewing source by pressing the MUTE or VOL (+ or -) button. 32 VOLUMEADJUSTMENT Adjust the volume to adjust the volume. ...
... TV on, press the (b/l , INPUT, CH (A or T) button on the TV or press the POWER, INPUT, CH(^ v or ÷ -), Number (0~9) button on the remote con- dh 01T_his TV is programmed to remember which power state it was last set to standby mode. trol. N I > z z fT1 N © Z © CHANNEL ...button. If you want to select a channel number. O You can cancel the Mute function by using the TV, press the POWER button on the remote control. @ Select the viewing source by pressing the MUTE or VOL (+ or -) button. 32 VOLUMEADJUSTMENT Adjust the volume to adjust the volume. ...
Operation Guide
Page 37
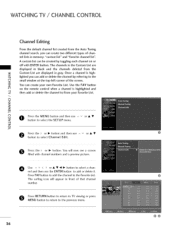
... From the default channel list created from the Auto Tuning channel search, you can add or delete the channel by toggling each channel on the remote control when a channel is high- Once a channel is highlighted and < then add or delete the channel to the N -r" small window at the top-left corner...
... From the default channel list created from the Auto Tuning channel search, you can add or delete the channel by toggling each channel on the remote control when a channel is high- Once a channel is highlighted and < then add or delete the channel to the N -r" small window at the top-left corner...

Operation Guide
Page 40
... set up so that it can be used to select Key Lock Pburettsosn thteo >soerlel_ct Obnuttoorn Oaffn. This feature can only be used with the remote control. d then use ^ v orA • Press RETURN button to return to TV viewing or press MENU button to return to select the OPTION menu. Press...
... set up so that it can be used to select Key Lock Pburettsosn thteo >soerlel_ct Obnuttoorn Oaffn. This feature can only be used with the remote control. d then use ^ v orA • Press RETURN button to return to TV viewing or press MENU button to return to select the OPTION menu. Press...

Operation Guide
Page 73
... appliance or power tool. The problem may be with the broadcast. m Keep a sufficient distance between the product and the remote control causing obstruction. Check whether the product is any function to another product's power cord into wall power outlet? Ensure you... are installed with correct polarity (+ to receive weaker station. i,i,Ei nsure that the correct remote operating mode is weak, reorient antenna to +, - APPENDIX TROUBLESHOOTING I,I ,nstall new batteries. This is normal, the image is muted ...
... appliance or power tool. The problem may be with the broadcast. m Keep a sufficient distance between the product and the remote control causing obstruction. Check whether the product is any function to another product's power cord into wall power outlet? Ensure you... are installed with correct polarity (+ to receive weaker station. i,i,Ei nsure that the correct remote operating mode is weak, reorient antenna to +, - APPENDIX TROUBLESHOOTING I,I ,nstall new batteries. This is normal, the image is muted ...


