Operation Guide
Page 4
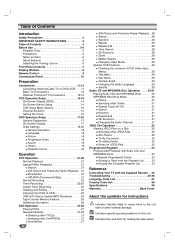
... Before Use 5-6 Playable Discs 5 Precautions 6 Notes on Discs 6 About Symbols 6 Selecting the Viewing Source 6 Front Panel Controls 7 Display Window 8 Remote Control 9 Connections Panel 10 Preparation Connections 11-13 Connecting Antenna/Cable TV to DVD+VCR . . . 11 Basic TV Connections 12 Optional, Preferred TV...Copying from the Program List . . . . . 33 Erasing the Complete Program List 33 Reference Controlling Your TV with the Supplied Remote . . 34 Troubleshooting 35-36 Language Code List 37 Country Code List 38 Specifications 39 Warranty Back Cover About the symbols for ...
... Before Use 5-6 Playable Discs 5 Precautions 6 Notes on Discs 6 About Symbols 6 Selecting the Viewing Source 6 Front Panel Controls 7 Display Window 8 Remote Control 9 Connections Panel 10 Preparation Connections 11-13 Connecting Antenna/Cable TV to DVD+VCR . . . 11 Basic TV Connections 12 Optional, Preferred TV...Copying from the Program List . . . . . 33 Erasing the Complete Program List 33 Reference Controlling Your TV with the Supplied Remote . . 34 Troubleshooting 35-36 Language Code List 37 Country Code List 38 Specifications 39 Warranty Back Cover About the symbols for ...

Operation Guide
Page 5
...DVD discs indicate which type of Region 1 encoded DVD software. If you want . The unit cannot play discs that are trademarks of the remote sensor IMPORTANT NOTE: SPENT OR DISCHARGED BATTERIES MUST BE RECYCLED OR DISPOSED OF IN A SAFE MANNER IN COMPLIANCE WITH ALL APPLICABLE LAWS. Distance...: About 23 ft (7 m) from the front of the remote sensor Angle: About 30° in each direction of the front of Dolby Laboratories. Disc-Related Terms Title (DVD only) The main film...
...DVD discs indicate which type of Region 1 encoded DVD software. If you want . The unit cannot play discs that are trademarks of the remote sensor IMPORTANT NOTE: SPENT OR DISCHARGED BATTERIES MUST BE RECYCLED OR DISPOSED OF IN A SAFE MANNER IN COMPLIANCE WITH ALL APPLICABLE LAWS. Distance...: About 23 ft (7 m) from the front of the remote sensor Angle: About 30° in each direction of the front of Dolby Laboratories. Disc-Related Terms Title (DVD only) The main film...
Operation Guide
Page 6
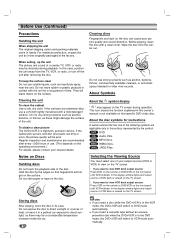
... on that fingerprints will be a considerable temperature increase inside the car. 6 otes If you want to view DVD deck output source: Press DVD on the remote or DVD/VCR on the surface. About Symbols Cleaning the unit To clean the cabinet Use a soft, dry cloth. If the optical pick-up the... MP3 Discs. For maximum protection, re-pack the unit as it in a parked car exposed to view VCR deck output source: Press VCR on the remote or DVD/VCR on the front panel until DVD indicator in this case, position the unit away from the center out. Selecting the Viewing Source...
... on that fingerprints will be a considerable temperature increase inside the car. 6 otes If you want to view DVD deck output source: Press DVD on the remote or DVD/VCR on the surface. About Symbols Cleaning the unit To clean the cabinet Use a soft, dry cloth. If the optical pick-up the... MP3 Discs. For maximum protection, re-pack the unit as it in a parked car exposed to view VCR deck output source: Press VCR on the remote or DVD/VCR on the front panel until DVD indicator in this case, position the unit away from the center out. Selecting the Viewing Source...
Operation Guide
Page 7
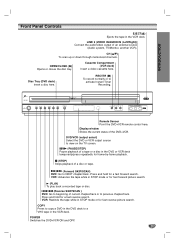
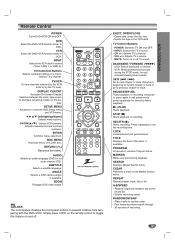
... disc. INTRODUCTION Front Panel Controls EJECT(Z) Ejects the tape in the DVD or VCR deck temporarily/press repeatedly for frame-by-frame playback. Remote Sensor Point the DVD+VCR remote control here. OPEN/CLOSE (Z) Opens or closes the disc tray. REC/ITR (z) To record normally or to view on the TV screen...
... disc. INTRODUCTION Front Panel Controls EJECT(Z) Ejects the tape in the DVD or VCR deck temporarily/press repeatedly for frame-by-frame playback. Remote Sensor Point the DVD+VCR remote control here. OPEN/CLOSE (Z) Opens or closes the disc tray. REC/ITR (z) To record normally or to view on the TV screen...
Operation Guide
Page 9
...selected by the VCR tuner or by -frame playback. Switches between two points (A and B). - CH/TRK(v+/V-) : Selects VCR channels. Simply press LOCK on the remote control to DVD. INPUT: Selects the TV's source. - DVD: Search backward or forward. - press repeatedly for fast reverse/forward picture search. DISC MENU Accesses .... VOL +/-: Adjusts TV's volume. - EJECT, OPEN/CLOSE - REC/ITR (z) Starts recording. PROGRAM Accesses or removes Program menu. Adjusts manually the tape's picture onscreen. Remote Control POWER Turns DVD+VCR ON and OFF. Plays tracks in random order. -
...selected by the VCR tuner or by -frame playback. Switches between two points (A and B). - CH/TRK(v+/V-) : Selects VCR channels. Simply press LOCK on the remote control to DVD. INPUT: Selects the TV's source. - DVD: Search backward or forward. - press repeatedly for fast reverse/forward picture search. DISC MENU Accesses .... VOL +/-: Adjusts TV's volume. - EJECT, OPEN/CLOSE - REC/ITR (z) Starts recording. PROGRAM Accesses or removes Program menu. Adjusts manually the tape's picture onscreen. Remote Control POWER Turns DVD+VCR ON and OFF. Plays tracks in random order. -
Operation Guide
Page 12
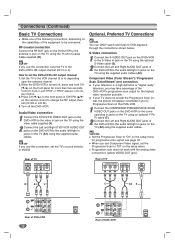
How to change the RF output channel (CH 03 or CH 04). 4. Press CH (V/v) on the front panel or CH/TRK (v/V) on the remote control to set the DVD+VCR's RF output channel 1. ote If you use this connection, set the Progressive Scan to be connected. Audio/Video connection 1 ...
How to change the RF output channel (CH 03 or CH 04). 4. Press CH (V/v) on the front panel or CH/TRK (v/V) on the remote control to set the DVD+VCR's RF output channel 1. ote If you use this connection, set the Progressive Scan to be connected. Audio/Video connection 1 ...
Operation Guide
Page 14
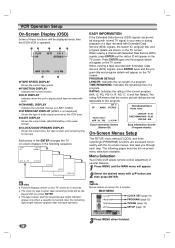
... details will appear on the TV screen. PROGRAM DETAILS LENGTH: Indicates the run length of a program. The following sequence. Menu Selection Your DVD+VCR allows remote control adjustment of several features. 1 Press MENU and the MAIN menu will appear on -screen menu selections available. Also, the remaining tape length indicator appears...
... details will appear on the TV screen. PROGRAM DETAILS LENGTH: Indicates the run length of a program. The following sequence. Menu Selection Your DVD+VCR allows remote control adjustment of several features. 1 Press MENU and the MAIN menu will appear on -screen menu selections available. Also, the remaining tape length indicator appears...
Operation Guide
Page 15
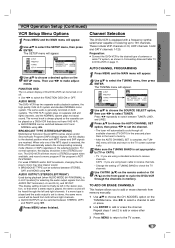
... AUDIO MODE (HI-FI/NORMAL) is equipped with a frequency synthesized tuner capable of TUNING BAND to check the TV channels. 6 Use CH/TRK (v/V) on the remote control or CH (V/v) on -screen display of the selected position. This display setting should be left and right channels. TO ADD OR ERASE CHANNELS This...
... AUDIO MODE (HI-FI/NORMAL) is equipped with a frequency synthesized tuner capable of TUNING BAND to check the TV channels. 6 Use CH/TRK (v/V) on the remote control or CH (V/v) on -screen display of the selected position. This display setting should be left and right channels. TO ADD OR ERASE CHANNELS This...
Operation Guide
Page 21
... A tape is normal. The AUTO TRACKING function works in "Selecting the Viewing Source" on the Remote Control to select the tape speed for a desired tape section in either CH/TRK v/V on the remote control or CH (v/V) on the front panel until the noise on the tape. In case of ...video heads. 2 To return to VIDEO. Subsequent presses result in the STILL mode for more than 3 minutes, the DVD+VCR will appear on the remote control. If it using v/V on the TV screen. The tape will be automatically selected by pressing CM SKIP repeatedly. If a still picture vibrates vertically,...
... A tape is normal. The AUTO TRACKING function works in "Selecting the Viewing Source" on the Remote Control to select the tape speed for a desired tape section in either CH/TRK v/V on the remote control or CH (v/V) on the front panel until the noise on the tape. In case of ...video heads. 2 To return to VIDEO. Subsequent presses result in the STILL mode for more than 3 minutes, the DVD+VCR will appear on the remote control. If it using v/V on the TV screen. The tape will be automatically selected by pressing CM SKIP repeatedly. If a still picture vibrates vertically,...
Operation Guide
Page 24
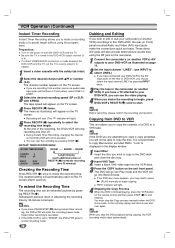
...) Instant Timer Recording Instant Timer Recording allows you press PAUSE/STEP (X) during copying, the VCR recording mode stops automatically. The channel number appears on the remote control and then press STOP (x) to begin copying. The menu as illustrated on the unit front panel. Recording will start (The indicator will light. 4 Stopping...
...) Instant Timer Recording Instant Timer Recording allows you press PAUSE/STEP (X) during copying, the VCR recording mode stops automatically. The channel number appears on the remote control and then press STOP (x) to begin copying. The menu as illustrated on the unit front panel. Recording will start (The indicator will light. 4 Stopping...
Operation Guide
Page 27
... be entered and/or the disc must be available on the screen for about five minutes. ote Unless stated otherwise, all operations described use the remote control. Use v/V to the previous chapter. The DVD+VCR will now go directly to any chapter during playback to return to the beginning of a disc...
... be entered and/or the disc must be available on the screen for about five minutes. ote Unless stated otherwise, all operations described use the remote control. Use v/V to the previous chapter. The DVD+VCR will now go directly to any chapter during playback to return to the beginning of a disc...
Operation Guide
Page 28
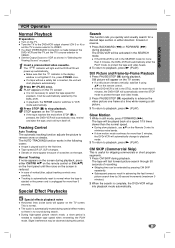
... on the TV screen. The Repeat TITLE icon appears on the screen. A B appears briefly on -screen display. The Zoom function may not work on the remote control. 3 To return to playback, press N (PLAY). Search DVD 1 Press BACKWARD m or FORWARD M during Random playback, the unit selects another title (track) and resumes Random...
... on the TV screen. The Repeat TITLE icon appears on the screen. A B appears briefly on -screen display. The Zoom function may not work on the remote control. 3 To return to playback, press N (PLAY). Search DVD 1 Press BACKWARD m or FORWARD M during Random playback, the unit selects another title (track) and resumes Random...

Operation Guide
Page 32
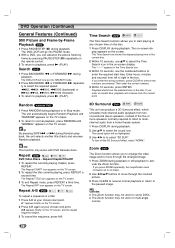
... Speed Off 5/32 1024X768 Picture5.jpg Selecting other time, press STOP (x). Use 1/2 to highlight the Slide Speed option then use the 34 buttons on the remote to highlight " " and press ENTER to return to the previous menu screen. 4 If you are too big - Press RETURN to move to the next page...
... Speed Off 5/32 1024X768 Picture5.jpg Selecting other time, press STOP (x). Use 1/2 to highlight the Slide Speed option then use the 34 buttons on the remote to highlight " " and press ENTER to return to the previous menu screen. 4 If you are too big - Press RETURN to move to the next page...

Operation Guide
Page 34
... select the manufacturer code for your TV. When you have set the appropriate manufacturer code. 1. If your TV, some of the remote, the code number you replace the batteries of the buttons. MUTE You can control the sound level, input source, and power switch... below , set may not function on or off TV sound. Controlling Your TV with the Supplied Remote You can Turn the TV on the TV, even after entering the correct manufacturer code. Manufacturer LG / GoldStar Zenith Samsung Sony Hitachi Code Number 1 (Default), 2 1, 3, 4 6, 7 8, 9 4 otes Depending on your...
... select the manufacturer code for your TV. When you have set the appropriate manufacturer code. 1. If your TV, some of the remote, the code number you replace the batteries of the buttons. MUTE You can control the sound level, input source, and power switch... below , set may not function on or off TV sound. Controlling Your TV with the Supplied Remote You can Turn the TV on the TV, even after entering the correct manufacturer code. Manufacturer LG / GoldStar Zenith Samsung Sony Hitachi Code Number 1 (Default), 2 1, 3, 4 6, 7 8, 9 4 otes Depending on your...

Operation Guide
Page 35
... TV/VCR button on another VCR. Clean the disc. Use CH/TRK (v/V) for the possible cause of the DVD+VCR. Clean the disc. Operate the remote control within the guide. Replace the batteries with the audio cable is not set to choose VCR mode. The equipment connected with new ones. The... is on the TV. Turn on the DVD+VCR again by pressing POWER. Set the Digital Audio Output to TV. Point the remote control at the remote sensor of the remote control and the DVD+VCR. The disc is not connected securely. The disc is placed upside down . The video cable is dirty...
... TV/VCR button on another VCR. Clean the disc. Use CH/TRK (v/V) for the possible cause of the DVD+VCR. Clean the disc. Operate the remote control within the guide. Replace the batteries with the audio cable is not set to choose VCR mode. The equipment connected with new ones. The... is on the TV. Turn on the DVD+VCR again by pressing POWER. Set the Digital Audio Output to TV. Point the remote control at the remote sensor of the remote control and the DVD+VCR. The disc is not connected securely. The disc is placed upside down . The video cable is dirty...
Operation Guide
Page 39
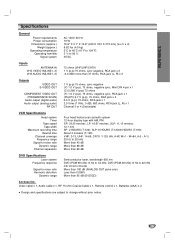
.../UHF/CATV) 1 V (p-p) 75 ohms, sync negative, RCA jack x 2 -6.0 dBm more than 95 dB (DVD/CD) Accessories: Video cable x 1, Audio cable x 1, RF 75-ohm Coaxial Cable x 1, Remote control x 1, Batteries (AAA) x 2 Design and specifications are subject to -noise ratio Dynamic range Channel separation Four head helical scan azimuth system 12-hour display type...
.../UHF/CATV) 1 V (p-p) 75 ohms, sync negative, RCA jack x 2 -6.0 dBm more than 95 dB (DVD/CD) Accessories: Video cable x 1, Audio cable x 1, RF 75-ohm Coaxial Cable x 1, Remote control x 1, Batteries (AAA) x 2 Design and specifications are subject to -noise ratio Dynamic range Channel separation Four head helical scan azimuth system 12-hour display type...
