

Operating Guide
Page 1
Installation and Operating Guide | Warranty Model Number | L30W36 | LCD AV MONITOR © Copyright 2003, Zenith Electronics Corporation.
Installation and Operating Guide | Warranty Model Number | L30W36 | LCD AV MONITOR © Copyright 2003, Zenith Electronics Corporation.
Operating Guide
Page 2
It is composed of the manufacturing process. The LCD Display panel The panel is common for a few defective cells to six defective cells has been adopted by all panel manufacturers and therefore should not be connected to a PC and used in place of up to appear as minute colored dots on the screen as reason for returning the LCD Monitor for refund or exchange. A tolerance of the a PC Monitor. Multimedia Display This LCD monitor can be considered as a result of 2.9 million individual cells.
It is composed of the manufacturing process. The LCD Display panel The panel is common for a few defective cells to six defective cells has been adopted by all panel manufacturers and therefore should not be connected to a PC and used in place of up to appear as minute colored dots on the screen as reason for returning the LCD Monitor for refund or exchange. A tolerance of the a PC Monitor. Multimedia Display This LCD monitor can be considered as a result of 2.9 million individual cells.
Operating Guide
Page 3
Maintenance 52 Troubleshooting Checklist 53 Product Specifications 55 Your Zenith Limited Warranty Back Cover Keep this manual with Monitor for future easy reference Table of Contents First step Setup and Operation Checklist 4 WARNINGS 5 Safety instructions 6 Monitor Overview Front Panel Controls 8 Connection Panel Overview 9 Remote ...AV Source Setup 17 DVD Setup 18 DTV Setup 19 PC Setup 20 Basic Features Setup and Operation Turning on the Monitor 22 Checking Available Features 23 Sleep Timer Setting Sleep Timer 24 Picture & Sound Auto Picture Control 25 Adjusting Picture ...
Maintenance 52 Troubleshooting Checklist 53 Product Specifications 55 Your Zenith Limited Warranty Back Cover Keep this manual with Monitor for future easy reference Table of Contents First step Setup and Operation Checklist 4 WARNINGS 5 Safety instructions 6 Monitor Overview Front Panel Controls 8 Connection Panel Overview 9 Remote ...AV Source Setup 17 DVD Setup 18 DTV Setup 19 PC Setup 20 Basic Features Setup and Operation Turning on the Monitor 22 Checking Available Features 23 Sleep Timer Setting Sleep Timer 24 Picture & Sound Auto Picture Control 25 Adjusting Picture ...
Operating Guide
Page 4
...remote control. Connect all accessories. 2. See page 13. 4. See page 22. 5. See page 11. 8. Setup and Operation Checklist Setup and Operation Checklist (See page 9 for monitor. Choose on screen menu language. See pages 25, 27, and 28. 9. See page 29. (English is selected.) 6. Fine-tune source image and sound to personal... preference or as required by source. Select viewing source for available connection and operational setup options.) 1. Unpack monitor and all external video and audio equipment see pages 14 through 20. 3.
...remote control. Connect all accessories. 2. See page 13. 4. See page 22. 5. See page 11. 8. Setup and Operation Checklist Setup and Operation Checklist (See page 9 for monitor. Choose on screen menu language. See pages 25, 27, and 28. 9. See page 29. (English is selected.) 6. Fine-tune source image and sound to personal... preference or as required by source. Select viewing source for available connection and operational setup options.) 1. Unpack monitor and all external video and audio equipment see pages 14 through 20. 3.
Operating Guide
Page 5
...important operating and maintenance (servicing) instructions in a residential installation. FCC NOTICE • L30W36 : A Class B digital device This equipment has been tested and found to comply with...'s authority to the presence of the following measures: - However, there is : Zenith Electronics Corporation 2000 Millbrook Drive Lincolnshire, IL 60069, USA Phone: 1-847-941-8000... protection against harmful interference in the literature accompanying the appliance. Safety Instructions Monitor Overview Connections Basic Operation Sleep Timer Picture & Sound Special Features WARNINGS WARNING...
...important operating and maintenance (servicing) instructions in a residential installation. FCC NOTICE • L30W36 : A Class B digital device This equipment has been tested and found to comply with...'s authority to the presence of the following measures: - However, there is : Zenith Electronics Corporation 2000 Millbrook Drive Lincolnshire, IL 60069, USA Phone: 1-847-941-8000... protection against harmful interference in the literature accompanying the appliance. Safety Instructions Monitor Overview Connections Basic Operation Sleep Timer Picture & Sound Special Features WARNINGS WARNING...
Operating Guide
Page 7
... product has been exposed to a wall or ceiling only as contact with them , paying particular attention to lightning and power-line surges. 16. f. Safety Instructions Monitor Overview Connections Basic Operation Sleep Timer Picture & Sound Special Features 14. Never spill liquid of overhead power lines or other hazards. 22. Refer all servicing...
... product has been exposed to a wall or ceiling only as contact with them , paying particular attention to lightning and power-line surges. 16. f. Safety Instructions Monitor Overview Connections Basic Operation Sleep Timer Picture & Sound Special Features 14. Never spill liquid of overhead power lines or other hazards. 22. Refer all servicing...
Operating Guide
Page 8
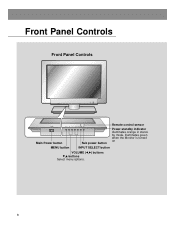
Front Panel Controls Front Panel Controls POWER ON OFF MENU VOL INPUT /I SELECT POWER ON OFF MENU Main Power button VOL INPUT /I SELECT Sub power button Remote control sensor Power standby indicator Illuminates orange in standby mode, illuminates green when the Monitor is turned on MENU button INPUT SELECT button VOLUME (F,G) buttons E,D buttons Select menu options. 8
Front Panel Controls Front Panel Controls POWER ON OFF MENU VOL INPUT /I SELECT POWER ON OFF MENU Main Power button VOL INPUT /I SELECT Sub power button Remote control sensor Power standby indicator Illuminates orange in standby mode, illuminates green when the Monitor is turned on MENU button INPUT SELECT button VOLUME (F,G) buttons E,D buttons Select menu options. 8
Operating Guide
Page 10
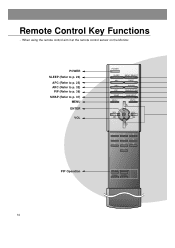
When using the remote control aim it at the remote control sensor on the Monitor. Remote Control Key Functions - POWER SLEEP (Refer to p. 24) APC (Refer to p. 25) ARC (Refer to p. 32) PIP (Refer to p. 36) SWAP (Refer to p. 37) MENU ENTER VOL PIP Operation POWER SLEEP APC ARC PIP SWAP MENU INPUT SELECT DASP PIP ARC TWIN PICTURE SUB INPUT MUTE VOL ENTER VOL 1 2 3 4 5 6 7 8 9 0 WIN.SIZE WIN.POSITION ZOOM- ZOOM+ 10
When using the remote control aim it at the remote control sensor on the Monitor. Remote Control Key Functions - POWER SLEEP (Refer to p. 24) APC (Refer to p. 25) ARC (Refer to p. 32) PIP (Refer to p. 36) SWAP (Refer to p. 37) MENU ENTER VOL PIP Operation POWER SLEEP APC ARC PIP SWAP MENU INPUT SELECT DASP PIP ARC TWIN PICTURE SUB INPUT MUTE VOL ENTER VOL 1 2 3 4 5 6 7 8 9 0 WIN.SIZE WIN.POSITION ZOOM- ZOOM+ 10
Operating Guide
Page 11
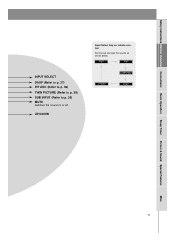
Safety Instructions Monitor Overview Connections Basic Operation Sleep Timer Picture & Sound Special Features INPUT SELECT DASP (Refer to p. 27) PIP ARC (Refer to p. 36) TWIN PICTURE (Refer to p. 39) SUB INPUT (Refer to p. 39) MUTE switches the sound on remote control Each press changes the source as shown below. UP/DOWN Input Select Key on or off. RGB1 RGB2 COMPONENT S-VIDEO VIDEO Misc. 11
Safety Instructions Monitor Overview Connections Basic Operation Sleep Timer Picture & Sound Special Features INPUT SELECT DASP (Refer to p. 27) PIP ARC (Refer to p. 36) TWIN PICTURE (Refer to p. 39) SUB INPUT (Refer to p. 39) MUTE switches the sound on remote control Each press changes the source as shown below. UP/DOWN Input Select Key on or off. RGB1 RGB2 COMPONENT S-VIDEO VIDEO Misc. 11
Operating Guide
Page 13
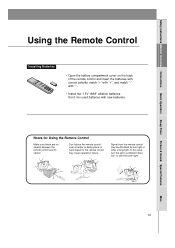
... control may be disturbed by sun light or other strong light. Don't mix used batteries with "-". • Install two 1.5V "AAA" alkaline batteries. Safety Instructions Monitor Overview Connections Basic Operation Sleep Timer Picture & Sound Special Features Using the Remote Control Installing Batteries • Open the battery compartment cover on the back...
... control may be disturbed by sun light or other strong light. Don't mix used batteries with "-". • Install two 1.5V "AAA" alkaline batteries. Safety Instructions Monitor Overview Connections Basic Operation Sleep Timer Picture & Sound Special Features Using the Remote Control Installing Batteries • Open the battery compartment cover on the back...
Operating Guide
Page 14
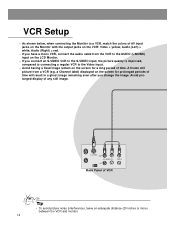
... (R) AUDIO (L) IN VIDEO Back Panel of time will result in a ghost image remaining even after you change the image. a Channel label) displayed on the LCD Monitor. - Avoid prolonged display of time. Avoid having a fixed image remain on the VCR: Video = yellow, Audio (Left) = white, Audio (Right) = red. ...- As shown below, when connecting the Monitor to the Video input. - If you connect an S-VIDEO VCR to the S-VIDEO input, the picture quality is improved, compared to connecting a regular VCR to...
... (R) AUDIO (L) IN VIDEO Back Panel of time will result in a ghost image remaining even after you change the image. a Channel label) displayed on the LCD Monitor. - Avoid prolonged display of time. Avoid having a fixed image remain on the VCR: Video = yellow, Audio (Left) = white, Audio (Right) = red. ...- As shown below, when connecting the Monitor to the Video input. - If you connect an S-VIDEO VCR to the S-VIDEO input, the picture quality is improved, compared to connecting a regular VCR to...
Operating Guide
Page 15
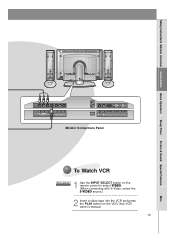
See VCR owner's manual. 15 Misc. Safety Instructions Monitor Overview Connections Basic Operation Sleep Timer Picture & Sound Special Features DC OUTPUT R AUDIO L MONO (DC 12V) AV INPUT VIDEO S-VIDEO Y PB PR COMPONENT (DVD/DTV ...INPUT) AC INPUT R AUDIO L RGB 2 INPUT RGB 1 INPUT RS 232C INPUT (DIGITAL RGB INPUT) (PC/DTV INPUT) (CONTROL/SERVICE) Monitor Connections Panel To Watch VCR 1 INPUT SELECT Use the INPUT SELECT button on the remote control to select VIDEO. (When connecting with S-Video, select the...
See VCR owner's manual. 15 Misc. Safety Instructions Monitor Overview Connections Basic Operation Sleep Timer Picture & Sound Special Features DC OUTPUT R AUDIO L MONO (DC 12V) AV INPUT VIDEO S-VIDEO Y PB PR COMPONENT (DVD/DTV ...INPUT) AC INPUT R AUDIO L RGB 2 INPUT RGB 1 INPUT RS 232C INPUT (DIGITAL RGB INPUT) (PC/DTV INPUT) (CONTROL/SERVICE) Monitor Connections Panel To Watch VCR 1 INPUT SELECT Use the INPUT SELECT button on the remote control to select VIDEO. (When connecting with S-Video, select the...

Operating Guide
Page 16
...you can watch cable TV programming. Tip • For further information regarding cable TV service, contact your local 16 cable TV service provider(s). This monitor cannot display TV programming without a TV tuner or cable TV converter box. DC OUTPUT (DC 12V) R AUDIO L MONO VIDEO AV INPUT S-...DTV INPUT) AC INPUT R AUDIO L RGB 2 INPUT RGB 1 INPUT RS 232C INPUT (DIGITAL RGB INPUT) (PC/DTV INPUT) (CONTROL/SERVICE) Monitor Connections Panel (R) AUDIO (L) VIDEO TV VCR RF Cable Cable Box Connections Panel To Watch Cable TV Programming 1 Use the INPUT SELECT button on the remote...
...you can watch cable TV programming. Tip • For further information regarding cable TV service, contact your local 16 cable TV service provider(s). This monitor cannot display TV programming without a TV tuner or cable TV converter box. DC OUTPUT (DC 12V) R AUDIO L MONO VIDEO AV INPUT S-...DTV INPUT) AC INPUT R AUDIO L RGB 2 INPUT RGB 1 INPUT RS 232C INPUT (DIGITAL RGB INPUT) (PC/DTV INPUT) (CONTROL/SERVICE) Monitor Connections Panel (R) AUDIO (L) VIDEO TV VCR RF Cable Cable Box Connections Panel To Watch Cable TV Programming 1 Use the INPUT SELECT button on the remote...
Operating Guide
Page 17
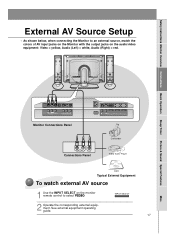
...& Sound Special Features External AV Source Setup - DC OUTPUT (DC 12V) R AUDIO L MONO AV INPUT VIDEO S-VIDEO Y PB PR COMPONENT (DVD/DTV INPUT) Monitor Connections Panel AC INPUT R AUDIO L RGB 2 INPUT RGB 1 INPUT RS 232C INPUT (DIGITAL RGB INPUT) (PC/DTV INPUT) (CONTROL/SERVICE) R AUDIO L ... Game Player DDR Typical External Equipment To watch external AV source 1 Use the INPUT SELECT on the monitor remote control to an external source, match the colors of AV input jacks on the Monitor with the output jacks on the audio/video equipment: Video = yellow, Audio (Left) = white,...
...& Sound Special Features External AV Source Setup - DC OUTPUT (DC 12V) R AUDIO L MONO AV INPUT VIDEO S-VIDEO Y PB PR COMPONENT (DVD/DTV INPUT) Monitor Connections Panel AC INPUT R AUDIO L RGB 2 INPUT RGB 1 INPUT RS 232C INPUT (DIGITAL RGB INPUT) (PC/DTV INPUT) (CONTROL/SERVICE) R AUDIO L ... Game Player DDR Typical External Equipment To watch external AV source 1 Use the INPUT SELECT on the monitor remote control to an external source, match the colors of AV input jacks on the Monitor with the output jacks on the audio/video equipment: Video = yellow, Audio (Left) = white,...
Operating Guide
Page 18
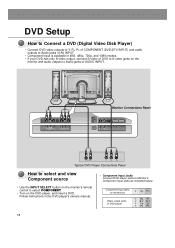
...480p, 720p, and 1080i modes. • If your DVD has only S-video output, connect S-video of DVD to S-video jacks on the monitor and audio outputs to Monitor's Component input jacks as indicated below. Component input jacks on the DVD player, and insert a DVD. DC OUTPUT (DC 12V) R AUDIO... L MONO AV INPUT VIDEO S-VIDEO Y PB PR COMPONENT (DVD/DTV INPUT) Monitor Connections Panel AC INPUT R AUDIO L RGB 2 INPUT RGB 1 INPUT RS 232C INPUT (DIGITAL RGB INPUT) (PC/DTV INPUT) (CONTROL/SERVICE) (R) AUDIO (L) B R...
...480p, 720p, and 1080i modes. • If your DVD has only S-video output, connect S-video of DVD to S-video jacks on the monitor and audio outputs to Monitor's Component input jacks as indicated below. Component input jacks on the DVD player, and insert a DVD. DC OUTPUT (DC 12V) R AUDIO... L MONO AV INPUT VIDEO S-VIDEO Y PB PR COMPONENT (DVD/DTV INPUT) Monitor Connections Panel AC INPUT R AUDIO L RGB 2 INPUT RGB 1 INPUT RS 232C INPUT (DIGITAL RGB INPUT) (PC/DTV INPUT) (CONTROL/SERVICE) (R) AUDIO (L) B R...
Operating Guide
Page 19
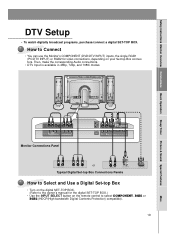
...digitally broadcast programs, purchase/connect a digital SET-TOP BOX. DC OUTPUT (DC 12V) R AUDIO L MONO AV INPUT VIDEO S-VIDEO Y PB PR COMPONENT (DVD/DTV INPUT) Monitor Connections Panel AC INPUT R AUDIO L RGB 2 INPUT RGB 1 INPUT RS 232C INPUT (DIGITAL RGB INPUT) (PC/DTV INPUT) (CONTROL/SERVICE) (R) AUDIO (L) Y PB...manual for the digital SET-TOP BOX.) • Use the INPUT SELECT button on the remote control to Connect • You can use the Monitor's COMPONENT (DVD/DTV INPUT) inputs, the single RGB1 (PC/DTV INPUT) or RGB2 for video connections, depending on your Set-top Box ...
...digitally broadcast programs, purchase/connect a digital SET-TOP BOX. DC OUTPUT (DC 12V) R AUDIO L MONO AV INPUT VIDEO S-VIDEO Y PB PR COMPONENT (DVD/DTV INPUT) Monitor Connections Panel AC INPUT R AUDIO L RGB 2 INPUT RGB 1 INPUT RS 232C INPUT (DIGITAL RGB INPUT) (PC/DTV INPUT) (CONTROL/SERVICE) (R) AUDIO (L) Y PB...manual for the digital SET-TOP BOX.) • Use the INPUT SELECT button on the remote control to Connect • You can use the Monitor's COMPONENT (DVD/DTV INPUT) inputs, the single RGB1 (PC/DTV INPUT) or RGB2 for video connections, depending on your Set-top Box ...

Operating Guide
Page 20
... PC to a displayable mode (Refer to page 21) and connect to your PC for the best picture. Tips • Avoid keeping a fixed image on the monitor. 20 use INPUT SELECT On the remote control PC Setup • First, turn on the display by pressing the button on the... and sound. Setup Instructions to Connect a PC to it. DC OUTPUT R AUDIO L MONO (DC 12V) AV INPUT VIDEO S-VIDEO Y PB PR COMPONENT (DVD/DTV INPUT) Monitor Connection Panel AC INPUT R AUDIO LL RGB 2 INPUT RGB 1 INPUT RS 232C INPUT (DIGITAL RGB INPUT) (PC/DTV INPUT) (CONTROL/SERVICE) How to use a screen...
... PC to a displayable mode (Refer to page 21) and connect to your PC for the best picture. Tips • Avoid keeping a fixed image on the monitor. 20 use INPUT SELECT On the remote control PC Setup • First, turn on the display by pressing the button on the... and sound. Setup Instructions to Connect a PC to it. DC OUTPUT R AUDIO L MONO (DC 12V) AV INPUT VIDEO S-VIDEO Y PB PR COMPONENT (DVD/DTV INPUT) Monitor Connection Panel AC INPUT R AUDIO LL RGB 2 INPUT RGB 1 INPUT RS 232C INPUT (DIGITAL RGB INPUT) (PC/DTV INPUT) (CONTROL/SERVICE) How to use a screen...
Operating Guide
Page 21
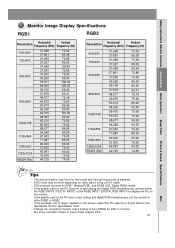
...the PC output to a format listed in these charts support DDC. 21 Misc. Safety Instructions Monitor Overview Connections Basic Operation Sleep Timer Picture & Sound Special Features Monitor Image Display Specifications RGB1 RGB2 Resolution Horizontal Frequency (KHz) Vertical Frequency (Hz) 640x350 720x400 ...the RGB2 INPUT (DIGITAL RGB INPUT) to function. • Not every resolution shown in the displayable monitor specification chart. • Change the computer's monitor output setting to the L30W36 for RGB1 (Analog RGB), and RGB2 (DVI, Digital RGB) modes. • If the graphic...
...the PC output to a format listed in these charts support DDC. 21 Misc. Safety Instructions Monitor Overview Connections Basic Operation Sleep Timer Picture & Sound Special Features Monitor Image Display Specifications RGB1 RGB2 Resolution Horizontal Frequency (KHz) Vertical Frequency (Hz) 640x350 720x400 ...the RGB2 INPUT (DIGITAL RGB INPUT) to function. • Not every resolution shown in the displayable monitor specification chart. • Change the computer's monitor output setting to the L30W36 for RGB1 (Analog RGB), and RGB2 (DVI, Digital RGB) modes. • If the graphic...

Operating Guide
Page 22
...remote control, aim it on. 3 If the Monitor is turned off with the ON OFF button on the Monitor • Press the main ON OFF button on the Monitor to turn the Monitor on the Monitor. Turning on the Monitor (power cord is still connected) 1 If the Monitor is turned off with the remote control and... with the remote control button. • Press the or INPUT SELECT button on the Monitor or press the POWER or INPUT SELECT button on the remote control and then the Monitor will turn on. 2 If the Monitor is switched to turn it at the sensor on . Tip • Adjusting volume level...
...remote control, aim it on. 3 If the Monitor is turned off with the ON OFF button on the Monitor • Press the main ON OFF button on the Monitor to turn the Monitor on the Monitor. Turning on the Monitor (power cord is still connected) 1 If the Monitor is turned off with the remote control and... with the remote control button. • Press the or INPUT SELECT button on the Monitor or press the POWER or INPUT SELECT button on the remote control and then the Monitor will turn on. 2 If the Monitor is switched to turn it at the sensor on . Tip • Adjusting volume level...

Operating Guide
Page 23
... the UP/DOWN and LEFT/RIGHT buttons as needed to adjust the selected menu option. • Press the MENU button to make adjustments. - Safety Instructions Monitor Overview Connections Basic Operation Sleep Timer Picture & Sound Special Features Checking Available Features - R-Adjust G-Adjust B-Adjust Screen Saver Set ID D Move E menu Exit TWIN/PIP...
... the UP/DOWN and LEFT/RIGHT buttons as needed to adjust the selected menu option. • Press the MENU button to make adjustments. - Safety Instructions Monitor Overview Connections Basic Operation Sleep Timer Picture & Sound Special Features Checking Available Features - R-Adjust G-Adjust B-Adjust Screen Saver Set ID D Move E menu Exit TWIN/PIP...
