
Operating Guide
Page 2
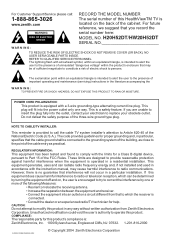
...Cliffs, NJ 07632. 1-201-816-2000 3-WIRE COMM-WARN B-2/02 © Copyright 2004 Zenith Electronics Corporation POWER CORD POLARIZATION: This product is provided to call : 1-888-865-3026 www.zenith.com WARNING RISK OF ELECTRIC SHOCK RECORD THE MODEL NUMBER The serial number of this HealthViewTM ...may cause harmful interference to radio communications. This equipment generates, uses and can be determined by turning the equipment off and on, the user is encouraged to try to correct the interference by one way. H20H52DT/HW20H52DT SERIAL NO WARNING: TO REDUCE THE RISK OF ELECTRIC ...
...Cliffs, NJ 07632. 1-201-816-2000 3-WIRE COMM-WARN B-2/02 © Copyright 2004 Zenith Electronics Corporation POWER CORD POLARIZATION: This product is provided to call : 1-888-865-3026 www.zenith.com WARNING RISK OF ELECTRIC SHOCK RECORD THE MODEL NUMBER The serial number of this HealthViewTM ...may cause harmful interference to radio communications. This equipment generates, uses and can be determined by turning the equipment off and on, the user is encouraged to try to correct the interference by one way. H20H52DT/HW20H52DT SERIAL NO WARNING: TO REDUCE THE RISK OF ELECTRIC ...
Operating Guide
Page 3
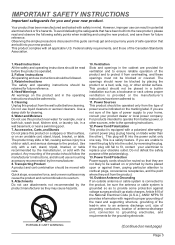
... precautions discussed in the operating instructions should be adhered to overturn. 9. Federal safety requirements, and those of the polarized plug. 13. Use a damp cloth for future reference. The openings should be blocked by the manufacturer. 8. Do not defeat the safety purpose of the ...causing serious injury to a child or adult, and serious damage to replace your new product. Transporting Product A product and cart combination should use liquid cleaners or aerosol cleaners. This product should be placed in a built-in a wet basement, or near a swimming pool. 7. ...
... precautions discussed in the operating instructions should be adhered to overturn. 9. Federal safety requirements, and those of the polarized plug. 13. Use a damp cloth for future reference. The openings should be blocked by the manufacturer. 8. Do not defeat the safety purpose of the ...causing serious injury to a child or adult, and serious damage to replace your new product. Transporting Product A product and cart combination should use liquid cleaners or aerosol cleaners. This product should be placed in a built-in a wet basement, or near a swimming pool. 7. ...
Operating Guide
Page 4
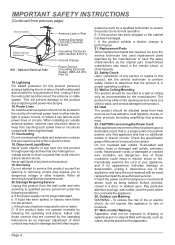
... such as this product, ask the service technician to perform safety checks to its appearance indicates damage or deterioration, unplug it, discontinue use Marking WARNING - Page 4 This will often require extensive work by the manufacturer. Wall or Ceiling Mounting The product should be sure ... and disconnect the antenna or cable system. Protect the power cord from previous page) Ground Clamp Electric Service Equipment NEC - Outdoor use of any kind into this owner's manual to dripping or splashing and no additional outlets or branch circuits. When installing an outside...
... such as this product, ask the service technician to perform safety checks to its appearance indicates damage or deterioration, unplug it, discontinue use Marking WARNING - Page 4 This will often require extensive work by the manufacturer. Wall or Ceiling Mounting The product should be sure ... and disconnect the antenna or cable system. Protect the power cord from previous page) Ground Clamp Electric Service Equipment NEC - Outdoor use of any kind into this owner's manual to dripping or splashing and no additional outlets or branch circuits. When installing an outside...
Operating Guide
Page 5
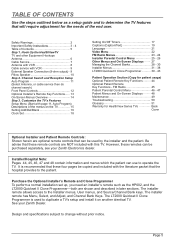
... patient can be copied and included with the literature packet that will require adjustment for the needs of the end user. See your Zenith Electronics dealer. Safety Warnings 2 Important Safety Instructions 3 - 4 Table of the menus on another identical TV. Hook Up the HealthViewTV...Optional Patient Remote Key Functions 44 Optional Patient Remote Key Functions - However, these four pages be purchased separately, see your Zenith Dealer. It is used by the installer and the patient. Design and specifications subject to operate the TV. Purchase the Optional Installer's Remote and...
... patient can be copied and included with the literature packet that will require adjustment for the needs of the end user. See your Zenith Electronics dealer. Safety Warnings 2 Important Safety Instructions 3 - 4 Table of the menus on another identical TV. Hook Up the HealthViewTV...Optional Patient Remote Key Functions 44 Optional Patient Remote Key Functions - However, these four pages be purchased separately, see your Zenith Dealer. It is used by the installer and the patient. Design and specifications subject to operate the TV. Purchase the Optional Installer's Remote and...

Operating Guide
Page 7
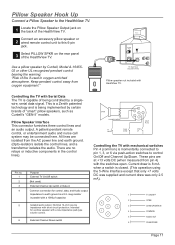
... Back Panel (Expanded View) TV Back ANTENNA CABLE TV SPEAKER M.P.I . The HealthView TV is on standard current, 120-volt 60 Hertz AC. If you 're using a cable box, Auto Program might only find the channel the cable service is designed to operate it on the 1 back of the optional remote 3 and... Up Connect cable service to the right. Cable TV Wall Jack In Cable Box Out output switch 3 4 If you 're using a cable box, leave the TV on channel 3 or 4 and use the cable box to one of Remote RF Coaxial Wire (75 ohm) 4 Plug in two AA batteries. Cable TV Wall Jack...
... Back Panel (Expanded View) TV Back ANTENNA CABLE TV SPEAKER M.P.I . The HealthView TV is on standard current, 120-volt 60 Hertz AC. If you 're using a cable box, Auto Program might only find the channel the cable service is designed to operate it on the 1 back of the optional remote 3 and... Up Connect cable service to the right. Cable TV Wall Jack In Cable Box Out output switch 3 4 If you 're using a cable box, leave the TV on channel 3 or 4 and use the cable box to one of Remote RF Coaxial Wire (75 ohm) 4 Plug in two AA batteries. Cable TV Wall Jack...

Operating Guide
Page 9
... VCR Back VCR Back AV Panel In output switch 3 4 Out Video Audio Leave the VCR and the television tuned to channel three or four and use the cable box to the HealthView TV. Do not attempt to the right. 3 Remove the back of Remote In Out output switch 3 4 Cable Box 4 Plug...
... VCR Back VCR Back AV Panel In output switch 3 4 Out Video Audio Leave the VCR and the television tuned to channel three or four and use the cable box to the HealthView TV. Do not attempt to the right. 3 Remove the back of Remote In Out output switch 3 4 Cable Box 4 Plug...
Operating Guide
Page 11
...Intended for control, data, and Audio output. These pins are at +13 volts DC (when measured from TV oxygen equipment." This is a Zenith patented technology and is capable of "smart" pillow speakers, such as Curbell's "GEN-II" models. Pin no relays or inductive components in... Data in parallel with mechanical switches Pin 4 (common) is momentarily connected to pin 1, 3, or 6 via push-action switches to earth ground is closed. (This operation using the 5-Wire Interface except that only +7 volts DC was supplied and current draw was only 2.5 mA). 1 4 2 5 6 3 3 1 4 2 5 6 TV ON...
...Intended for control, data, and Audio output. These pins are at +13 volts DC (when measured from TV oxygen equipment." This is a Zenith patented technology and is capable of "smart" pillow speakers, such as Curbell's "GEN-II" models. Pin no relays or inductive components in... Data in parallel with mechanical switches Pin 4 (common) is momentarily connected to pin 1, 3, or 6 via push-action switches to earth ground is closed. (This operation using the 5-Wire Interface except that only +7 volts DC was supplied and current draw was only 2.5 mA). 1 4 2 5 6 3 3 1 4 2 5 6 TV ON...
Operating Guide
Page 12
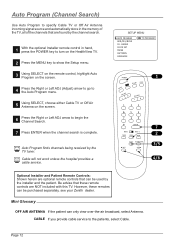
Auto Program finds channels being received by the channel search. Be advise that can be purchased separately, see your Zenith dealer. Press the Right or Left ADJ arrow to the patients, select Cable. AUTO PROGRAM ADD/DEL/BLNK CH. Cable will not... source and automatically store in hand, 1 press the POWER key to turn on the HealthView TV. 2 Press the MENU key to show the Setup menu. 3 Using SELECT on the remote control, highlight Auto Program on the screen. CHANNEL -+ 1 2 3 4 5 6 7 8 9 0 ENTER BED 1 BED 2 TIMER MENU BANK SELECT CH PREVIEW ADJ ADJ 1 7 2 ...
Auto Program finds channels being received by the channel search. Be advise that can be purchased separately, see your Zenith dealer. Press the Right or Left ADJ arrow to the patients, select Cable. AUTO PROGRAM ADD/DEL/BLNK CH. Cable will not... source and automatically store in hand, 1 press the POWER key to turn on the HealthView TV. 2 Press the MENU key to show the Setup menu. 3 Using SELECT on the remote control, highlight Auto Program on the screen. CHANNEL -+ 1 2 3 4 5 6 7 8 9 0 ENTER BED 1 BED 2 TIMER MENU BANK SELECT CH PREVIEW ADJ ADJ 1 7 2 ...
Operating Guide
Page 13
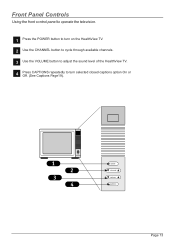
Front Panel Controls Using the front control panel to operate the television. 1 Press the POWER button to turn on the HealthView TV. 2 Use the CHANNEL button to cycle through available channels. 3 Use the VOLUME button to adjust the sound level of the HealthView TV. 4 Press CAPTIONS repeatedly to turn selected closed captions option On or Off. (See Captions Page19). 1 2 3 4 power channel volume captions Page 13
Front Panel Controls Using the front control panel to operate the television. 1 Press the POWER button to turn on the HealthView TV. 2 Use the CHANNEL button to cycle through available channels. 3 Use the VOLUME button to adjust the sound level of the HealthView TV. 4 Press CAPTIONS repeatedly to turn selected closed captions option On or Off. (See Captions Page19). 1 2 3 4 power channel volume captions Page 13
Operating Guide
Page 14
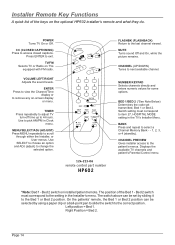
...1 BED 2 TIMER MENU BANK SELECT CH PREVIEW ADJ ADJ 124-213-06 remote control part number HP602 FLASHBK (FLASHBACK) Return to next available channel. Use to the correct position. POWER TV/FM FLSHBK MUTE CC VOLUME + - CHANNEL (UP/DOWN) Tunes to the last channel viewed. Left position = ... - - 1, 2, 3, or 4 (standby). MUTE Turns sound Off and On, while the picture remains. Installer Remote Key Functions A quick list of the Bed 1 - Use SELECT to choose an option and ADJ (adjust) to the setting in Clock menu. On the patients' remote, the Bed 1 or Bed 2 position can be...
...1 BED 2 TIMER MENU BANK SELECT CH PREVIEW ADJ ADJ 124-213-06 remote control part number HP602 FLASHBK (FLASHBACK) Return to next available channel. Use to the correct position. POWER TV/FM FLSHBK MUTE CC VOLUME + - CHANNEL (UP/DOWN) Tunes to the last channel viewed. Left position = ... - - 1, 2, 3, or 4 (standby). MUTE Turns sound Off and On, while the picture remains. Installer Remote Key Functions A quick list of the Bed 1 - Use SELECT to choose an option and ADJ (adjust) to the setting in Clock menu. On the patients' remote, the Bed 1 or Bed 2 position can be...
Operating Guide
Page 15
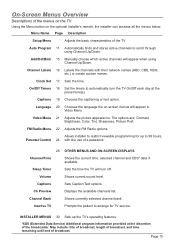
... Adjusts the FM Radio options. Volume Shows current sound level. Inactive TV Prompts the patient to restrict viewable programming for TV service. Using the Menu button on -screen menus will appear in. Clock Set 17 Sets the time. Video Menu Video Menu 21 Adjusts the picture...TV On/Off each day at the discretion of the TV Auto Program 11 Automatically finds and stores active channels to scroll through using Channel Up/Down. Channel Bank Shows currently selected channel bank. Page 15 On-Screen Menus Overview Descriptions of broadcast. Captions 19 Chooses...
... Adjusts the FM Radio options. Volume Shows current sound level. Inactive TV Prompts the patient to restrict viewable programming for TV service. Using the Menu button on -screen menus will appear in. Clock Set 17 Sets the time. Video Menu Video Menu 21 Adjusts the picture...TV On/Off each day at the discretion of the TV Auto Program 11 Automatically finds and stores active channels to scroll through using Channel Up/Down. Channel Bank Shows currently selected channel bank. Page 15 On-Screen Menus Overview Descriptions of broadcast. Captions 19 Chooses...
Operating Guide
Page 16
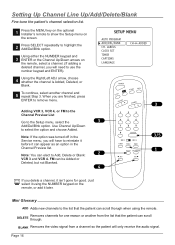
.... FM can scroll DELETE through. Press the MENU key on the optional 1 Installer's remote to remove menu. When you delete a channel, it can elect to use the number keypad and ENTER). Adding VCR 3, VCR 4, or FM to the Channel Preview List Go to select the option and choose Added.... Use Channel Up/Down to the Setup menu, select the Add/Del/Blnk option. Note: You can appear as an option in the Service menu, you ...
.... FM can scroll DELETE through. Press the MENU key on the optional 1 Installer's remote to remove menu. When you delete a channel, it can elect to use the number keypad and ENTER). Adding VCR 3, VCR 4, or FM to the Channel Preview List Go to select the option and choose Added.... Use Channel Up/Down to the Setup menu, select the Add/Del/Blnk option. Note: You can appear as an option in the Service menu, you ...
Operating Guide
Page 17
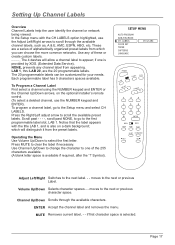
... labels. Press the Right/Left adjust arrow to select the first letter. which you can be customized for your needs. Operating the Menu Use Volume Up/Down to scroll the available preset labels. moves to clear the label if necessary. Scroll past - - - -, scroll past...The 20 programmable labels can choose the more common networks. To program a channel label, go to one is available if required, after the "!" Use Channel Up/Down to change the character to the first programmable label slot, LAB 1. Symbol). MUTE Removes current label, - - Each programmable label...
... labels. Press the Right/Left adjust arrow to select the first letter. which you can be customized for your needs. Operating the Menu Use Volume Up/Down to scroll the available preset labels. moves to clear the label if necessary. Scroll past - - - -, scroll past...The 20 programmable labels can choose the more common networks. To program a channel label, go to one is available if required, after the "!" Use Channel Up/Down to change the character to the first programmable label slot, LAB 1. Symbol). MUTE Removes current label, - - Each programmable label...
Operating Guide
Page 18
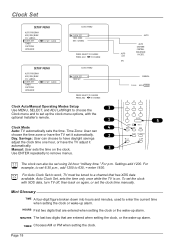
... DAY. Auto Clock Set, sets the time only once while the TV is on the clock. 3 Use ENTER repeatedly to remove menus. MINUTES The last two digits that are entered when setting the clock or the...the TV set up alarm. Mini Glossary TIME A four-digit figure broken down into hours and minutes, used to a channel that are entered when setting the clock, or the wake-up alarm. HOURS First two...CLOCK SET TIME SET PRESS SELECT TO CHOOSE PRESS ADJ TO CHANGE Clock Auto/Manual Operating Modes Setup 3 Use MENU, SELECT, and ADJ Left/Right to choose the Clock menu and to work, TV must be set...
... DAY. Auto Clock Set, sets the time only once while the TV is on the clock. 3 Use ENTER repeatedly to remove menus. MINUTES The last two digits that are entered when setting the clock or the...the TV set up alarm. Mini Glossary TIME A four-digit figure broken down into hours and minutes, used to a channel that are entered when setting the clock, or the wake-up alarm. HOURS First two...CLOCK SET TIME SET PRESS SELECT TO CHOOSE PRESS ADJ TO CHANGE Clock Auto/Manual Operating Modes Setup 3 Use MENU, SELECT, and ADJ Left/Right to choose the Clock menu and to work, TV must be set...
Operating Guide
Page 19
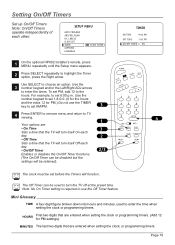
... the clock or programming timers. First two digits that are entered when setting the clock or programming timers. (Add 12 HOURS for PM.) Do not use the Off Timer feature. Setting On/Off Timers Set up On/Off Timers Note: On/Off Timers operate independently of each day. 2 0 ENTER 4 BED... keypad to set 1-8-0-0. (6 for the hours and the extra 12 for PM settings). Mini Glossary TIME A four-digit figure broken down into hours and minutes, used to TV viewing. 1 Your options are: • On Time 3 Sets a time that the TV will turn itself Off each day. • On/Off ...
... the clock or programming timers. First two digits that are entered when setting the clock or programming timers. (Add 12 HOURS for PM.) Do not use the Off Timer feature. Setting On/Off Timers Set up On/Off Timers Note: On/Off Timers operate independently of each day. 2 0 ENTER 4 BED... keypad to set 1-8-0-0. (6 for the hours and the extra 12 for PM settings). Mini Glossary TIME A four-digit figure broken down into hours and minutes, used to TV viewing. 1 Your options are: • On Time 3 Sets a time that the TV will turn itself Off each day. • On/Off ...
Operating Guide
Page 20
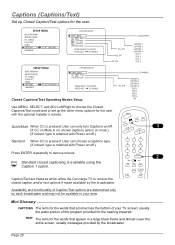
...1 CAPTION 2 CAPTION 3 CAPTION 4 TEXT 1 TEXT 2 TEXT 3 TEXT 4 ON, OFF ST ANDARD CAPTION 1 CAPTION 2 CAPTION 3 CAPTION 4 TEXT 1 TEXT 2 TEXT 3 TEXT 4 OFF Use MENU, SELECT, and ADJ Left/Right to choose the Closed Captions/Text mode and to remove menus. CHANNEL -+ 1 (If locked, type is retained with Power... on/off.) 1 2 3 Standard When CC is pressed: User can only turn Captions on/off. (If CC on Mute is available using the Caption 1 option. 0 ENTER 2 BED 1 BED 2 TIMER MENU BANK SELECT CH PREVIEW ADJ ADJ Caption/Text are determined only by the broadcaster....
...1 CAPTION 2 CAPTION 3 CAPTION 4 TEXT 1 TEXT 2 TEXT 3 TEXT 4 ON, OFF ST ANDARD CAPTION 1 CAPTION 2 CAPTION 3 CAPTION 4 TEXT 1 TEXT 2 TEXT 3 TEXT 4 OFF Use MENU, SELECT, and ADJ Left/Right to choose the Closed Captions/Text mode and to remove menus. CHANNEL -+ 1 (If locked, type is retained with Power... on/off.) 1 2 3 Standard When CC is pressed: User can only turn Captions on/off. (If CC on Mute is available using the Caption 1 option. 0 ENTER 2 BED 1 BED 2 TIMER MENU BANK SELECT CH PREVIEW ADJ ADJ Caption/Text are determined only by the broadcaster....

Operating Guide
Page 21
... on the optional Installer's remote control so the Setup menu appears. LABELS CLOCK SET TIMER CAPTIONS LANGUAGE ENGLISH 1 Press the MENU key on the screen. Use the SELECT key on the remote control, to TV viewing. Language Choose the language for the on-screen menus.
... on the optional Installer's remote control so the Setup menu appears. LABELS CLOCK SET TIMER CAPTIONS LANGUAGE ENGLISH 1 Press the MENU key on the screen. Use the SELECT key on the remote control, to TV viewing. Language Choose the language for the on-screen menus.

Operating Guide
Page 22
... or repeat from step two to set the picture the way you to set the other menu options. 2/A SELECT CH PREVIEW ADJ ADJ Picture Preference A Use SELECT to choose Picture Preference on the optional Installer remote. Choose the Preset option in the TV picture. • Color: Adjusts levels of white in... Picture Preference to quickly reset the levels to their original values. Page 22 Video Menu Use the Video menu to choose either Custom or Preset. Press the MENU key repeatedly until the Video 1 menu appears, on the screen...
... or repeat from step two to set the picture the way you to set the other menu options. 2/A SELECT CH PREVIEW ADJ ADJ Picture Preference A Use SELECT to choose Picture Preference on the optional Installer remote. Choose the Preset option in the TV picture. • Color: Adjusts levels of white in... Picture Preference to quickly reset the levels to their original values. Page 22 Video Menu Use the Video menu to choose either Custom or Preset. Press the MENU key repeatedly until the Video 1 menu appears, on the screen...
Operating Guide
Page 23
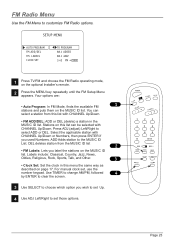
...• FM ADD/DEL: ADD or DEL (delete) a station in this list can select a station from the MUSIC ID list 2 • FM Labels: Lets you used Numbers. Stations on the MUSIC ID list. Labels include: Classical, Country, Jazz, News, Oldies, Religious, Rock, Sports, Talk, and Other. 3 • Clock Set: ...Set the clock in the MUSIC ID list. FM Radio Menu Use the FM Menu to set those options. LABELS CLOCK SET TO PROGRAM 88.1 ADDED 88.1 JAZZ 3:42 PM TIMER 1 Press TV/FM and choose the...
...• FM ADD/DEL: ADD or DEL (delete) a station in this list can select a station from the MUSIC ID list 2 • FM Labels: Lets you used Numbers. Stations on the MUSIC ID list. Labels include: Classical, Country, Jazz, News, Oldies, Religious, Rock, Sports, Talk, and Other. 3 • Clock Set: ...Set the clock in the MUSIC ID list. FM Radio Menu Use the FM Menu to set those options. LABELS CLOCK SET TO PROGRAM 88.1 ADDED 88.1 JAZZ 3:42 PM TIMER 1 Press TV/FM and choose the...
Operating Guide
Page 24
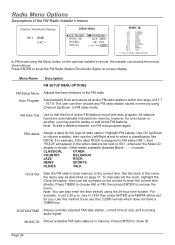
... in this method if you may want to enter the current time directly. The user can then choose any FM radio station stored in memory using Channel Up/Down, in memory. For example, if the label ROCK is shown. Other labels available (besides Blank - - - -) include: CLASSICAL OTHER ...the menus shown above. STATION/TIME Shows currently selected FM radio station, current time (if set the clock, highlight the Clock Set option, then use the LT2000 remote which does not have a TIMER key. Radio Menu Options Descriptions of the FM Radio Installer's menus. (Station/Time/Audio Display) ...
... in this method if you may want to enter the current time directly. The user can then choose any FM radio station stored in memory using Channel Up/Down, in memory. For example, if the label ROCK is shown. Other labels available (besides Blank - - - -) include: CLASSICAL OTHER ...the menus shown above. STATION/TIME Shows currently selected FM radio station, current time (if set the clock, highlight the Clock Set option, then use the LT2000 remote which does not have a TIMER key. Radio Menu Options Descriptions of the FM Radio Installer's menus. (Station/Time/Audio Display) ...

